Enhanced Edition
By Christian Thibaudeau
Foreword by Chris Shugart Editor: Tony Schwartz
Photos: Patrick Lemieux, Jean Boutet Jr.

F.Lepine Publishing
ISBN 0-9781105-6-0
2006 e-Book Publication www.MuscleDriveThru.com
CHAPTER 1
Introduction
In this chapter …
- About me
- What you’ll get from this book
- About the editor
About the author
Power Broker
An Interview with Christian Thibaudeau by Chris Shugart
(Originally published at www.t-mag.com)
T-mag listens to its readers. When we get a lot of feedback about a particular article or a contributor, we pay attention. After Christian Thibaudeau published a few articles with us, the message we received from readers was pretty clear: “We want to hear more from that guy!”
Thibaudeau (pronounced Tee-Bow-Doh) is yet another French Canadian phenom in the strength and conditioning community. He’s successfully trained a wide array of athletes from Olympic lifters and strongmen to hockey players and figure skaters. He’s also a competitive Olympic weightlifter, a football coach, and is completing his M.Sc. degree in exercise science. Judging from his articles so far at T-mag, he also knows a heck of a lot about packing on mass.
We decided to sit down with Thibaudeau and pick his brain about a variety of topics.
Testosterone: Let’s start off with some personal history. What’s your athletic background and how did that lead to you becoming a coach yourself?
Christian Thibaudeau: I was the kid that nobody ever selected for dodgeball in grade school. You know the type: skinny-fat with no athletic ability, much less physical capacities. The sad thing is that I loved sports. I watched every type of sport there was on TV, day in and day out. I loved athletics so much but was about the worst athlete in the world!
T: I’ve seen you lift and obviously a lot has changed! What happened?
CT: When I turned 11, I decided that enough was enough. I actually started doing push- ups, sit-ups and other such exercises every day. While it didn’t turn me into a future Olympian, it did improve my self-esteem somewhat. From that moment on I was hooked on training!
In high school I was able to make the football team as a receiver. That’s when I really started working out hard. I was about 13 years old and would train every lunch hour. When I look back I must say that I started my training career doing exactly the opposite of what all the others did. Most guys start off training only their upper body; I only worked my legs. I reasoned that as a receiver I only needed strong legs.
By the time I turned 17 I was a trainaholic! I was playing linebacker and trained every chance I had. In the morning I’d do biceps curls to look good at school (yeah, I’ve been that guy!), at lunchtime I’d train my legs, and in the evening I’d work my upper body. The
sad thing is that I was addicted to working out, but knew nothing of nutrition. As a result I only gained a little mass and ended my high school career at 5’9″ and 175 pounds.
In college I really started to train intelligently. Our team had a very good strength coach (whom I’m now working with) and my weight went up to 225 pounds in two years, and I had strength to match, at least for a 19-year-old kid.
Basically I never had talent at any sport; that’s what prompted my interest in training. Ironically, there wasn’t a day in which I wouldn’t curse my lack of talent. Today I actually think of it as a blessing in disguise. I realized that I liked training more than playing football. So after my “career” was over I turned to Olympic lifting. I also competed in strongmen competitions. I did fairly well, but at 5’9″ it’s hard to be competitive.
T: What do you do now as a coach? What’s your week like?
CT: My schedule varies during the year. In the summer I spend five to eight hours a day training hockey players; that’s their off-season. During the season most leave for their respective team. We keep in touch but I don’t train them directly. I also train football players in my group. On some days I have 15 to 20 athletes training together. That makes for a very positive and motivating atmosphere. In the winter my clientele is mostly comprised of football players and figure skaters.
I’m also a football coach and that takes up a lot of my time, but I just love working with young athletes. As I said, I always loved athletes and I consider any chance I get to work with them a blessing, regardless of their level.
T: Judging from your training photos, I’m guessing you’re now one strong and powerful S.O.B.! What are your best lifts?
CT: Well, I’ve got what I’d call good overall strength; I’m not extremely strong in a few lifts. I can’t compete with elite powerlifters as far as the deadlift, squat, and bench press are concerned and I started Olympic lifting too late to be an international force, but I have no weakness.
I’ve cleaned 170kg (374lbs) from blocks, power cleaned 145kg (319lbs) from the hang for four reps, clean and jerked 162.5kg (357lbs), snatched 132.5kg (291lbs) with straps, power snatched 120kg (264lbs), full squatted 255kg (561lbs) with no suit or wraps, front squatted 200kg (440lbs). I don’t train the bench press more than three months or so out of the year but I’ve done 180kg (395lbs). I’ve also push pressed 150kg (330lbs).
Nothing to write home about, but it does show some strength balance. And I feel it’s not that bad for the worst genetics on the planet!
T: Well, you may not be an “international force,” but that’s pretty damn impressive to most people! Switching gears, you once wrote that aerobic conditioning was overrated for boxers. What about everyone else?
CT: It’s overrated for everybody but distance athletes. My athletes never do any aerobic work. However, they’ll do a lot of 50 to 60 seconds sprints while pulling a light sled, lots of 400m running with short rest intervals and lots of HIIT type running.
I feel these training methods are much more sport specific and more effective at burning body fat. You should see the body of hockey player Alex Tremblay, the leading scorer in Canadian University Hockey. Most natural bodybuilding competitors look like Fat Albert next to him!
T: You’ve also written about something called non-functional hypertrophy. Tell us about that.
CT: I’m not the first to talk about non-functional hypertrophy. Dr. Mel C. Siff is probably one of the first to have explained this concept. More recently Brian Haycock has also brushed the subject.
Basically, non-functional hypertrophy refers to gains in muscle size that aren’t associated with an improved capacity to produce force. That could either be due to hypertrophy of the non-contractile elements of the muscle structure (sarcoplasm, collagen, etc.) or an increase in fiber size that’s excessive and leads to internal friction which reduces concentric force potential.
T: And in English that would mean…..
CT: Non-functional hypertrophy is like adding weight to your car without touching the engine. Your car is heavier but you don’t have more power to balance that increase in weight. It might make you look good, but it certainly won’t make you efficient! It’s the classic case of looking like Tarzan but playing like Jane.
Athletes should focus on functional hypertrophy. To promote it you must use methods which lead to a high level of muscular tension. We’re talking about heavy-load training and explosive training. The two best examples of functional hypertrophy are the Westside Barbell Club lifters and elite Olympic weightlifters.
T: Cool. We see a lot of stuff these days encouraging bodybuilders to incorporate Olympic lifts into their training. Why should a bodybuilder — or just some guy wanting to look big and powerful — use Olympic lifting?
CT: Because I said so! Nah, seriously I think it all comes down to a variety of stimulus. Bodybuilders pretty much have the slow, controlled exercises covered. They use mostly moderate tension/long TUT methods which are good to some extent, but I’ve always believed if you attack an enemy via several fronts you stand a greater chance of winning. Same thing goes with training!
Explosive training, not just the Olympic lifts, creates a very brief but extremely high intramuscular tension. This is a powerful growth stimulus that shouldn’t be forgotten. F = ma [Force equals mass times acceleration]. By using high-acceleration exercises you increase force output, which increases intramuscular tension, which increases growth stimulus.
But in all fairness, bodybuilders don’t have to use the Olympic lifts. Including regular lifts that are performed explosively is a good start.
T: Can you give us an example?
CT: The Westside guys use the bench press and squat because these are their main competition lifts, but an athlete or bodybuilder could use the same method with other exercises. I’d recommend using only multi-joint exercises for that purpose, though.
I’d say that the Olympic lifts are superior to develop whole-body power, but for some guys who don’t have access to an Olympic lifting coach, this last option can be a viable choice.
T: Okay, this may sound crazy, but speaking of lifting explosively, I read something once about actually throwing the bar up out of your hands while benching, then catching it. Is that a real training technique or just a flamboyant way of committing suicide?
CT: Funny you should mention that! I’ve seen a form of bar throwing drill performed by many athletes. In fact, Alexeyev himself used what he called “snatch throws” in which he’d throw the bar for height, kinda like strongmen and highland game athletes who throw objects for height.
I’ve also seen Adam Archuletta perform bench press throws, but he was using a contraption similar to a Smith machine. I hate the Smith machine, but I believe this is one instance in which it might actually be useful. I’ve used this drill myself. I equate it to a jump squat for the upper body and thus recommend using 20 to 30% of your max bench press.
T: Very interesting! In fact, I think TC wrote about using the Smith machine this way back in the early days of T-mag. I think he called them “Katzenjammers.” Anyhow, let’s change subjects. What’s your general opinion of steroids?
CT: That’s hard to answer in my position, given that I still compete in a tested sport and that I work with a lot of young athletes, but I feel that they’re not as bad as most people think they are. I’d certainly not give them to my athletes, but I know that for 90% of the athletes out there, steroids are necessary to reach the top. In some sports, you just can’t win without them. Sad but true.
I do feel that with proper supplementation and nutrition you can approach the effects of steroids, at least as far as strength and power are concerned. I hate to make
generalizations, but an optimal supplementation stack could give most people 50% of the results of a steroid cycle. I know it sounds corny, but I’ve seen it work! I’ve had numerous athletes gain 20 pounds of muscle and 10 to 15% on all major lifts in three months from hard training and an optimal supplementation regimen.
However, for athletes who decide to use steroids, I feel that a short cycle approach is optimal. Obviously for bodybuilders it’s another story.
T: Any supplements you consider essential?
CT: Well, it depends on the needs (and budget) of the athlete. But if it’s going to give you an idea, my own supplement cabinet contains flax seed oil in industrial quantities, Tribex-500, M, protein digestive enzymes, Grow!, multivitamins, ZMA, and Power Drive. I’m also evaluating Myostat and I use creatine, but only intermittently. I believe this is a great list for any athlete. Depending on the goals I might add a few things.
T: When it comes to professional athletes, I’m sometimes astounded about how little they know about diet and training. They seem to be great despite their level of knowledge. Is this a testament to superior genes, great coaches, or what?
CT: A year ago I would’ve said superior genes, but now I think that superior motor control is the reason. The greatest athletes are motor geniuses. Motor control is somewhat predetermined, but motor potential can be greatly improved during childhood. In my opinion, that’s the period during which elite athletes are made.
One of the greatest mistakes made by parents is early specialization. Here in Canada parents will decide to turn their son into the next Mario Lemieux when he’s five years old! From then on he’ll only practice hockey. Big mistake! I believe that during childhood it’s important to develop all motor abilities and that requires a wide array of stimulations. A child should participate in many different activities. For one, I believe that gymnastics are a great sport introduction for most kids.
T: Let’s get to the ugly stuff. What things or people in your field drive you crazy and really piss you off?
CT: There are two things that drive me nuts. First are the sport coaches. In most sports there’s a certain “training tradition,” e.g. hockey players must do a lot of aerobic work, figure skaters can’t do strength training or they’ll get too big, etc. When you come up with novel training approaches these coaches are often skeptical and some are downright against what you’re doing. That complicates your job because in the end, they hold the big end of the stick.
The other thing that drives me nuts is the constant need to “sell.” You gotta’ be more innovative than the others, sound better, be bigger than life. The thing is, pretty much everything has been done! At least everything that’s really effective. But many coaches
— who are trying to look better then they are — always come up with new stuff only for novelty’s sake. Innovation is good, but not at the expense of efficiency.
T: You once wrote, “Complexity is the language of simple minds. Always be wary of the guy who sounds impressive.” Was that a jab at some people in the coaching field?
CT: You better believe it! I feel there are many coaches out there who try to make their mark by sounding intelligent and spouting complex words and concepts. I won’t point any fingers but they’re generally the people who, deep down, lack confidence. These people are also known for clinging to other better known coaches to help their own progression and to multiply personal attacks on other coaches.
T: Not surprising in this crazy industry! Now, I like to use the term “missing ingredient” a lot. What missing ingredients do you see in athletes and bodybuilders? In other words, what are they overlooking that could really help them?
CT: If you read my T-mag hamstring article you’ll have the answer: they need better hamstrings! Most athletes will benefit immediately from additional hamstring work.
I also believe that most athletes don’t use supplements wisely. I’ve only seen two approaches that athletes take in regard to supplementation: They either ignore it or they shotgun it! Those who use supplements don’t know what they’re taking or why they’re taking them half the time. Plus, too many of them “overtake” supplements. Balance and timing is more important than sheer quantity.
T: Agreed. Just for the fun of it, give me an exercise that you feel all weight-trained athletes should be using, yet most don’t.
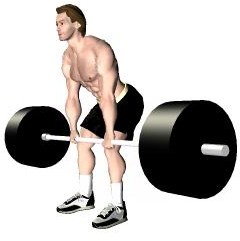
CT: For athletes I’d say the power snatch from blocks. For regular individuals and bodybuilders, I’d go with snatch grip deadlift and push press.
T: What’s the most useless, worst exercise out there that people put in their programs?
CT: There aren’t really any “bad” exercises. Any exercise is better than doing nothing. But there are some that aren’t much better than doing nothing! I personally don’t think too highly of any sentence that ends, “on the Smith Machine.
T: As an Olympic lifter, what do you think of the squat?
CT: Obviously, I do believe that the squat is the best exercise to develop lower-body strength. Nothing beats it. However, I feel that neglecting the hamstrings while building a big squat is a surefire way of getting injured. All exercises are good, but there’s such a thing as too much of a good thing.
The one thing that sickens me about the squat is that it’s been turned into a macho lift. The guy will load up the plates, grunt, shout, and do one-eigth of a rep! I feel that when it
comes to the squat, the most important thing is to use proper form and a full range of motion; only add weight if you can handle a full repetition!
T: How about the leg press? We hear a lot of mixed opinions on it from various coaches.
CT: I rarely use the leg press in my athletes’ training. The only case in which I’ve used it was an athlete who had shoulder problem and couldn’t even put the bar on his shoulders
— the stretch was too much! While I worked on rehabbing his shoulders I had him train on the leg press and hack squat.
I also believe the leg press can be a viable third leg exercise, behind squats and lunges in a program. I don’t see the leg press as a main exercise. When performed well, it’s not more dangerous than any other exercise, but it’s just not that effective.
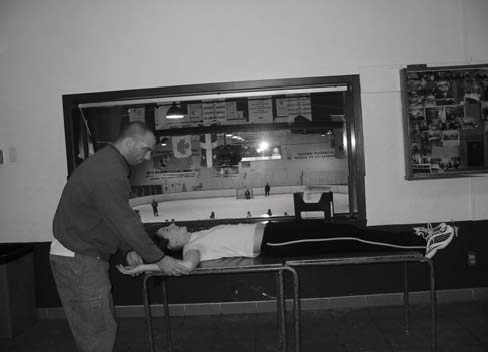
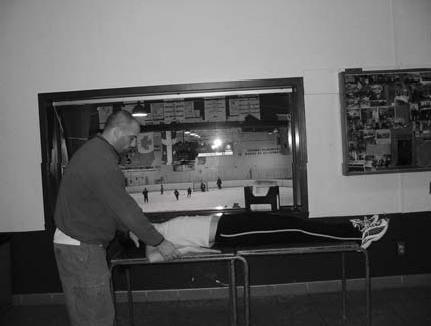
T: You train combat athletes, lifters, and strongmen but you also train figure skaters. That’s a little shocking. What do you do with them exactly?
CT: [laughing] Well, I’m not going to tell you what I’d like to do with some of them for sure!
T: Mmm, Michelle Kwan wearing nothing but whipped cream…. Oh sorry, go ahead.
CT: Three years ago a friend of mine named Martin Gervais came to me for help. He was intelligent enough to recognize the value of the Olympic lifts for skaters. At first I was brought in to teach them the Olympic lifts and eventually I began training them full time. Soon we added two other elite skating clubs to our list.
T: How did they do?
CT: I’ll tell you, do not underestimate these girls! They might look like little ice princesses but in the gym they mean business. I even had one skater compete in Olympic lifting where she won three bronze medals at the Quebec Games (equivalent of a tri-state championship). At 14 years of age and a bodyweight of 128 pounds, she power cleaned and jerked 60kg (135lbs) and power snatched 50kg (110lbs). In training she even did a set of five reps with 45kg (100lbs) on the power snatch after less than three months of training!
It’s a lot of fun working with the skaters. Once you get past the cute little dresses, they’re like any other athletes.
T: It seems that every type of athlete is weight training these days. I mean, in the old days, golfers didn’t lift weights, they just golfed. Now the best of them use resistance training. I also read about NASCAR drivers hitting the weights. Your thoughts?
CT: I feel that every activity that requires some form of physical capacity can be improved with strength training. It’s just a matter of finding the proper exercises.
Funny you mention NASCAR drivers. I worked with a Panoz series pilot all summer long. The training included a lot of “weird” exercises but also some basic stuff like power cleans and other such movements. We also did a lot of neck and abdominal work.
T: What about the mental or psychological side of training? Got any interesting tricks or tidbits of info there we can apply to our workouts?
CT: I must confess that both my parents where psychologists. In fact, my father once worked as a sports psychologist. But in all honesty I don’t feel that special psychological techniques need to be used. The most important thing is for the athlete to have an optimal level of arousal.
Too little arousal and the intensity will suffer; too much arousal and you might actually burn out by “over-psyching” yourself. I see lifters banging their heads and shouting before a hard lift. That’s no good! It might help in the short term, but in the long run it might actually be detrimental. I much prefer a focused and confident approach.
So I’m not a big fan of the ephedrine and caffeine stack as I believe it can cause over- psyching. However, I do believe that Power Drive can help get you into that focused zone.
T: When discussing overtraining with the world’s best coaches, I’ve noticed that some of them take it very seriously. It’s their number-one priority to prevent it. Yet others think overtraining is overrated, and that people pay way too much attention to it. What do you think?
CT: I take overtraining seriously. In fact, I’ve sent some of my athletes home after only one exercise because I felt they were out of gas. No matter how good your training plan is, you must always monitor how your athlete is feeling. You never know what could lead to overtraining: a stressful job, a tough relationship, you name it.
I find that taking the morning heart rate is a good indicator of the physical state of the athlete. If the morning heart rate is 3-5 BPM (beats per minute) higher than normal, you might want to cut down the volume slightly. If it’s 5-10 BPM higher than normal, both intensity and volume must be decreased.
T: Good tip! Do you think there’s ever going to be a “next big thing” when it comes to weight training, or have we pretty much figured it all out already? Is there any training system out there now that you’d call the “next big thing” or is it just more novelty stuff designed to “sell”?
CT: Mostly it’s designed to sell. And the sad thing is that today’s novel approaches are actually quite old! They just have been forgotten and rediscovered.
There are some things that show promise, like vibration training for example, but I wouldn’t call that the “next big thing.” In my opinion, the next biggest breakthrough will come from a refining of the current training methods. We have all the tools, but I just don’t think we know exactly how to use them yet. I also believe we’ll see some novel methods, but these will mostly be derivations of what we have right now.
The problem is that we might very well have a “next big thing” and never realize it. See, there’s so much bull out there, so many fads, that it’s likely that the “next big thing” will be introduced much like those fads and we may miss the boat. But I’ll keep my eyes open and keep you informed!
T: Let’s back up just a second. What’s vibration training?
CT: Vibration training has been developed by Carmelo Bosco, an Italian sport scientist better known for his work on power output and vertical-jump testing. This relatively new method consists of standing on a special platform than can vibrate at different rhythms and amplitudes. This intense vibration has been shown to improve power output, jumping height, and strength.
Furthermore, one could do stretching exercises while on the platform to greatly enhance the effect of the stretch. Vibration training does seem to have an overall effect on the whole body. It also affects growth hormone release and leads to a very intense CNS activation. The training stimulus with vibration training is very intense because the stimulus changes so fast. This creates a great need for muscle activation. For those who’d like to learn more, visit Power-Plate.com.
T: Thanks for the chat, Christian. We look forward to seeing more articles from you in the future at T-Nation.
CT: It’s been a pleasure, Chris.
Now in regard to the book. I truly believe that this book achieve something special in that it conciliate training for an athlete and training for a good body. Each type of athlete will find something useful in the book and can learn a lot from it. Athletes will particularly like chapters 2, 3, 4, 5, 6, 7, 8, 11 and 12 while bodybuilders will get a lot from chapters
2, 3, 5, 6, 7, 8, 9 and 10. That’s not to say that you should not read the entire book, you never know where you mind find the little trick that will switch your gains into high gear.
About the Editor
Tony Schwartz is a strength and conditioning coach based out of the Midwest-region of the United States. Tony specializes in program design for strength and power athletes. His methods and modalities for increasing strength and power have been described as both unorthodox and unusually effective. He is currently working towards perfecting synergistic training, nutrition, and supplementation systems that can be used by elite and amateur athletes alike.
In addition to his work in the strength and conditioning field, Tony Schwartz is also a research assistant in the field of biomechanics where his main focus is gait analysis.
Tony Schwartz is available for private training in the Chicago, IL area, as well as in the Bloomington, IN area. In addition, Tony also designs personalized training, nutrition, and supplementation programs online. If you would like more information on Tony’s methodologies and programs please contact him at [email protected]
CHAPTER 2
Keys to strength and size
In this chapter …
- The two key variables to increasing strength and size
- The importance of maximal tension
- Total Time Under Tension
- The role of the nervous system in strength and power development
“What makes a training program effective?”
The two keys to hypertrophy and strength gains
Over the past few years strength training enthusiasts and adepts of the “body beautiful” have been spoiled. Now, more than ever, there is a slew of effective training programs available to everyone wanting to better their body or their capacities. I’m probably as guilty as any other strength coach, having myself flooded the training community with more than a few training programs.
While having a cabinet filled with the latest and greatest strength training programs is a good thing, it gives you a whole bunch of choices. I’ve always felt that it is best to understand the “whys” rather than simply knowing the “hows.” If you know why a certain training approach works well, it will allow you to design programs that will be just as effective as any out there! Of course, most training authorities won’t let you in on the secret “why” because they want to stay indispensable! But as you probably already know, I’m not your average training authority. For starters I don’t have a bloated ego, and I feel that education is better than dictation. So it is with my professor that I’ll talk to you today while I reveal the two secrets to hypertrophy and strength gains.
Key no.1: Intramuscular tension
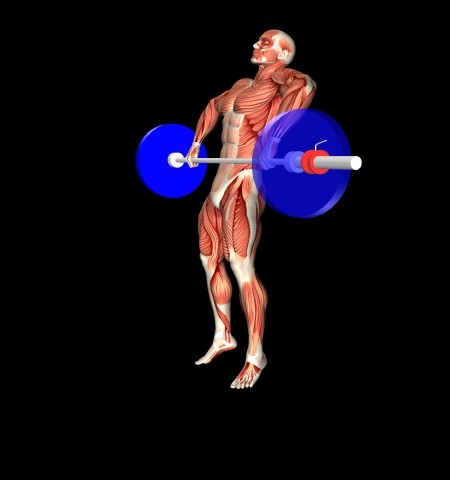
The intramuscular tension refers to the effort of the muscle necessary to produce a certain force output. We already know that force is equal to mass x acceleration, so it should also be evident that intramuscular tension will be influenced by the magnitude of the load and the acceleration one has to transfer to the resistance. In simpler words, you can increase intramuscular tension by increasing the weight or the acceleration (or both).
This first factor (the importance of the tension present in the muscle) is the principal responsible factor for the quality of the gains stimulated, the higher the intramuscular tension, the more functional the stimulated hypertrophy will be. Furthermore, a high intramuscular tension increases the rate of protein degradation and the subsequent amino acid uptake by the muscles.
![]()
![]()
![]()
Understanding tension
acceleration
Load to be lifted and accelerated
mass
Force needed to lift the load and to accelerate it
Muscular tension necessary to produce the force
It’s important to comprehend that muscular tension is not the same thing as “the burn” or the feeling of the muscles tiring. Many peoples believe that a slow contraction puts a greater amount of tension on the muscles simply because they “feel” a burn or a tensed sensation, this is not the case!
In every concentric contraction (overcoming or lifting a load), lifting a certain weight with more acceleration will always produce a greater degree of intramuscular tension.
In an eccentric contraction (yielding or lowering a resistance) it’s the opposite; the less acceleration you allow, the more intramuscular tension there will be.
Why the difference? Well, to lift a load faster you must produce more force. But to lower it faster requires you not to exert more force, but less (letting the bar go down doesn’t require any force). During an eccentric contraction you need a greater force output to bring the bar down slowly, hence the increased tension.
So what does that give us concretely?
For the concentric portion

Intramuscular tension is increased if the resistance is greater and acceleration is preserved.
Intramuscular tension is increased if the acceleration is greater and the resistance preserved.
Intramuscular tension is increased if both
acceleration and load are increased
The key to remember is that regardless of the load used, you should try to lift the bar with as much speed as possible during the concentric portion of the exercise.
For the eccentric portion
Intramuscular tension is increased when you lower the weight with less speed. In fact, it has been shown that the best bench pressers in the world lower the bar to the chest at a slower pace than lesser benchers. This obviously means that ensuring proper tension during the eccentric portion of a lift (down slow) and lifting it as fast as possible (fast up) will lead to better gains. Obviously there is a limit to this, if you lower the bar too slow your muscles will tire faster and you will lose some force potential on the subsequent concentric portion. As a rule of the thumb, lowering the load in 3-5 seconds is best in most cases. Even in Olympic lifting exercises this is effective. Old time lifters, who did not have bumper plates had much better physiques than today’s lifters, mostly because
they had to lower the bar under control. Alexeyev himself was known for always controlling the load on the way down, even once bumper plates became available.

Intramuscular tension is increased if the resistance is greater and acceleration is preserved.
Intramuscular tension is increased if the
acceleration is lower and the resistance preserved.
Intramuscular tension is increased if acceleration is decreased and the load is increased
Key no.2: Total time under Tension
The second factor (TUT) is the principal responsible factor for the quantity of stimulated hypertrophy. A greater volume of work will stimulate more hypertrophy (as long as the stimulation doesn’t exceed the capacity to recover). More physical work leads to greater total protein degradation (while tension only influences the rate of degradation) and will lead to more structural adaptation provided that the athlete has enough time and nutrients to recover.
You must note that I talked about “Total” TUT. What I mean is that the cumulative TUT for all the sets of an exercise will be much more influential than the TUT per set. This explains why you must do more sets when training with heavier weights and lower reps; the TUT for each set is low, so to maximize gains you must increase the Total Time Under Tension by adding more sets.
So what does that tell us?
- If the tension is too low during an exercise, even when performed at a high volume, it will not lead to much in the way of size or strength gains.
- If the volume is too low, even if the tension is very high, it will not give you much size or strength gains.
- Ideally you want to maximize tension by using either a heavy weight, or lifting the load as fast as possible while lowering it slowly.
- If you select a load that you can do for 1-5 reps, you must do more sets to get a strong growth stimulus.
“For performance gains, the nervous system is the key”
Oftentimes the nervous system, not the muscular apparatus is the limiting factor in force production. Tsatsouline stated that “Your muscles already have the strength to lift a car, they just don’t know it yet” (Tsatsouline, 2000). I agree with that statement and feel that it’s a good image to help understand the potential improvement in force production by developing the nervous system.
Let us use Tsatsouline’s example. Feats of strength by apparent weaklings are common. Just think of the frail middle-aged women who suddenly possess superhuman strength when her child gets trapped under an automobile or another heavy apparatus. There are many documented cases in which the woman was actually able to lift the car off the ground to free her child. A feat that she could not repeat in a million years under normal circumstances. Sure her strength was potentiated by adrenaline and other hormones, but the muscles that lifted the car were the same she already had, new muscles didn’t blossom out of nowhere to help her lift the car! The stress and extreme stimulation from the situation simply improved her capacity to produce force with the muscles she already had! Neurotransmission was improved, protective mechanisms were shutdown, sensory feedback was ignored … All of this made her able to work to her full potential, something that we don’t come remotely close to doing under regular circumstances.
By now it should be clear to you that the limit in force production lies in the nervous system. The greater the proportion of his strength potential an athlete can use is, the better he’ll be. The difference between absolute strength (the full potential for strength production) and limit strength (the actual maximum strength that an individual can voluntarily produce) is termed the strength deficit.
Absolute strength – Limit strength = Strength deficit
In chapter 3 I will present one way of estimating an athlete’s strength deficit using the squat and bench press.
“What makes me strong?”
![]()
Muscle fibers
Golgi Tendon Organs
Tendon
Receptors
Muscles
Nervous system
These structures have the greatest influence on force production:
-
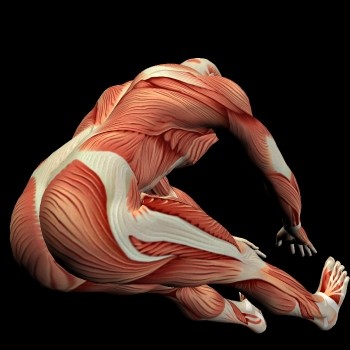
- Muscles: A bigger muscle is a potentially stronger muscle. The contractile capacities of the muscle fibers and the ratio of fast twitch/glycolitic fibers to slow twitch/oxidative fibers also has an influence.
- Muscle receptors: Some receptors will act as an inhibiting factor in force production. Notably the Golgi Tendon Organs, which act as a protective mechanism and lead to a partial shutdown of the muscles if the tension present is too high. Other receptors, such as the muscle spindles, will increase force production by provoking an elastic effect (myotatic reflex) when the muscle is stretched.
- Nervous system : The efficacy of the nervous system influences force production by modulating motor unit (muscle fiber) activation, their synchronization, and the rate of contraction of the motor units. In simpler terms, the more efficient your CNS is, the more you can get out of the muscles you already have!
- Other factors: Motivation, environment, stress level, fatigue, nagging injuries, etc.
This graphic shows us that if you are an athlete, train an athlete, or are interested in maximum strength development you must focus your efforts of several factors, not just the actual muscles. You will need to develop your muscles, the efficacy of your nervous system, the capacity to utilize the positive reflexes (stretch reflex), and the ability to inhibit the negative ones.
If all you’re interested is muscle size, you can still benefit from a focus on all four of those factors because getting stronger will allow you to place a greater stimulus on your muscles and you will gain size at a much faster rate.
Furthermore, there’s something that I noticed from experience, I now call it “Priming hypertrophy facilitation.” This means that after a bout of training focusing on power and strength, your body responds much faster to any subsequent hypertrophy training.
I’ll use myself as an example. For the past 4 years I concentrated mostly on the Olympic lifts, and even before that I would train for strength, not size. But during my last 2 years in Olympic lifting I would include 4-6 weeks of bodybuilding-type training once or twice per year. Oddly enough, I found that during those 4-6 weeks I could gain more muscle size than most guys doing bodybuilding training year-round would gain in 4-6 months!
Recently, I switched my training to more of a bodybuilding approach and gained a lot of quality muscle naturally. I gained a lot of size while dieting, which is something in itself. I truly believe that without my foundation in Olympic lifting/strength training my gains would have been much slower.
While there have been no studies on the subject, I speculate that the higher adaptive demand of power and strength training turns the body into a more adaptive machine, giving your body the capacity to adapt to training stress. So when you switch to a bodybuilding workout, which doesn’t require as complex of an adaptation, the body is able to gain at a much faster rate.
This doesn’t mean that one should stop doing bodybuilding training, but rather that anybody wanting more size should include phases of strength and power training.
CHAPTER 3
Evaluation of needs
In this chapter …
- Simple ways of determining an athlete’s muscle fiber type
- Evaluating the efficacy of the nervous system
- Finding flexibility problems via muscle testing
- Postural analysis
“Know thy athletes”
If you want to design a training program that will give the best possible results, you must know the needs and capabilities of a client (or yourself). Ready-to-wear training programs can be a big problem for some individuals. While they can be good, (hey, even I will give you a few program samples in this book!) when it comes to peak performance you must tailor a program to the client (or yourself) perfectly.
To accomplish this you must know his weaknesses, strengths, goals, and physiological makeup.
Strengths and weaknesses
Knowing an athlete’s relative strengths and weaknesses will allow you to choose the training methods best suited to his needs. For example, an individual with a less than efficient nervous system will benefit from training means that will increase his neural drive. Another athlete may have a very efficient nervous system, but a low amount of muscle mass. This athlete will benefit from an increase in the “size of his motor.”
Furthermore, some individuals have what are called “muscle imbalances.” If the agonist and antagonist muscles of the same joint are way out of balance it can increase the risk of injury. Knowing which muscles are too weak compared to their antagonist will allow you to choose exercises that will not only improve performance, but also reduce the risk of injury.
Goals
An individual who wants to gain a lot of muscle will not train the same way as a sprinter! It’s important to know the ultimate goal(s) of your athlete (or yourself) and plan the training program accordingly. A lot of peoples are seduced by the latest training “fad” and will jump from one such fad to the other, never really questioning whether this is adequate for their objectives or not.
You improve in what you train for. Thus choose training methods that will give you the best results in your area of specialization.
Physiological makeup
Knowing an individual’s ratio of muscle fibers can help you design a more effective training program. Individuals who are slow-twitch dominant will benefit more from higher volumes of training, while fast-twitch dominant athletes will progress more on a lower volume, higher intensity and higher acceleration training program.
An athlete’s posture is also important to analyze. Think of your posture as the wheels of a car; if one of your tires is slightly misaligned it will reduce the performance of your car
as well as lead to some overuse. If you drive only 10-20 miles per day chances are that it will not be much of a problem, however if you drive 100-200 miles per day the problems will compound very quickly.
The same goes for an athlete. The same misalignment in posture is compounded for an athlete because of the great demands he places on his body. While attaining the perfect posture is not always possible, reducing misalignment as much as possible will make for a longer, more productive career.
For individuals only looking to have a beautiful body, a good posture really creates a positive effect on how you look. Sloppy posture can make you look like a doof even if your muscle mass is high and body fat is low.
Simple tests to get an idea of an athlete’s fiber makeup
It is impossible to know the exact ratio of muscle fibers within a muscle unless you use the very painful and intrusive muscle biopsy. However some tests can give us a good idea if an individual is slow-twitch dominant or fast-twitch dominant. While it will not tell us that somebody has 65.786% fast twitch fibers, it can give us a general perception of the makeup of the individual. And really, that’s all we need to design optimal training programs.
Test no.1: The 80% reps test
This is an oldie but a goodie. It’s probably the easiest, and most objective way of determining muscle fiber dominance. The procedure is simple, after a proper warm-up load the bar to 80% of your maximum and perform as many reps as you can in good form. The table below will help you interpret the results you got.
| Number of reps with 80% | Muscle fiber dominance | Most beneficial training |
| 1-3 | Fast twitch extremely dominant | Very low volume of work High acceleration exercises High load exercises |
| 4-6 | Fast twitch very dominant | Low volume of work
High acceleration exercises High load exercises |
| 7-10 | Fast twitch dominant | Low volume of work High load exercises
High acceleration exercises |
| 11-13 | Equal ratio | Moderate volume of work High acceleration and slower tempo training Moderate load exercises |
| 14-17 | Slow twitch dominant | High volume of work Long duration sets Slower eccentric tempo |
| 18-21 | Slow twitch very dominant | High volume of work Long duration sets Slower eccentric tempo |
| +21 | Slow twitch extremely dominant | Very high volume of work Long duration sets
Slower eccentric tempo |
For best results using this test you should include exercises for all body parts with as little cross-over as possible. Not all muscles in the same individuals will have the same fiber dominance, so I suggest using the following test exercises:
| Exercise Muscle(s) tested | |
| Full back squat | Quadriceps, glutes |
| Leg curl | Hamstring |
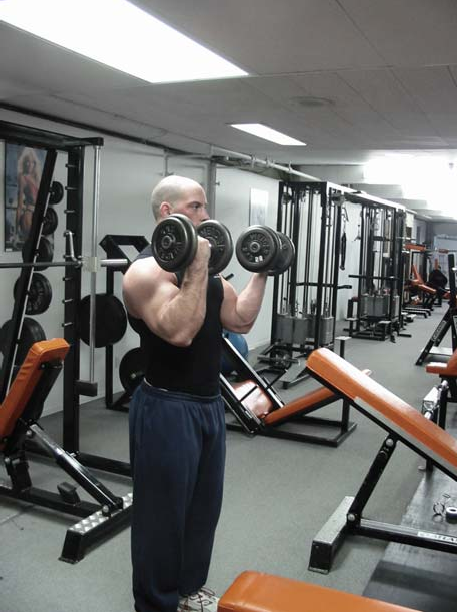
| Dumbbell bench press | Pectorals, triceps |
| Dumbbell shoulder press | Shoulders, triceps |
| Barbell rowing | Upper back, biceps |
| Seated calf raise | Calves |
This should give you a very good general idea of your muscle fiber dominance. It’s not perfect, but it will give you a good idea on how to orient your training program.
Test no. 2: Vertical jump dips depth test
This test is hard to administer on yourself because you know what is being tested and that can influence your results. However it is a good subjective test to perform on others. Have an athlete test on the vertical jump. Tell him that he can dip as low as he wants; the goal is to jump as high as possible. The athlete will think that you are testing his vertical jump capacities while you are really testing his dipping depth.
The actual result of the jump is without much consequence for this test. What you look for is the degree of knee flexion on the dip before the vertical jump. The deeper or the slower the dipping phase, the more slow-twitch dominant an athlete is. The shallower or the faster the dipping phase, the more fast-twitch dominant an athlete is.
Use the table to get a good idea of the fiber makeup of the individual:
| Characteristics of the dipping phase Fiber dominance | |
| Very long dip (past parallel)
+ Slow dip + Slow turnaround between dip and jumping |
Slow-twitch very dominant |
| Long dip (hips and knee in the same line)
+ Slow dip + Slow turnaround |
Slow-twitch dominant |
| Moderate-to-long dip
+ Average speed dip + Relatively rapid turnaround |
Equal ratio |
| Short dip (45 degrees knee flexion)
+ Fast dip + Rapid turnaround |
Fast-twitch dominant |
| Very short dip (less than 45 degrees knee flexion)
+ Very fast dip + Very rapid turnaround |
Fast-twitch very dominant |
Obviously this later test is not perfect as it only tests the lower body. However studies have found a very strong relationship between overall (or average for the whole body) fiber dominance and the results of this test. It certainly won’t hurt to add it to the 80% reps test to get an even better idea of the fiber dominance of an athlete.
Nervous system effectiveness
Testing for nervous system efficacy is much harder because it’s impossible for a coach to quantify the actual neural drive to the muscles. However we can estimate the efficacy of the nervous system indirectly by using the strength deficit.
I already explained that the strength deficit is the difference between your muscles’ potential for force production and their actual maximal force output. How can this clue us in on the efficacy of the nervous system? It’s fairly simple. A large strength deficit means that you cannot use most of the potential of your muscles. This indicates that your nervous system does not have the capacity to recruit a lot of motor units, thus it is less efficient. A small strength deficit means that you can utilize a great proportion of your muscles’ potential, thus your nervous system is efficient.
The following table presents a possible way of evaluating one’s strength deficit. Find out the athlete’s 1RM in the squat and the bench press, evaluate his build and body size, then divide the total (bench + squat) by the athlete’s bodyweight and see where that places him.
| Evaluating the Strength Deficit with the Bench press and Squat | |||||||
| Height | Body type* | Very important Strength
deficit |
Important strength deficit | Moderate strength deficit | Small strength deficit | ||
| Short (- 5’7”) | Ectomorph | Under 3 lbs / lbs of BW | 3 to 4 lbs / lbs of BW | 4 to 5 lbs / lbs of BW | 5 to 6 lbs/ lbs of BW | ||
| Endormorph | Under 3.5 lbs / lbs of BW | 3.5 to 4.5 lbs / lbs of BW | 4.5 to 5.5 lbs / lbs of BW | 5.5 to 6.5 lbs/ lbs of BW | |||
| Mesomorph | Under 4 lbs / lbs of BW | 4 to 5 lbs / lbs of BW | 5 to 6 lbs / lbs of BW | 6 to 7 lbs/ lbs of BW | |||
| Medium (5’7” – 6’) | Ectomorph | Under 2.5 lbs / lbs of BW | 2.5 to 3.5 lbs / lbs of BW | 3.5 to 4.5 lbs / lbs of BW | 4.5 to 5.5 lbs/ lbs of BW | ||
| Endormorph | Under 3 lbs /
lbs of BW |
3 to 4 lbs / lbs
of BW |
4 to 5 lbs / lbs
of BW |
5 to 6 lbs/ lbs
of BW |
|||
| Mesomorph | Under 3.5 lbs / lbs of BW | 3.5 to 4.5 lbs / lbs of BW | 4.5 to 5.5 lbs / lbs of BW | 5.5 to 6.5 lbs/ lbs of BW | |||
| Tall (6’1” +) | Ectomorph | Under 2 lbs / lbs of BW | 2 to 3 lbs / lbs of BW | 3 to 4 lbs / lbs of BW | 4 to 5 lbs/ lbs of BW | ||
| Endormorph | Under 2.5 lbs / lbs of BW | 2.5 to 3.5 lbs / lbs of BW | 3.5 to 4.5 lbs / lbs of BW | 4.5 to 5.5 lbs/ lbs of BW | |||
| Mesomorph | Under 3 lbs / lbs of BW | 3 to 4 lbs / lbs of BW | 4 to 5 lbs / lbs of BW | 5 to 6 lbs/ lbs of BW | |||
* Ectomorph = small bones, lean, lengthy body, low muscle mass (key word: bones) Endomorph = big bones, excess bodyfat, moderate to heavy muscle mass (key word: fat) Mesomorph = Heavy muscle mass, low to moderate bodyfat, big bones (key word: muscle)
An individual with an important strength deficit will benefit most from training techniques emphasizing the improvement of the neuromuscular portion of force
production (lower volume, greater load and/or greater acceleration), while an individual with a small strength deficit will profit from an improvement in his muscle mass to some extent. However, regardless of the strength deficit, training methods aimed at developing the neuromuscular factors should constitute the core of an athletic training program.
Like all field tests, this one is not perfect. Other variables outside of nervous system efficacy can come into play, but we’re not in a lab setting. To design an effective program all we need are clues, and this test gives you a very solid clue in regards to nervous system efficacy.
Postural analysis and range of motion testing
Much of the information presented in this section comes from Dr. Martin Normand Ph.D., DC, who is a full professor of biomechanics in the Department of Exercise Science at Quebec University, as well as a practicing chiropractor.
Analyzing an athlete’s posture and the relative extensibility (flexibility) of his various muscle structures can greatly help you in your exercise selection. A hypo-extensible (or hyper-tonic) muscle presents an increased risk of injury, especially if high velocity movements are involved. On the other hand, hyper-extensibility (or hypo-tonicity) can also lead to an increased risk of injury because of joint laxity and instability.
There is nothing more important to an athlete’s/bodybuilder’s sustained progress than being injury-free as much as possible. When injured, an athlete or bodybuilder cannot gain size, strength, power, or skills. So injury prevention should be a priority of every coach and athlete.
One of the current problems with stretching is that we seem to either devote way too much time to it, or no time at all; there is no middle ground. Stretching for stretching’s sake can be counterproductive. Recommending a generic stretching program can have some problems, not the least being that some muscles that should not be stretched will be stretched, and others, which need an improved range of motion, are neglected. This is where muscle testing and postural analysis comes in. By conducting a brief series of range of motion tests on the major muscle groups you can pin point which muscles are hypo-extensible (lack range of motion), hyper-extensible (too much range of motion), or adequate. This will enable the coach to select the proper stretching exercises needed.
What we want to do is stretch the muscles that are too tight (and thus have an excessive tension buildup) and strengthen the muscles that are too flexible. While strengthening exercises should be included for all the major muscle groups, a special emphasis should be placed on the muscles that are hyper-extensible. This special emphasis will help reduce joint instability and thus the risk of injury. One should never stretch a muscle that is already too flexible, unless his activity of choice demands it (e.g. circus performer, gymnast, etc.).
The key to remember is that for maximal performance the range of motion of each muscle should be optimal, not excessive or insufficient.
Muscles often go in pairs. When a joint agonist is hyper-extensible, chances are that its antagonist muscle is hypo-extensible/hyper-tonic. For example, when the hip flexors (psoas and rectus femoris) are short and tight, the hip extensors (glutes and hamstrings) are likely to be long and weak (at least in proportion to the hip flexors). A lot has been said about the ideal strength ratios between a pair of muscles. However, I feel that a balance in extensibility is much more important than a balance of strength, at least for injury prevention. If both muscles in a pair are equivalent in terms of tension and extensibility, the risk of injury is greatly reduced.
Muscle testing
Muscle testing refers to performing a battery of field tests to establish the range of motion of the major muscle groups. To properly test the extensibility of a muscle you do a manual displacement of a segment from the flexed position to the extended position, stopping the movement when you feel a significant increase in muscle tension. At this point note the joint angle.
I recommend the following testing procedure:
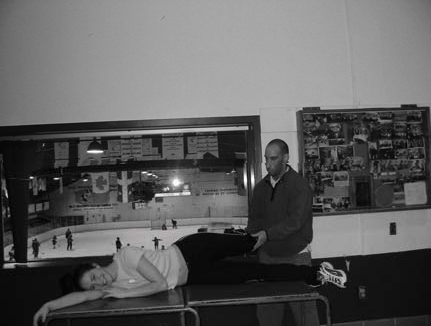
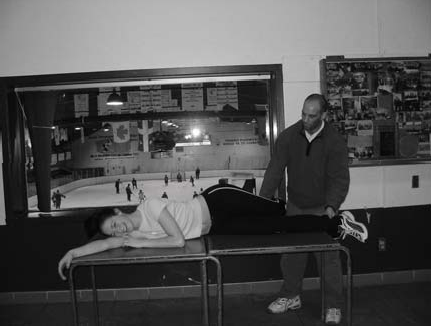
- Iliopsoas
Since this muscle is a hip flexor we will test its extensibility during a passive hip extension. To properly execute the test, the tested leg (on the table) is extended at the knee so that the rectus femoris (which is also a hip flexor and knee extensor) will be shortened and thus will have less effect on the results of the test.
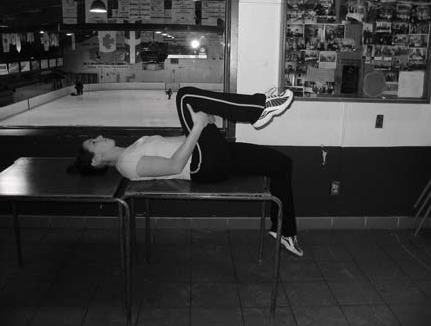
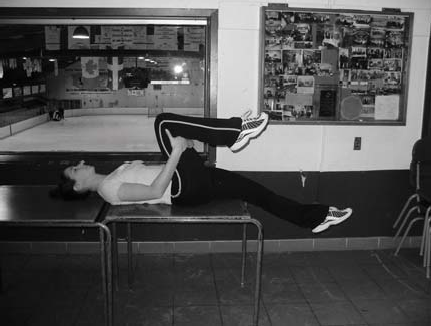
Test: The subject is on his back and slowly pulls on the non-test leg (if you test for the right psoas you pull on the left leg) to bring it towards him and induce a flexion that will lead to a relative extension of the tested leg (Thomas test).
Results: If the extensibility of the psoas is normal the tested leg will stay on the table when the subject brings the other leg towards him.
If the tested leg lifts off the table we have a hypo-extensibility. To test for a hyperextensibility perform the same test but with the tested leg hanging off of the table’s end, if it points down (lower than the table) when you bring the leg towards you, you have hyper-extensibility.
Careful! You can have a false positive result in this test. If the lower back leaves the table (if lordosis increases) it can give you a false hypo-extensibility result. The lower back must remain flat on the table at all times. To do so, the non-tested leg should only be lifted up to a point where a flat back can be maintained.
Normal psoas extensibility
Psoas hypo-extensibility (leg leaves the table)
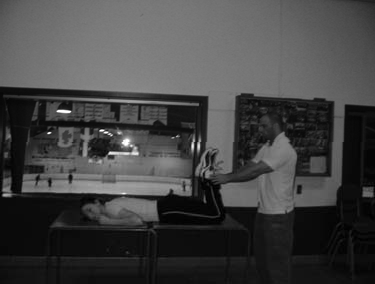
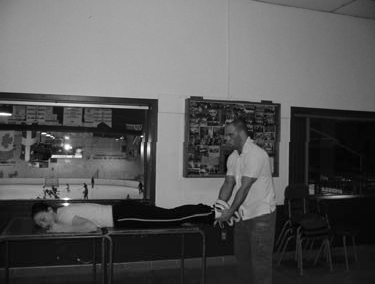
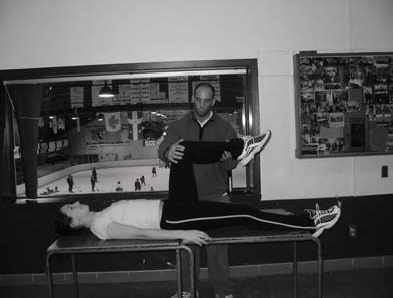
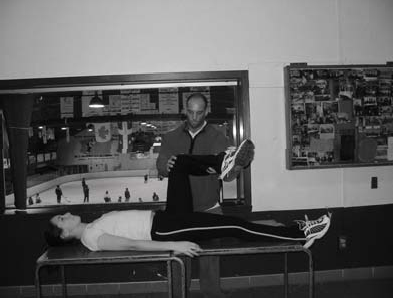
- Rectus femoris
The rectus femoris is a hip flexor and a knee extensor. So its extensibility is tested during hip extension and knee flexion.
Test: The test is a modified Thomas test. So it is the same procedure as the iliopsoas test, except that only the upper portion of the tested leg is on the table; the lower portion hangs freely at the end of the table, which will lead to an automatic passive knee flexion.
Results: If we have a normal extensibility of the rectus femoris, the angle between the lower and upper leg will be around 80 degrees. If we have an hypo-extensibility the lower leg will rise somewhat (extension at the knee) and if we have an hyper-extensibility the hanging lower leg will be loose and you will be able to create an additional passive knee flexion without causing an increase in muscle tension.
Normal rectus femoris extensibility
Rectus femoris hypo-extensibility
- Biceps femoris
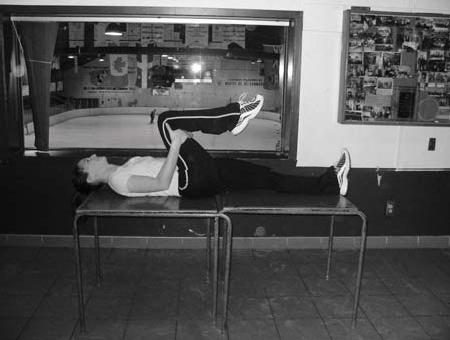
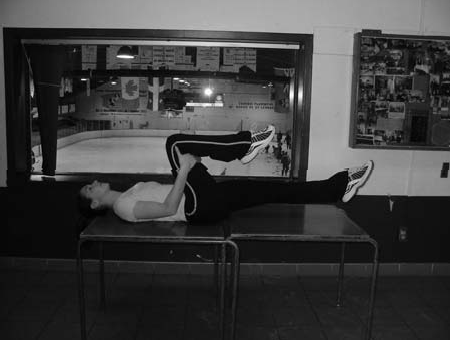
The biceps femoris (short head) is a knee flexor, so its extensibility should be tested during a knee extension.
Test: The subject is on his abdomen to place the hips in a neutral position, diminishing the involvement of the bi-articular portion of the hamstrings. The starting position is fully flexed at the knees and the coach induces a slow knee extension. It is important that this be a passive action, in any extensibility test the subject should never contract any muscle.
Results: An athlete with normal extensibility will have the legs fully extended at the knees without any problems. Hypo-extensibility is spotted if the extension at the knees is incomplete. Hyper-extensibility is spotted if there is hyperextension at the knees.
Starting position of the biceps femoris test
Normal biceps femoris extensibility
Biceps femoris hypo-extensibility
- Bi-articular portion of the hamstrings
The biceps femoris (long head), the semitendinosus, and the semimembranosus are hip extensors and knee flexors. So we test them by doing a passive hip flexion with the leg extended at the knee.
Test: The subject is lying on his back, both legs on the table, the lower back is flat on the table at all times. While keeping the leg fully extended at the knee, the coach lifts the tested leg (doing a passive hip flexion). It is important that the lower back stays on the table at all times and that the hips also remain stable.
Results: Normal extensibility is characterized by an angle of 80-90 degrees between the leg and table. Over 100 degrees would be considered to be hyper-extensibility and under 70-80 degrees would be considered hypo-extensibility.
Normal bi-articular hamstring extensibility
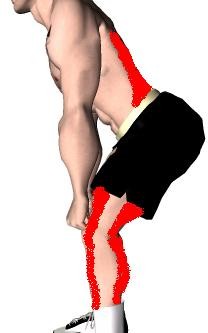
- Spinal erectors and hamstrings
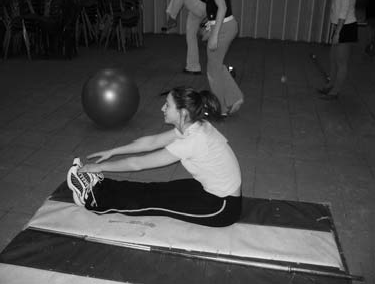
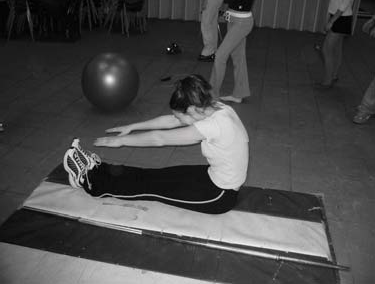
The erector spinae are trunk extensors. Therefore, we must test them during trunk flexion.
Test: Sitting position, legs fully extended, toes pointing straight up. The subject attempts to touch his toes with his fingers.
Results: If…
- the lower back doesn’t bend forward very far but the upper back is bending forward (giving a rounded back position) and the subject is not able to touch his toes we have hypo-extensibility of the lumbar erectors.
- the lower back bends forward but the upper back remains flat (doesn’t bend forward) we have hypo-extensibility of the thoracic erectors.
- the legs flex at the knees we have hypo-extensibility of the hamstrings.
- the athlete is able to touch his toes we have normal extensibility.
- the athlete is able to touch farther than his toes we have hyper-extensibility.

Good overall extensibility
Thoracic erector hypo-extensibility
Lumbar erector hypo-extensibility
- TFL
The tensor fasciae latae is a hip abductor, internal rotator, hip flexor, and a knee extensor. To test its extensibility we will do a passive hip adduction and external rotation.
Test: The subject is on his side (tested leg on top). The tested leg is bent 90 degrees at the knee and is slightly pulled back (hip extension), the other leg is fully extended and on the table. The coach lifts the tested leg and lets it go down slowly.
Results: If the extensibility is normal the knee of the tested leg will touch the table. If it doesn’t there is hypo-extensibility of the TFL. If there is hyper-extensibility of the TFL the leg will actually be able to go below the table.
Starting position for the TFL test
Borderline acceptable extensibility
- External hip rotators
To test the group of muscles responsible for external hip rotation we must do a passive internal hip rotation.
Test: The subject is lying on his back. The tested leg is flexed 90 degrees at the hip and at the knee. The coach stands on the side of the tested leg and brings the foot of the tested leg towards him while keeping the upper leg perpendicular to the ground at all time.
Results: Normal extensibility of the external hip rotators is 45 degrees of movement. Less than 45 degrees is hypo-extensibility and more than 50-60 degrees is hyper- extensibility.
- Internal hip rotators
To test the group of muscles responsible for an internal hip rotation we must do a passive external hip rotation.
Test: The subject is lying on his back. The tested leg is flexed 90 degrees at the hip and at the knee. The coach stands on the side of the tested leg and brings the foot of the tested leg inwards (doing a passive external hip rotation) while keeping the upper leg perpendicular to the ground at all times.
Results: Normal extensibility of the internal hip rotators is 45 degrees of movement. Less than 45 degrees is hypo-extensibility and more than 50-60 degrees in hyper-extensibility.
The proper execution of the internal hip rotators test
- Internal shoulder rotators
The group of muscles involved in internal shoulder rotation (subscapularis, teres major, anterior deltoid, pectoralis major, latissimus dorsi) are tested by doing a passive external shoulder rotation.
Test: The subject lies on his back, the tested upper arm is in line with the shoulders and the arm is bent 90 degrees at the elbow. The coach slowly executes a passive external shoulder rotation (bringing the lower arm close to head-level).
Result: Normal extensibility is characterized by a 90 degree range of motion. This means that the coach should be able to bring the forearm to the table. Less than that is hypo- extensibility and more than that (arm lower than the table) is hyper-extensibility.
Normal extensibility of the internal rotators
- External shoulder rotators
The group of muscles involved in an external shoulder rotation (infraspinatus, teres minor, posterior deltoid) are tested by doing a passive internal shoulder rotation.
Test: The subject lies on his back, the tested upper arm is in line with the shoulders and the arm is bent 90 degrees at the elbow. The coach slowly executes a passive internal shoulder rotation (bringing the lower arm close to torso-level).
Result: A normal extensibility is characterized by a 90 degree range of motion. Meaning that the coach should be able to bring the forearm to the table. Less than that is hypo- extensibility and more than that (arm lower than the table) is hyper-extensibility.
Normal extensibility of the external rotators
Those are the 10 basic tests I recommend. As you will notice the emphasis is placed on the lower body and the shoulders, which are the most problematic areas. But you can design your own tests, all you need to know is the movement in which a muscle is active.
Testing for pectoral extensibility is also a good idea because in most athletes it is hypo- extensible. But to diagnose pectoral tightness all you need to do is look at the athlete’s posture. If his pectorals are tight his shoulders will be rounded forward instead of in-line with the hips.
Performing these 10 tests will take you about 10-15 minutes once you are used to the procedure and the information you will get out of them will prove to be invaluable in the proper planning of training.
A brief word on extensibility/flexibility
A thorough explanation of proper stretching procedures would require a whole book in itself and it is outside the scope of this one. However, the following figure illustrates the various factors involved in having an optimal range of motion.

Extensibility of the skin
Adhesions
Nervous system
Ligaments
Muscle tissue extensibility
The following structures can influence the actual range of motion:
-
- Muscle structures: A muscle with proper extensibility is generally associated with an optimal usable range of motion.
- Ligaments and joint structures: The ligaments can limit the range of motion due to their role as joint stabilizers. On the other hand, ligaments that are too loose can also be problematic, causing joint instability.
- The nervous system: Sometimes there will be a lack in usable range of motion despite adequate extensibility of the muscles and ligaments. In this case the nervous system can be the cause of the lack of range of motion, not allowing the muscles to work throughout their complete amplitude.
- Other factors: Elasticity of the skin, adhesions between the muscle fibers, and adhesions between the muscle and its fascia.
This tells us that several stretching techniques should be used. If the problem is structural, static stretching will be adequate. But more advanced techniques such as PNF or ballistic stretching become necessary to solve range of motion problems due to neural factors. If adhesions are the cause of the problem an ART treatment is the best solution.
Client evaluation
- Physical data
- Height: Weight:
- Muscle extensibility (check appropriate case):
| Right Left | ||||||
| – | Normal | + | – | Normal | + | |
| Iliopsoas | ||||||
| Rectus femoris | ||||||
| Mono-articular hamstrings (biceps femoris short head) | ||||||
| Bi-articular hamstrings | ||||||
| Spinal erectors | ||||||
| TFL | ||||||
| External hip rotators | ||||||
| Internal hip rotators | ||||||
| External shoulder rotators | ||||||
| Internal shoulder rotators | ||||||
- Strength deficit (check most appropriate):
Very important: Important: Moderate: Small:
- Morphological/phenotypical data
- General body type (check most appropriate choice):
| Mesomorph (very lean and muscular) | |
| Meso-endo (muscular but not very lean) | |
| Meso-ecto (muscular but small joints and lengthy bones) | |
| Ectomorph (thin and elongated physique) | |
| Endomorph (thick and fat physique) |
- Body fat percentage/degree of leanness (check appropriate case):
| Ripped (3-5%male; 9-11% female) | |
| Defined (6-8% male; 12-15% female) | |
| Lean (9-11% male; 16-21% female) | |
| Average (12-15% male; 22-25% female) | |
| Soft (16-18% male; 22-28% female) | |
| Overfat (19-23% male; 29-35% female) | |
| Obese (24%+ male; 35%+ female) |
- Fiber type dominance (check most appropriate):
| Muscle groups | Fast-twitch very dominant | Fast-twitch dominant | Mixed ratio | Slow-twitch dominant | Slow-twitch very dominant |
| Pectorals | |||||
| Upper back | |||||
| Arm flexors | |||||
| Arm extensors | |||||
| Leg flexors | |||||
| Leg extensors | |||||
| Shoulders |
- Goal(s)
Fat loss:
Muscle gain:
Sports performance:
General fitness/health/wellness:
CHAPTER 4
Training methods
In this chapter …
- A presentation and description of high force training methods
- Pros, cons, and “when-to” for all methods described
- How to plan the use of these methods in the training of an athlete
“The importance of force”
Force production is the basis for most sport actions. Without force production there is no movement. We must distinguish between force and maximum strength since both concepts are often mistakenly mixed with one another. Strength is the capacity to produce force during a muscular contraction (Bouchard et al. 1975). Force itself is the result of the tension produced by the muscle, which allows one to fight inertia, move a mass, or accelerate it. Without force production one cannot move his body in space, he cannot overcome an adversary, he cannot accelerate, basically he cannot do anything involving movement.
As a result, it is capital to develop the capacity to create muscular tension and to produce force if one is going to be a successful athlete. The capacity to produce force is often associated with big muscles. While it’s true that a muscle has a potential for force production proportional to its cross-section (ultimately to it’s size), one cannot dismiss the importance of the neuromuscular factors involved in force production.
The F = ma formula is capital to proper planning of training. Here’s how you should understand it.
“The total amount of force produced by a muscle or a group of muscles is equal to the summation of the force required to move the mass and the force required to accelerate it.”
In other words, you need to apply a certain level of force to fight the inertia of a resistance (this is generally equal to a bit more than the weight to be lifted). Then, the more you want to impart acceleration to the resistance, the more additional force you’ll need to produce. That’s why additional loading is not always necessary or adequate to increase force.
Now, the following graphic classifies exercise methods according to their relative dependence on the acceleration and mass factors. The methods farther on the left are acceleration dominant and become more mass dominant as we go to the right of the figure.
![]()
Ballistic —- Speed-strength —- Strength-speed —- Controlled —- Maximal Supra-max
The accelerative effort is the main source of force production
The effort to fight the resistance is the main source of force production
![]()
![]()
![]()
![]()
![]()
![]()
![]()
![]()
![]()
![]()
![]()
![]()
Eccentric training with loads over the concentric max (105-140%)
Cheated lifting Heavy partial reps
Lifting exercises with a heavy load (85%+)
Eccentric training
Isometric training
Lifting exercises with moderate to near maximal loads (50 – 85%)
Loaded sports movements performed at a controlled pace
Olympic lifts
Lifting exercises against moderate loads (30 – 70%)
Lifting movements with a minimal load
Loaded sports movements
Jump training Plyometrics Throws Weighted jumps Absorption drills
![]()
![]()
![]() The following table expands on the many possible training methods presented in the preceding graph.
The following table expands on the many possible training methods presented in the preceding graph.
Ballistic Method
Controlled Repetition Method
Supra-Maximal Method
Maximal Method
![]()
![]()
![]()
Strength- Speed Method
Basic Force Training Methods
Speed- Strength Method
F = M * A
F = M * A
F = M * A
F = M * A
F = M * A
F = M * A
| Acceleration | Acceleration | Acceleration |
| is very
dominant. Mass is low. |
is dominant. Mass is low. | and mass are
contributing equally. |
| High speed strength exercises | ||
|
||
| Mass is | Mass is very | Mass is very |
| dominant.
Acceleration is low. |
dominant.
Acceleration is very low-to-nil. |
dominant.
Acceleration is very low-to-nil. |
| Low speed strength exercises | ||
|
||
Understanding the effect of the F = ma equation is very important for several reasons:
-
- It allows one to vary the training methods used to maximize the capacity to produce force.
- It enables the coach to avoid selecting redundant exercises (several exercises developing the same physical capacities).
- It makes progression safer. You do not need to constantly increase the load to increase your capacity to produce force; you can improve by imparting more acceleration to the load.
- It gives you a better understanding of what each exercise can contribute to your athlete’s preparation.
Each of these 6 methods and their derivatives have their place in sports training. But that doesn’t mean that they should all be used at the same time by all athletes. Remember that athletes have a limited capacity to sustain and adapt to training stress, so it is a mistake to try to invent the “world’s best program” by adding a bit of everything that works.
Ballistic method
Ballistic refers to an actual projection of the source of resistance. The source of resistance itself can either be from an outside source (e.g. medicine ball) or from the athlete’s bodyweight. The intensity of these exercises vary from very low (simple bounding drills) to very high (loaded absorption drills, high impact plyos). These exercises are the ones in which the acceleration factor is the most important in relation to total force production. These exercises have a great impact on the nervous system because of the high accelerative demands. While low intensity ballistic exercises (bounding drills, basic jump training, light medicine ball throws, etc.) are not very stressful (and thus can be used quite often, mostly as a good specific warm-up tool), high intensity ballistic exercises (depth jumps, weighted jumps, heavy medicine ball throws, loaded absorption drills) should only be used infrequently (once or twice a week) for a limited period of time (4-6 weeks). The latter exercises (high intensity) do carry a great potential for power improvement, but they are very stressful on the nervous system and the tendons. It is also important to understand that the training effect of the high intensity ballistic exercises is delayed, meaning that the improvements in the capacity to produce power are best seen 2-3 weeks after the last stimulation.
Pros: Great way to develop power in specific muscles/movements, produces good results very fast, exercises are stimulating to perform. The lower intensity drills are a great way to start a workout effectively.
Cons: The high intensity exercises are very demanding on the nervous system, the habituation rate is high (the exercises produce results fast, but stop producing early), often a higher risk of injury than with other methods.
When to use the method: The low intensity exercises can be used as a warm-up before most workouts although the coach should stay away from excessive volume (5-10 minutes will do, more than that is excessive). The higher intensity exercises should be used intermittently during the year, for cycles of 4-6 weeks at a time, the frequency should be kept to 1-2 times per week with a relatively low volume of work (more throws and weighted jumps doesn’t bring more results than less work … the main effect is on the nervous system which doesn’t require a lot of volume to be stimulated). DO NOT start using these high intensity exercises close to a game, unless the athlete has a long history with them.

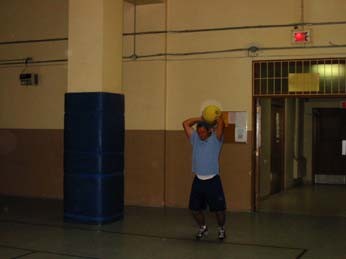
Medicine ball throws are low-intensity ballistic exercises that are well suited as a specific warm-up tool for hockey players By including various types of throws you can prepare all your muscles for
Speed-Strength method
This method is very similar to the ballistic method, except that there is not necessarily a projection of the source of resistance. The relative importance of the accelerative effort is almost as great as with the ballistic method.
The best example of this form of training is loaded sports movements. For example skating with a weighted sole in the skate (very, very light insoles), skating/running while pulling a light sled or using a sport parachute, firing shots with an overweight stick, etc.
This form of training was once very popular with athletes, but it has become less utilized in recent years. The main drawback of this form of training is that it can impair coordination in the sports movement if the load leads to a change (even minimal) in the technique. If used correctly it can be a good way to strengthen specific movement patterns and the muscles involved in the movement.
Another form of this method is explosive lifting with minimal loading (10-20% of 1RM). This is generally best used during the warm-up of a strength session. To be effective, the athlete must accelerate the load as much as possible.
Pros: Loaded sports movements can strengthen the muscles in a very specific manner. It can also help technical correction via enhanced feedback (you can feel the movement better when there is a bit more resistance and thus can spot your weaknesses).
Cons: Very easy to abuse and even the slightest mistake in loading can lead to a negative effect on sport performance.
When to use the method: The use of loaded sports movements should be limited to very experienced coaches who can spot the slightest technical discrepancy and to very advanced athletes who have a stable and solid technical mastery. This method, if used at all, should be limited to early in the preparatory period and should be used for a 4 week cycle at the most, once or twice per week (preferably once).
Strength-Speed method
The strength-speed method includes exercises in which the force output is a result of both a high acceleration and a moderate/heavy mass to be moved. The best known example of this form of training is the Olympic lifts and their variations. Recently, another way to use this method has been popularized by powerlifting coach Louie Simmons. Simmons recommends using the dynamic effort method by using 55-60% of your max in lifts such as the bench press and the squat while lifting the weight as fast as possible. He uses a low number of reps to maximize acceleration during each rep. I would like to point out two things at this point:
- Simmons uses the dynamic effort method with the bench and the squat because these are the lifts being contested in his sport (powerlifting), an athlete could use other exercises.
- Other lifting experts who recommend explosive lifting have recommended a load different than Simmons. Hatfield recommends as high as 70-80% for explosive strength.
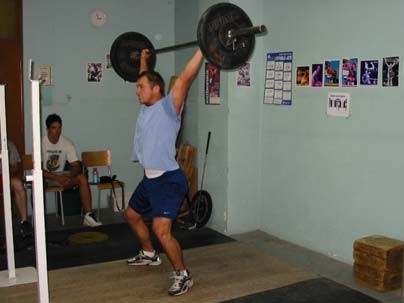
I must emphasize that with strength-speed exercises you do not really use a percentage set in stone. You judge the load according to the speed of execution. Increase the load as long as a high acceleration and technical efficiency can be maintained.
“You should spend at least 30% of your strength & power training volume with exercises included in this method.”
This form of training is highly stimulating for the nervous system because of the high rate of force development, the high acceleration, and the coordination required. As such, training volume should be minimized and the emphasis should be on acceleration and quality of execution. When used at a low volume, this form of training can be used quite often due to the small effect it has on the musculoskeletal system (low protein degradation due to the low time under tension). Furthermore, a higher training frequency on these lifts greatly improves coordination.
Pros: This is the training method that generally has the greatest total force production and the greatest power output. As a result it is one of the best ways to improve sports performance through training. The benefits are not limited to the structures worked because there is a general effect of potentiation of the nervous system, making the whole body more effective.
Cons: Some of these lifts require a greater technical mastery and may take some time to learn, especially if the coach is inexperienced in the teaching of those exercises. It is easy to do too much volume in one session and thus overload the nervous system. The more complex exercises carry a greater risk of injury.
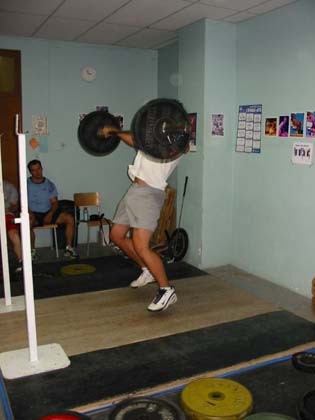

The Olympic lift variations are the best examples of strength-speed exercises because you need to accelerate a relatively heavy load to complete the lift.
‘Normal’ strength exercises like the squat or bench press can also become strength-speed exercises if the load is decreased to allow maximum acceleration of the bar.
When to use the method: Strength-speed exercises should constitute the core of your special training program. It should be introduced early in the preparation period and continued throughout the year. Early in the year emphasize learning the technique of the Olympic lifts by using more volume (2-3 Olympic lifting exercises per workout, 20-30 total reps per exercise), more frequency (2-4 times per week), and very low intensity (60- 70% on the Olympic lifts). This work should be submaximal. As you advance in the year, and once the athlete is pretty efficient, reduce the volume (1-2 olympic lift exercise(s) per workout, 10-20 total reps per exercise) and the frequency (1-2 times per week), but increase the intensity (80-90% on the Olympic lifts). Remember that it is crucial that the athlete be proficient in Olympic lifting technique before you increase the intensity.
Controlled repetition method
This form of training includes classic hypertrophy (i.e. bodybuilding) training and sport movements performed at a controlled pace (often times with loading). The best examples of the controlled pace sport movements are heavy sled-dragging and performing sports movements wearing a weighted vest. This leads to hypertrophy in the specific muscles involved in the action and specific conditioning (improvement in the energy system efficiency).
Resistance training using a bodybuilding approach (higher volume, lower speed of action, more isolation exercises) doesn’t directly improve the athlete’s performance. However, it can help strengthen the tendons, which can reduce the risk of injuries. Still, remember that increased muscle mass can be detrimental to performance for two reasons:
- Non-functional hypertrophy (sarcoplasmic hypertrophy) doesn’t lead to an improvement in the capacity to produce force, but it does lead to added body weight (thus you have to carry more weight without having more strength).
- Excessive muscle hypertrophy constricts the vascular system, especially the blood vessels and capillaries in the muscles, which leads to decreased oxygen and nutrient transport to the muscle. This makes the disposal of intramuscular waste byproducts and recovery from training difficult.
Following non-functional H
Following functional H
Original fiber
A muscle after functional and non-functional hypertrophy
Non-functional hypertrophy is an increase in the non-contractile elements of a muscle fiber and it has been shown to occur predominently with bodybuilding-type training (Zatsiorsky, 1996). Non-functional hypertrophy is equivalent to increasing the weight of a car but not the strength of it’s engine (or adding wagons to a train). So ultimately it is understandable why it is not desirable.
To be fair, bodybuilding training doesn’t only stimulate non-functional hypertrophy. As stated earlier, all training methods lead to functional and non-functional hypertrophy, but to various extents and in different proportions. In that regard, controlled training may have a place in an athlete’s training, but only as an assistance method to the core of the training. I believe that it should be used to strenghen muscles which are subject to injuries (shoulders, rotator cuffs, lower back, abdominals).
Pros: Can increase tendon strength. Can lead to added muscle mass. It’s safe to do. Not much stress on the nervous system so it is not likely to overload it.
Cons: Most of the hypertrophy gains are non-functional and may lead to lowered performance. Requires a lot of physiological energy for very little results.
When to use the method: I believe that for elite performance an individual should be training for function, and form will follow. However one can add several exercises to increase hypertrophy in relatively weak and/or fragile muscles (i.e. hamstring, shoulders). I believe that one can put more emphasis on gaining muscle mass early in the year, but even during that time of increased bodybuilding-type training nervous system training should remain the focus.
Maximal method
This training method includes all exercises in which you must produce a lot of muscular tension (close to your limit strength).
- Heavy lifting: Using a load of 85-100% in classic strength lifts (squat, bench press, deadlift, front squat, incline press, push press, barbell row, etc.)
- Eccentric training: Lowering a load close to your 1RM (90-100%) in an exercise. The descent should be under control (2-4 sec.). This is usually done for reps (3-6). A partner or two are required to perform this method (they must lift the weight to get it back to the starting position for you).
- Isometric training: Exerting strength against an immovable resistance. Generally done for a few sets (2-5) of a few seconds (6-12) generating as much force as possible against the immovable resistance.
While all three of these methods are in the same category, they do have very different impacts on the body.
Heavy lifting (85-100%)
High intensity lifting is the best way to increase muscle strength. It also has a very important neural component. The closer to your maximum you go, the greater the relative importance of the nervous system. That’s why heavy lifting is a great tool for the athlete. When combined with strength-speed exercises it creates the best stimulus for strength and power gains.
However, since heavy lifting is very demanding on the nervous system (and the tendons), volume and frequency must be planned carefully. It is easy to do too much work, especially when the athlete is in good shape and feels “psyched” to beat his record.
Understand that it is not necessary (or even desirable) to constantly lift limit weights in training to maximally stimulate strength gains. Don’t forget that strength levels fluctuate, they do not linearly improve over the course of the training season.
Furthermore, the capacity to lift bigger weights in training doesn’t necessarily mean that the muscles are getting stronger and more effective. Remember that gym performance has a lot to do with the level of arousal, motivation, fatigue, etc.
Thus increases and decreases in gym performance are not a good way to gauge the true progress of an athlete’s strength. As such, always trying to lift limit weights is erroneous. When you try to beat your record in a certain lift you are not developing strength, you are learning to demonstrate your strength in that particular lift.
Also do not make the mistake of planning heavy weight lifting out of context. The capacity to produce force will be greatly diminished if the volume of work in other training methods is high. Plan in consequence.

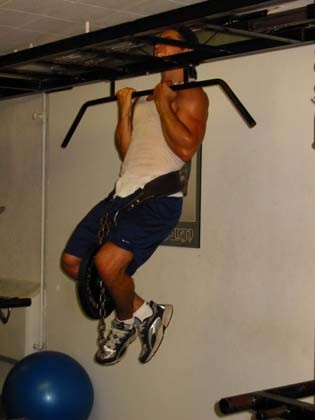
Heavy lifting refers to straining to lift a weight. One must attempt lifts with
near-maximal resistance to develop limit strength.
One should always use multi-joint exercises with this training method.
Pros: Best way to gain limit strength. Has an important neural factor which irradiates through the whole body. Increases muscle strength and size via functional hypertrophy.
Cons: When used out of context it can set the athlete back a few days. Easy to overstress the nervous system if overdone. Can be hard on the tendons.
When to use the method: This method should be used throughout the year, but at varying degrees. Early in the preparatory period the importance of heavy lifting is relatively high and increases up to the middle of the competitive preparation period. After that point it is drastically decreased to a maintenance level to allow
one to be in top form at the competitions. Even during periods of high volumes of heavy lifting I prefer to use a minimalist approach (2-3 exercises per workout, 15- 30 total reps per exercise, 2-4 times per week). Only multi-joint exercises (squat, bench press, deadlift, etc.) should be used with this method. Note that if you plan to do a workout using loads of 90-95% of your 1RM before a game or test, you must plan a taper of 9-12 days between that session and the game/test. If you plan to go as high as 100% (or test a new max) you’ll need a taper of 12-18 days. Another important matter is that the stronger an athlete is, the less lifts with 95- 100% weights are required, these athletes will benefit more from an increased volume of lifts at around 85-90% of their max.
The following table (modified from the work of R.A. Roman and A.S. Prilepin) illustrates how you should plan a certain heavy lifting session.
-
- Select the appropriate intensity level according to your athlete’s capacities at the moment (how much CNS stress can he tolerate?)
- Once the intensity is decided, decide on the volume in total reps that your athlete can sustain. This depends on how much volume he already had during the week.
- Decide how you are going to split the total reps (e.g. are you going to do 3 x 6, or 3 x 5 + 3 x 1 …).
Intensity level, CNS importance, and optimal volume in heavy lifting exercises
| Percentage | Intensity / CNS
importance |
Reps per set | Optimal total reps | Acceptable volume range |
| 60-69.9% | Small | 4-8 | 20 | 18-26 |
| 70-79.9% | Medium | 3-6 | 18 | 12-24 |
| 80-89.9% | Large | 2-4 | 15 | 10-20 |
| 90-97.5% | Near maximal | 1-2 | 5-10 | 2-12 |
| 98-100% | Maximal | 1 | 2-4 | 1-6 |
| +100% | Overload | 1 | 1-2 | 1-4 |
Eccentric training (90-100%)
It is possible to produce a greater amount of strength under eccentric (yielding, negative, lowering) conditions. While the difference between concentric (overcoming, positive, lifting) and eccentric limit strength varies between athletes, it is generally found to be
+20-40% in favor of the eccentric portion. This is evidenced by the fact that you can lower a much heavier load than you can lift.
As such it is possible to place a very large stimulus on the muscles by lowering a near- maximal or maximal load under control for several reps. The effects of this method are very pronounced. It can lead to a very important improvement in tendon strength, in the muscle limit strength capacity, and in the nervous system’s capacity to activate the
muscles. However, this method carries a huge burden on the nervous system and the tendons.
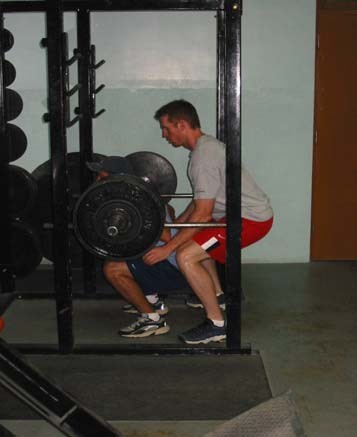
With the eccentric training method you lower a near-maximal or maximal load under control and you lift the weight with the assistance of a spotter.
Pros: Can give you important gains in muscle and tendon strength when used properly. Improves the neural drive.
Cons: One of the most stressful training methods, both on the nervous system and the musculoskeletal system. If used in excess it can overload the CNS, injure tendons, and lead to overtraining. Leads to severe muscle soreness and stiffness after training.
When to use the method: Near-maximal to maximal eccentric training should be used seldomly and generally in the middle portion of the preparatory period, if it’s used at all. Only advanced athletes should use this method and when they do they should do so for very short cycles (2-4 weeks) with at least 2 weeks between cycles. The volume should be kept very low (around 6 total reps per workout once a week).
Isometric training
This method was once very popular in the 60s and 70s, but has been disregarded since. It consists of exerting strength against an immovable resistance. The logic is that isometric strength is slightly higher than concentric strength. This method does lead to strength gains, but only at the specific joint angle being worked. It is possible to gain strength in the whole range of movement by doing isometric holds at every 15o, but those gains are not readily transferable to dynamic movements.
Pros: Can lead to strength gains at a specific joint angle.
Cons: Not transferable to dynamic movements. Can increase blood pressure. Hard to quantify progress and thus to plan volume. Hard to vary intensity.
When to use the method: Isometric training can be used to strengthen a specific weak point in an exercise (sticking point) and during the rehabilitation process. Generally a few sets of 6-12 seconds are used.
Supramaximal method
These methods are to be delt with prudence. They carry a greater risk of injuries and can easily lead to neural overloading. They consist of using exercises in which you lift greater weights than you are capable of. You do so by either:
- Doing very heavy eccentric training (120-140%)
- Cheating to get past the sticking point
- Doing only partial reps (e.g. quarter squats)
These exercises place a huge stimulus on the nervous system (thus, they can produce great results or put you into immediate stagnation … it’s a very fine line in this case) and on the tendons (moderation will strenghen them, excess will injure them). This method can lead to great strength gains. However, much like with isometrics, the gains are not always directly transferable.
Pros: Can yield important strength gains. Can help you bust through a strength plateau. Makes you “used to” handling heavy loads.
Cons: It’s the easiest method to abuse. Gains are not always transferable. Important soreness.
When to use the method: Very, very rarely! As a part of a shock microcycle it can be good. I would not recommend using any of these methods for more than 2 weeks straight. When used the volume should be minimal.
Conclusions in regard to the various training methods
There are many training methods available, but they should not be used by all athletes during the whole season. Before falling victim to the claims of a training method, make sure that you understand the pros and cons of each (they all have pros and cons). Here’s a chart that will help you put everything into context.
| Early preparatory | Late preparatory | Competitive | In Season | |||||
| Beginning athlete (13-15 years old athlete) | Low int. Ballistic + Strength-speed ++++ Controlled + | Low int. Ballistic + Strength-speed ++++ Controlled +
Maximal ++ |
Low int. Ballistic + Strength-speed +++ Maximal ++ | Low int. ballistic + Strength-speed ++ Maximal + | ||||
| Intermediate athlete (16-17 years old athlete) | Low int. ballistic + Strength-speed ++++ Controlled +
Maximal ++ |
Low int. ballistic + Strength-speed ++++ Maximal ++ | Low int. Ballistic + High Int. Ballistic + Strength-speed +++
Maximal + |
Low int. ballistic + Strength-speed ++ Maximal + | ||||
| Advanced athlete (18-20 years old
athlete) |
Low int. Ballistic + Speed-strength + Strength-speed ++++
Maximal ++ |
Low int. Ballistic + High Int. Ballistic + Strength-speed ++++
Maximal ++ |
Low int. Ballistic + High Int. Ballistic + Strength-speed +++
Maximal+ |
Low int. ballistic + Strength-speed ++ Maximal + | ||||
| Surpramax + | ||||||||
| Elite athlete (Pro) | Low int. Ballistic +
Speed-strength + Strength-speed ++++ |
Low int. Ballistic +
High Int. Ballistic + Strength-speed ++++ |
Low int. Ballistic +
High Int. Ballistic + Strength-speed +++ |
Low int. ballistic +
Strength-speed + Maximal + |
||||
| Maximal ++ | Maximal ++ | Maximal+ | ||||||
| Surpramax + | ||||||||
This table illustrates when each training method can be used in the year (not when it must be used). For the sake of comprehension:
++++ = Very strong emphasis
+++ = Strong emphasis
++ = Significant emphasis
+ = Moderate emphasis / introduction / maintenance The division in periods is as follows:
- Early preparatory: From the end of the season to 1/3 of the way through the off-season.
- Late preparatory : From 1/3 of the way through the off-season to 2/3 of the way through the off-season.
- Competitive: From 2/3 of the way through the off-season to the start of the competitive season.
- In-season : The season itself
In this chapter …
CHAPTER 5
Planning volume
- The proper rep and set relationships for muscle size
- The proper rep and set relationships for strength gains
- The proper rep and set relationships for power gains
There is no perfect rep and set scheme. Depending on the individual’s fiber makeup, his experience, and needs it can vary greatly. One must keep in mind that, depending on your fiber dominance, the adequate volume of strength work will vary greatly. Someone who is fast-twitch dominant will benefit from lower volumes of training and will probably overtrain with a high volume approach (people are sometimes amazed that some of my athletes will train for only 30 minutes yet are stronger, more powerful, and have a better physique than 99% of people). On the other hand, slow-twitch dominant individuals will need a higher volume of work to gain size and they have a lower risk of overtraining as their work capacity is generally higher. However, one law holds true, the amount of reps and the amount of sets are inversely proportional. This means that if the reps are low, the sets should be higher and vice-versa. The following graphs will give you a good starting point when planning the number of reps and sets.
![]()
![]()
Reps/Sets relationships for hypertrophy gains per exercise for a mixed fiber type
8
9
10
11
12
13
14
15
Reps
Sets
5
4
3
2
80% of maximum
Intensity (load)
60% of maximum
![]()
![]()
Reps/Sets relationships for hypertrophy gains per exercise for a fast-twitch dominant
5
6
7
8
9
10
11
12
Reps
Sets
5
4
3
2
80% of maximum
Intensity (load)
60% of maximum
![]()
![]()
Reps/Sets relationships for hypertrophy gains per exercise for a slow-twitch dominant
10
11
12
13
14
15
16
17
Reps
Sets
5
4
3
2
80% of maximum
Intensity (load)
60% of maximum
![]()
![]()
Reps/Sets relationships for strength gains per exercise for a mixed fiber type
2
3
4
5
6
7
Reps
Sets
6
5
4
3
95% of maximum
Intensity (load)
80% of maximum
Reps/Sets relationships for strength gains per exercise for a fast-twitch dominant
1
3
4
5
6
7
Reps
Sets
5
4
3
2
100% of maximum
Intensity (load)
80% of maximum
Reps/Sets relationships for strength gains per exercise for a slow-twitch dominant
4
5
6
7
8
Reps
Sets
5
4
3
2
95% of maximum
Intensity (load)
80% of maximum
Reps/Sets relationships for power gains per exercise for a mixed fiber type
4
5
6
7
8
9
Reps
Sets
6
5
4
3
60% of maximum
Intensity (load)
15% of maximum
Reps/Sets relationships for power gains per exercise for a fast-twitch dominant
2
3
4
5
6
7
Reps
Sets
6
5
4
3
60% of maximum
Intensity (load)
15% of maximum
Reps/Sets relationships for power gains per exercise for a slow-twitch dominant
6
7
8
9
10
11
Reps
Sets
6
5
4
3
60% of maximum
Intensity (load)
15% of maximum
One important thing to understand is that the more experienced a trainee is, the less he will benefit from the rep and set schemes on the right side of each graph and the bigger the effect of the methods on the left side will be. This is why as you gain experience you should increase your average training intensity, decrease the number of reps per set, and increase the number of sets per exercise.
Number of exercises
Training volume, or the total workload, is also affected by the number of exercises per training session. Athletes and bodybuilders follow different rules: athletes need to train energy systems and movements, while bodybuilders need to train muscles.
This means that the training split used by both types of trainees as well as the number (and type) of exercises to use will be very different. Bodybuilders should divide their training program into muscle groups, devoting one or two training days per week to each muscle group. For bodybuilders, each muscle group should be worked with 3-5 exercises.
Athletes need to divide their sessions into broader classes, I prefer the upper body/lower body split for athletes. In this case, most of the exercises should be multi-joint movements. 2-4 multi-joint exercises are used per workout and you can add 1 or 2 isolation exercises at the end of each session.
The training split will be covered in more detail in the next chapter.
CHAPTER 6
Accute training variables
In this chapter …
-
- Training frequency per muscle group
- Total number of weekly sessions
- Intensity zone/number of reps per set
- Number of sets per muscle group
- Loading pattern for an exercise
- Tempo of an exercise
- Rest intervals
- Exercise selection
Acute training variables
Acute training variables are also called “training parameters” and they basically indicate how you train. ATV includes:
-
- Training frequency per muscle group
- Total number of weekly sessions
- Intensity zone/number of reps per set
- Number of sets per muscle group
- Loading pattern for an exercise
- Tempo of an exercise
- Rest intervals
- Exercise selection
- Training frequency per muscle group
The following graphic is adapted from a study conducted by Rhea et al. (2003) which consisted of a meta-analysis of a ton of studies conducted regarding strength training. They concluded that beginners should train each muscle group 3 times per week to get the most results while intermediate lifters should train each muscle group twice per week.
2
EFFICACY (SCALE)
1
0
1
2
FREQUENCY
3
| Beginners | |
| Intermediates | |
While the study did not research advanced lifters, according to the trend it’s safe to assume that a frequency of training each muscle group once every five days is ideal.
Of course, this holds true for muscle mass gains: where training volume is relatively high compared to training for strength and power. So the recommendations made here don’t necessarily apply to strength athletes (powerlifters, Olympic lifters, strongmen, etc.).
Here are some examples of possible training splits:
Beginner
| Day | Targeted muscles |
| Monday | Whole body, compound movements |
| Tuesday | OFF |
| Wednesday | Whole body, isolation |
| Thursday | OFF |
| Friday | Whole body, compound movements |
| Saturday | OFF |
| Sunday | OFF |
Intermediate 1
| Day | Targeted muscles |
| Monday | Chest/Shoulders/Triceps/Quadriceps |
| Tuesday | OFF |
| Wednesday | Back / Biceps / Abdominals / Hamstrings |
| Thursday | OFF |
| Friday | Chest/Shoulders/Triceps/Quadriceps |
| Saturday | Back / Biceps / Abdominals / Hamstrings |
| Sunday | OFF |
Intermediate 2
| Day | Targeted muscles |
| Monday | Chest (push) / Hamstrings / Biceps |
| Tuesday | Back (vertical pull) / Triceps /Abdominals |
| Wednesday | OFF |
| Thursday | Quadriceps / Hamstrings |
| Friday | Chest (adduction) / Shoulders |
| Saturday | Back (horizontal pull) / Quadriceps / Abdominals |
| Sunday | OFF |
Intermediate 3
| Day | Targeted muscles |
| Monday | Back (horizontal pull) / Biceps / Abs |
| Tuesday | Quadriceps / Hamstrings |
| Wednesday | Chest (push) / Shoulders (push) / Triceps |
| Thursday | Back (vertical pull) / Abs |
| Friday | Chest (adduction) / Shoulders (raises) / Triceps |
| Saturday | Quadriceps / Hamstrings |
| Sunday | OFF |
Advanced
| Jour | Muscles visés |
| Day 1 | Back / Biceps |
| Day 2 | Quadriceps/Hamstrings |
| Day 3 | OFF |
| Day 4 | Chest/Triceps/Shoulders |
| Day 5 | Abdominals / Lower back |
| Day 6 | Repeat |
- Intensity zone/reps per set
The following table illustrates how the more advanced trainee should perform fewer reps per set than the beginner.
| Beginner Intermediate Advanced | |||
| Strength | 5 | 3 | 1 |
| 6 | 4 | 2 | |
| 7 | 5 | 3 | |
| 8 | 6 | 4 | |
| 9 | 7 | 5 | |
| Functional hypertrophy | 10 | 8 | 6 |
| 11 | 9 | 7 | |
| 12 | 10 | 8 | |
| Total hypertrophy | 13 | 11 | 9 |
| 14 | 12 | 10 | |
| 15 | 13 | 11 | |
| 16 | 14 | 12 | |
| Beginner Intermediate Advanced | |||
| Strength- endurance | 17 | 15 | 13 |
| 18 | 16 | 14 | |
| 19 | 17 | 15 | |
| 20 | 18 | 16 | |
| 21 | 19 | 17 | |
| 22 | 20 | 18 | |
| 23 | 21 | 19 | |
| 24+ | 22+ | 20+ | |
For maximum muscle growth a trainee should spend most of his training time in the functional and total hypertrophy zones. Training volume should be divided about 50/50 among those two zones (normally use the functional hypertrophy zone for compound exercises and the total hypertrophy zone for isolation exercises).
Every one in a while it’s also smart to spend some time in the strength zone because this will increase myogenic tone (muscle tonus), creating a more dense and hard look. It will also increase the capacity of the nervous system to recruit muscle fibers which will enhance the effect of the subsequent bouts of hypertrophy training.
Strength-endurance work (especially when used with short rest intervals) can help with fat loss, vascularization and even serve as active recovery if the loads used are very light.
- Number of sets per muscle group
Research seems to indicate that 3-4 sets per exercise is the best to bring out maximal results. Advanced trainees might even see some benefits from going up to 5-6 sets per exercise. When training for hypertrophy we should aim for a total of 9 to 12 sets per muscle group (some being able to tolerate up to 16). So if you choose to perform 3-4 sets per exercise you should use 3-4 movements per muscle group. If you prefer to use 5-6 sets, then 2-3 exercises will be more appropriate.
Keep in mind that there should be an inverse relationship between the number of reps per set and the number of sets: if you perform few reps per set, you’ll need to perform more sets for the exercise.
- Loading pattern for the exercise
A loading pattern refers to how the sets for one exercise are arranged. For example, straight sets will have you use the same weight and reps for all your work sets while wave loading, pyramidal loading or plateau loading will vary the load and reps with each set.
Straight sets
When performing straight sets you execute one or two warm-up series then jump right into your working weight, which you maintain for the whole exercise. For example, let’s say that your program calls for 4 x 6-8 you would do:
1 x 8 @ 90lbs (warm-up)
1 x 8 @ 135lbs (warm-up) 4 x 8 @ 185lbs (work sets)
It’s possible that due to fatigue you are not able to complete the 8 reps on your last set or two. That’s why the prescription calls for 6-8 reps. I believe in giving a 2 reps “give” when designing a program. If you are in top shape and the program calls for 6 reps but you are able to do 8, isn’t it better to go up to 8? Sure it is! And if you are tired and are not able to perform the prescribed 8 reps does it means that you screwed up your workout? No, as long as you can stay within the 2 reps range you’re fine.
Graphically straight sets look like this (we’ll keep our 4 x 6-8 example).
| 8 reps
185lbs |
8 reps
185lbs |
8 reps
185lbs |
8 reps
185lbs |
||
| 8 reps
135lbs |
|||||
| 8 reps
90lbs |
|||||
Wave loading
Wave loading refers to a loading pattern where the load and reps change with every set within a wave. A wave is a group of 2-3 sets. Normally 2 waves are performed when training for muscle size while 2-4 waves can be used when training for strength. You should try to use heavier weights with each new wave.
When planning a hypertrophy wave you want to have one of the two following patterns:
Hypertrophy wave with strength gains
Set 1 – Total hypertrophy zone
Set 2 – Functional hypertrophy zone Set 3 – Strength zone
| Hypertrophy/Strength wave | |||
| Set | Beginner | Intermediate | Advanced |
| Set 1 | 15 reps | 12 reps | 10 reps |
| Set 2 | 12 reps | 8 reps | 6 reps |
| Set 3 | 8 reps | 6 reps | 4 reps |
| Set 4 | 15 reps | 12 reps | 10 reps |
| Set 5 | 12 reps | 8 reps | 6 reps |
| Set 6 | 8 reps | 6 reps | 4 reps |
Hypertrophy wave with strength-endurance gains
Set 1 – Strength-endurance zone Set 2 – Total hypertrophy zone
Set 3 – Functional hypertrophy zone
| Hypertrophy/Strength-endurance wave | |||
| Set | Beginner | Intermediate | Advanced |
| Set 1 | 20 reps | 18 reps | 15 reps |
| Set 2 | 15 reps | 12 reps | 10 reps |
| Set 3 | 12 reps | 10 reps | 8 reps |
| Set 4 | 20 reps | 18 reps | 15 reps |
| Set 5 | 15 reps | 12 reps | 10 reps |
| Set 6 | 12 reps | 10 reps | 8 reps |
When training for strength, one of the following wave pattern can be used:
Mixed strength/functional hypertrophy wave
Set 1 – Functional hypertrophy zone Set 2 – Strength zone high end
Set 3 – Strength zone low end
| Mixed strength/functional hypertrophy wave | |||
| Set | Beginner | Intermediate | Advanced |
| Set 1 | 10 reps | 8 reps | 6 reps |
| Set 2 | 8 reps | 6 reps | 4 reps |
| Set 3 | 6 reps | 4 reps | 2 reps |
| Set 4 | 10 reps | 8 reps | 6 reps |
| Set 5 | 8 reps | 6 reps | 4 reps |
| Set 6 | 6 reps | 4 reps | 2 reps |
Mixed relative/limit strength wave
Set 1 – Strength zone high end Set 2 – Strength zone middle Set 3 – Strength zone low end
| Mixed relative/limit strength wave | |||
| Set | Beginner | Intermediate | Advanced |
| Set 1 | 9 reps | 7 reps | 5 reps |
| Set 2 | 7 reps | 5 reps | 3 reps |
| Set 3 | 5 reps | 3 reps | 2 reps |
| Set 4 | 9 reps | 7 reps | 5 reps |
| Set 5 | 7 reps | 5 reps | 3 reps |
| Set 6 | 5 reps | 3 reps | 2 reps |
Relative strength wave
Set 1 – Strength zone middle Set 2 – Strength zone low end Set 3 – Strength zone low end
| Relative strength wave | |||
| Set | Beginner | Intermediate | Advanced |
| Set 1 | 7 reps | 5 reps | 3 reps |
| Set 2 | 6 reps | 4 reps | 2 reps |
| Set 3 | 4 reps | 2 reps | 1 reps |
| Set 4 | 7 reps | 5 reps | 3 reps |
| Set 5 | 6 reps | 4 reps | 2 reps |
| Set 6 | 4 reps | 2 reps | 1 reps |
Pyramid loading
The pyramid schemes are somewhat outdated but can still be used when training for muscle size (not so much when training for strength). In a regular pyramid you start with a higher number of reps and a lesser amount of weight and with each set you increase the weight while reducing the reps. In an inverted pyramid you do the opposite: you start with a heavy weight for few reps and decrease the load with each set while increasing the reps.
In a double pyramid you start like a regular pyramid: you start with higher reps and decrease them for your next 2-3 sets then increase them again for your last set or two.
Here are some illustrations of what a pyramid pattern might look like:
Pyramid loading
Set 4 4 reps at 90%
Set 3
6 reps at 80%
Set 2
8 reps at 75%
Set 1
12 reps at 65%
Inverted pyramid loading
Set 4
10 @ 70%
Set 3
8 @ 75%
Set 2
6 @ 80%
Set 1
4 @ 90%
Double pyramid loading
Set 5 12 @ 65%
Set 4 6 @ 80%
Set 3
4 @ 90%
Set 2 6 @ 80%
Set1
12 @ 65%
There are two problems with pyramid loading schemes. They either:
- Cause too much fatigue to make the heavy set effective (regular pyramid scheme)
- Start heavy too soon, when the CNS is not properly activated (inverted pyramid)
The double pyramid, which is somewhat similar to wave loading, is less problematic and should be the preferred pyramid pattern if one chooses to use one.
Flat pyramid loading
This method is somewhat similar to regular pyramid loading in that the load is progressively increased with each set. However the number of reps stays the same. This means that only the last 1-2 sets are actually true work sets while the other 2-3 are progressive warm-ups (they still have a training effect though). This is the type of loading scheme used by Dorian Yates among other. It is often believed that Yates trained using a HIT or Heavy Duty program in which one performs only one set of an exercise to failure. This is not so, Yates actually performed up to 5 sets of an exercise but only the last one was a true limit effort. This method is interesting when training in the functional hypertrophy zone because it allows one to get his CNS and muscles geared up for a limit effort gradually without causing too much fatigue (which would impair the limit effort).
However in most cases the “effective volume” (EV): the number of reps that are tough enough to cause an adaptation is too low. It is a nice change of pace when one has been doing high volume training for a long time though. For example, if a trainee has been on a high volume routine for 6-8 weeks, including 3-4 weeks of flat pyramid loading with a low volume of work will enable the body to recover from the previous bout of high volume work and a surcompensation effect will occur. This is called delayed adaptation. The following table illustrates what a flat pyramid scheme might look like:
| Set | Beginner | Intermediate | Advanced |
| Set 1 | 10 reps @ 50% | 8 reps @ 55% | 6 reps @ 60% |
| Set 2 | 10 reps @ 55% | 8 reps @ 60% | 6 reps @ 65% |
| Set 3 | 10 Reps @ 60% | 8 reps @ 65% | 6 reps @ 70% |
| Set 4 | 10 Reps @ 65% | 8 reps @ 70% | 6 reps @ 75% |
| Set 5 | 10 reps @ 70% | 8 Reps @ 75% | 6 reps @ 80% |
Plateau loading
Plateau loading is somewhat similar to pyramid loading except for two differences:
- There isn’t as many different steps
- More than one set is performed at each step
You basically perform different plateaux (2 to 4) each one having 2 sets at the same training load and reps. After a plateau you can start another one either of a higher intensity or of a lower intensity level. Here are some examples:
| Example of a simple progressive plateau | |||
| Set | Beginner | Intermediate | Advanced |
| Set 1 | 12 reps | 10 reps | 8 reps |
| Set 2 | 12 reps | 10 reps | 8 reps |
| Set 3 | 10 reps | 8 reps | 6 reps |
| Set 4 | 10 reps | 8 reps | 6 reps |
| Set 5 | 8 reps | 6 reps | 4 reps |
| Set 6 | 8 reps | 6 reps | 4 reps |
| Example of a simple regressive plateau | |||
| Set | Beginner | Intermediate | Advanced |
| Set 1 | 8 reps | 6 reps | 4 reps |
| Set 2 | 8 reps | 6 reps | 4 reps |
| Set 3 | 10 reps | 8 reps | 6 reps |
| Set 4 | 10 reps | 8 reps | 6 reps |
| Set 5 | 12 reps | 10 reps | 8 reps |
| Set 6 | 12 reps | 10 reps | 8 reps |
| Example of a double progression plateau | |||
| Set | Beginner | Intermediate | Advanced |
| Set 1 | 10 reps | 8 reps | 6 reps |
| Set 2 | 10 reps | 8 reps | 6 reps |
| Set 3 | 8 reps | 6 reps | 4 reps |
| Set 4 | 8 reps | 6 reps | 4 reps |
| Set 5 | 12 reps | 10 reps | 8 reps |
| Set 6 | 12 reps | 10 reps | 8 reps |
I personally prefer the double progression plateau because it allows you to be properly prepared for the heavier sets while not being too fatigued to perform well.
- Tempo of an exercise
First a little recap about tempo. Tempo simply means the rhythm at which you are performing an exercise. There are three principal ways of planning tempo:
-
- Not planning it at all … this is the “just lift the damn bar” school of thought. I personally think that when planning session geared at developing limit strength (thus using big weights) this is the way to go.
- Giving a general recommendation. In that case a movement’s phase can either be
- slow (4-5+ seconds), b) controlled (2-4 seconds), c) fast (1-2 second) or d) explosive (as fast as possible). In most cases the concentric/lifting portion of a movement should always be either fast or explosive while the eccentric/lowering phase should either be controlled or slow. The preceding applies when one is training to build muscle mass.
- Using a 3 or 4 digit number to precisely prescribe the movement rhythm. This method will be illustrated in a few moments. First I’d like to say that I’m not such a big fan of prescribing exact tempos. I find that it can hamper exercise performance as the trainee is focused on counting his tempo timing. I also find it unpractical because as the set progress and fatigue sets in, it might become impossible to continue the set with the prescribed tempo but it would be possible to perform a few more reps using a non-specific tempo. Should the trainee stops when he cannot respect the prescribed tempo even though he can still do some work? With beginners precise tempo recommendations might be good, as it forces them to control their movement. But once past the beginner stage I much prefer tempo method no.2.
Still, some peoples like the use the 3-4 digits tempo prescription so I might as well explain how it works anyway. First the 3 digit one, popularized by Charles Poliquin.
The 3-digits method is represented by a number such as 302 or 401 (these are just examples). Each of the three digits represents the length in seconds of one phase of the exercise. The first digit represents the length of the eccentric (lowering) phase the second
represents the length of the pause between the act of lowering and lifting the weight while the third digit represents the length of the concentric (lifting) phase. For example:
3 1 2
TEMPO
Transition in 1 sec.
Eccentric in 3 sec.
Concentric in 2 sec.
The 4-digits method is very similar except for the addition of a fourth digit indicating the time interval between the completion of a repetition and the beginning of a new one. The first three digits mean the same thing as in the 3-digits method. For example:
Transition in 1 sec.
4 121
TEMPO
Transition in 1 sec.
Eccentric in 4 sec.
Concentric in 2 sec.
Besides the limitations presented above there is yet one more difficulty when it comes to the “digits” methods of tempo prescription.
The first number refers to the eccentric portion of the movement, not necessarily the phase which comes first in the exercise and the third number refers to the concentric portion, not necessarily the third phase of the exercise.
Take the lat pulldown for example: the concentric phase comes first in the movement (not the eccentric phase) while the eccentric phase is third (instead of being first). A 301 tempo could be confusing to some trainees: do I execute the first phase (concentric) in 3 seconds or is it in 1 second? Let me illustrate:
1st phase : concentric 2nd phase : transition 3rd phase : eccentric
If we were to prescribe the tempo according to the order of the phases it might look something like 103 when in reality we should write down 301 because the digits are not ordered based on which phase comes first but rather by eccentric phase (first digit), transition (second digit), concentric phase (third digit). It thus becomes obvious how confusing it can become for a beginner to training.
That having been said, exercise tempo can be an important variable when training for hypertrophy (muscle size) because it can greatly change the training stimulus, especially when talking about the length/speed of the eccentric phase of the movement.
When training for size gains, an individual should always try to lower the weight slowly or under control (so 3-6 seconds) but attempt to lift it as fast as possible. This way we maximise the time under tension factor by increasing the length of the eccentric phase and we maximise intramuscular tension by increasing the force output during the concentric portion of the lift (by increasing the acceleration factor). You thus get a double growth stimulus!
- Length of the rest intervals
When training only for muscle growth you should always aim to reduce the length of the rest intervals so that you’ll increase the density of your training. This is the trigger to several growth producing and fat burning hormonal responses. Still, you don’t want to
take rest intervals that are so short that you must decrease the weights you are using. When training for hypertrophy you should start with rest intervals ranging from 60-120 seconds gradually working your way down to 30-45 seconds over time.
Obviously when training for strength or power this is not sufficient as we want to use long enough rest intervals so that both the muscles and nervous system are recovered. This normally requires 3-5 minutes.
6. Exercise selection
There are literally hundreds, if not thousands, of exercises to choose from when one decides to build up his body. There are also numerous apparatus on which one can train: barbell, dumbbells, kettlebells, variable resistance machines, plate loaded machines, cable/pulley stations, etc. So it’s no wonder that most trainees can be overwhelmed or even confused when it comes to choosing the proper exercises.
- Machines vs. free-weights
This has been a debate for as long as training machines have hit the market. For more than 40 years training fanatics have been arguing about the superiority or machines over free-weights and vice-versa. Both sides seem to have valid arguments; the machine camp argue that machines are safer because it’s a controlled environment and are just as effective as free-weight because the muscles cannot make the difference. Well, first of all the “safety” issue is not entirely true; machines are not necessarily safer than free- weights. Sure you reduce the risk of injury causes by a loss of control of the bar. There is a trade-off however: machines, by locking you in a constant movement pattern, greatly increase the risk of overuse injuries. One is not safer than the other. Any type of work against an external resistance carries its risks. So that argument by pro-machines is moot.
Free-weights do offer several advantages over machines:
-
- They require the trainee to control the weight in a tri-dimensional space while machines guide your movement. So free-weights will improve special orientation, body control as well as strengthen the all important stabilization muscles. All of which are very important for athletes.
- Free-weights exercises tend to involve more supporting muscle groups than machines. Some will see this as a disadvantage (less muscle isolation) but in reality, if one wants to build a lot of muscle fast, it’s an advantage.
- Free-weights give you the possibility to perform many exercises while with machines you are normally limited to 1-2 movement per station.
That’s not to say that machines don’t have their place in a training program. While most compound (multi-joints) exercises should be performed with free-weights, some isolation work can be performed on machines or a cable/pulley station. Since these last two apparatus are almost stress-free on the nervous system, they allow a trainee to increase his training volume without risking CNS overload.
- Multi-joints vs. isolation
What is best when trying to build a muscular physique? Using only multi-joints exercises (bench press, squat, deadlift, barbell rowing, military press, etc.) or only isolation exercises? Some will say (rightly so) that you cannot build a lot of muscle mass by performing only isolation work while others will argue (also correctly) that performing only multi-joints movements might neglect some areas and overdevelop some others leading to a powerful but not necessarily aesthetic physique.
Both sides are right! If you want to build a very muscular physique there is no way around it: you must base your training on multi-joints exercises. However since these exercises involve multiple muscle groups at the same time, it’s possible to overdevelop some muscles groups while others are left relatively un-stimulated. This is because the body will always rely on its strengths to perform a certain task. If you have very strong deltoids and triceps but a relatively weaker chest and you are performing a set of bench press, your body will rely on the shoulders and triceps to do most of the work while the pectorals will not be fully stimulated. Multi-joints movements have a tendency of accentuating muscle imbalances. So if your quest for that muscular and aesthetic physique you will have to add some isolation work for your weakest body parts so that they can be brought up to par with the rest of your body.
So the take home message is:
Multi-joints free-weight exercises should be the bulk of your training program. To that you can add assistance isolation exercises performed with free-weights and auxiliary isolation exercises performed on machines or cable/pulley station.
CHAPTER 7
Blocks of training
In this chapter …
- Blocks of training: periodization for dummies
- Block training for athletes
- Block training for bodybuilders
“Training blocks: Periodization for Dummies”
When the words “periodization of training” are spoken, it’s likely that you’ll end up with a room full of confused faces and blank stares. For some odd reason, there’s this stigma of complexity that surrounds periodization. Many western authors are to blame because they make it look much harder than it actually is. Most of the time they will do so because they want to showcase just how much they know, and how much research they did. Great if you are lecturing to a room full of Ph.Ds in exercise physiology, not so good if you are trying to actually teach people how to train!
I personally like to make things simple. I believe that taking a complex matter and making it easy to understand is a sign of intelligence, much more so than taking a simple concept and making it sound like rocket science. Periodization of training is something simple, really! According to Freeman:
“Periodization is simply dividing an athlete’s training program into a number of periods of time, each with a specific training goal or goals. The heart of periodization is simple: make training an objective process”
Nowhere is it stated that periodization must use a lot of complex graphs and statistical analysis. And nowhere is it stated that there is only one way to periodize a training program. People seem to think that the only form of periodization is linear, going from a period of low intensity/high volume to a period of high intensity/low volume. Well, this form of periodization, linear periodization, has been seen as old news by its own creators for over 30 years! Yet many western “experts” still follow the dogma blindly.
What are training blocks?
Instead of a linear progression I prefer to use blocks of training. A block of training is simply a certain period of training that uses the same exercises, the same training means, and that has similar training objectives.
A training block should not be shorter than two weeks (or two microcycles of 5-10 days). A period shorter than that cannot lead to significant, chronic, positive adaptations. Generally a training block will either be 4 weeks in length or 8 weeks for a “double block”.
Each training block is its own functional unit, meaning that you plan each training block individually. Several blocks can be planned in advance, but when you do so you only plan the individual training sessions one block at a time. You may establish the goals of 4-6 blocks in advance, but the specific training to be used is planned 4 weeks, or 1 block, at a time. This will allow the coach to adjust the program according to how the athlete responds. During a block the loading schemes change every week. However the exercises stay the same for the whole block. You change exercises with the start of each new block. You have four different loading schemes possible in block training:
- Introductory loading: This is where you introduce the athlete to the training methods and exercises that will be used in the whole training block. The volume and intensity is low because all we want is to establish the current level of the athlete and to get him used to the exercises being used.
- Base loading: In this portion of the block the volume of training is maximal. The objective is to perform a very large amount of work, as much as the athlete/bodybuilder can tolerate. The fact that more sets are used will lead to more structural adaptations.
- Shock loading: If the base loading week is based on a lot of volume, the shock loading portion is based on using a lot of intensity. The volume is lowered somewhat, to around 70-80% of that of the base week. But the loads used are higher. The fact that more intensity is used will lead to more functional adaptations.
- Unloading/Test: This is planned at the end of a training block and is used to test how much the athlete progressed and help decide on the upcoming block. The test is planned for the 5th day of the week. On this day you will test your maximum on 3-4 different exercises (if you compete you test your competitive movements). The first 4 days of the week use a very low volume, no more than 50-60% of the volume of the base week. The intensity is 5 to 10% inferior to the shock week, but maximal for the test day. After the test day you have two days of complete rest.
Block structure
The most basic and easiest block to use is the four-week block. With a four-week block you devote one week to each type of loading. This is the best way to develop optimum results with most athletes. Once again, understand that the exercises used stay the same during the whole duration of the block, but you change exercises each time you change blocks.
The most effective training block is as follows:
Week 1: Introduction loading
Week 2: Base week
Week 3: Shock week
Week 4: Unloading and test
Here are a few blocks that I like to use:
Athletic/Strength block for a very efficient nervous system Week 1: 3 x 5 (80-85% of max)
Week 2: 3 x 5 (80-85% of max), 3 x 4 (85-90% of max)
Week 3: 3/2/1/3/2/1 (90% / 95% / 100% / 92% / 97% / 102%)
Week 4: 3 x 3(85-90% of max) for the first 4 days, test on the 5th day
Athletic/Strength block for a lesser nervous system Week 1: 3 x 8 (77-82% of max)
Week 2: 3 x 8 (77-82% of max), 3 x 4 (85-90% of max)
Week 3: 5/3/2/5/3/2 (85% / 90% / 95% / 87% / 92% / 97%)
Week 4: 3 x 6(80-85% of max) for the first 4 days, test on the 5th day
Those are the two basic cycles I use with most of my athletes in the off-season and it has been shown to bring great strength and power gains. However, this is for athletes and strength development. For bodybuilding purposes the same approach can be used and it becomes:
Bodybuilding block for fast-twitch dominant/easy gainers Week 1: 3 x 8
Week 2: 3 x 8, 3 x 6
Week 3: 7/5/3/7/5/3
Week 4: 2 x 6, 2 x 3
Bodybuilding block for mixed fibers/average gainers Week 1: 3 x 10
Week 2: 3 x 10, 3 x 8
Week 3: 8/6/4/8/6/4
Week 4: 2 x 8, 2 x 5
Bodybuilding block for slow-twitch dominant/hard gainers Week 1: 3 x 15
Week 2: 3 x 12, 3 x 10
Week 3: 10/7/5/10/7/5
Week 4: 2 x 10, 2 x 6
You’ll notice that I did not give percentages for the bodybuilding blocks, that’s because when planning a bodybuilding training I recommend using a load close to your best (for the plan number of reps) at all sets.
The workouts
With blocks of training I like to use 4 sessions per week. Depending on the type of client I will use one of the following schedules:
Athlete
Day 1: Lower body Day 2: Upper body Day 3: Off
Day 4: Lower body Day 5: Upper body Day 6: Off
Day 7: Off
Bodybuilder
Day 1: Chest and back Day 2: Legs and abs Day 3: OFF
Day 4: Biceps and triceps
Day 5: OFF
Day 6: Anterior/medial deltoid and rear deltoid
Day 7: OFF
The exercises
At each workout 4-5 exercises should be used, each of the exercises respect the loading (sets, reps, and intensity) guidelines for the week. A good exercise selection could go something like this (these are just suggestions):
Athlete
Day 1: Full back squat, Romanian deadlift, 1-leg back extension, lunges
Day 2: Bench press, incline press, push press, barbell rowing, seated rowing/chins
Day 4: Power snatch from blocks, power clean from blocks, front squat, jump squat (light)
Day 5: Push jerk, ballistic bench press (light), overspeed chins (with partner help), 1 arm rowing
Bodybuilder
Day 1: Low incline dumbbell bench press, flat flies, dips, seated rowing, barbell rowing
Day 2: Full back squat, lunges, Romanian deadlift, leg curl, abdominal work
Day 4: Zottman curl, hammer curl, preacher curl, overhead cable triceps extension, EZ- bar lying triceps extension
Day 6: Alternate dumbbell shoulder press, incline lateral raises, 1-arm cable lateral raises, Bent press, bent over lateral raises
These are the exercises for one block of training, the exercises should change after the 4 weeks. Obviously, these are just examples of possible exercise choices. You can use equivalent exercises if you feel more comfortable with other choices.
Changing blocks
When you change blocks you must first choose new exercises. You do not have to use all new exercises at each block, but it’s best to change at least 3 out of 5 for optimum results. The amount of reps, sets and intensity can vary depending on the goal of the athlete. The guidelines I gave are those of my “workhorse” blocks; those that I will use most of the time. However there are some times where I will use more volume or more intensity depending on the needs and capacities of the athlete. If you understand the structure of a 4-week block you can easily manipulate volume and intensity according to the needs of the athlete while still respecting the basic principles of block loading.
Block objectives
As I mentioned, during a block the goal(s) is/are stable. Meaning that one block might be devoted to strength development (strength block), another one to power development (power block), another one to speed development (speed block), and yet another one to hypertrophy (hypertrophy block). Now, just because a certain quality is emphasized during a block doesn’t mean that you do not include work for other capacities. Even during a phase where there is a certain emphasis you still try to maintain (or even improve) other physical capacities.
But generally speaking each training block should only have one general objective. And depending on what type of activity an athlete does, the correct arrangement of the blocks will vary. I will briefly discuss each type of block as well as give you the proper block sequence depending on the type of athlete.
Types of blocks
There are three general block divisions, each having several types of blocks. The divisions are: special-strength work, track work, and sport work. For the purposes of this book only the first division of blocks will be explored.
The special-strength work category can have several types of blocks. The most common being: strength block, power block and hypertrophy block.
Strength block: A strength block is also called “concentrated strength loading.” Meaning that a large volume of work is dedicated to improving limit strength in all of the muscle groups. During this type of block, strength work will constitute around 75% of the total training volume while 15% will be dedicated to power work and 10% to hypertrophy.
Power block: A power block can also be called “conjugated-sequencing loading.” This means that you use a wide array of training methods situated on the whole force spectrum (see the chapter on training methods for a complete listing of these methods) with an emphasis on ballistic work, speed-strength and strength-speed work. During this phase power exercises comprise 50-70% of the training volume while limit strength work accounts for 20-30% and hypertrophy work for 10-20%.
Hypertrophy block: The hypertrophy block is also termed a “structural block.” Quite simply, the objective is to increase the size of the muscular structures (muscle and tendons). During this phase, high-volume/controlled eccentric and isolation exercises are used a lot. Basically, it includes the most effective bodybuilding methods (see the chapter on bodybuilding tips for some ideas). 50-70% of your training volume is spent on hypertrophy work, limit strength work accounts for 20-30% and power work for 10-20%.
Arrangement of blocks
Different types of athletes will benefit from different block arrangements. This is especially true if one compares bodybuilders with most types of competitive athletes. The following sequencing of blocks is a good starting point:
Bodybuilder
| Block 1 | Block 2 | Block 3 | Block 4 | Block 5 | Block 6 |
| Strength | Hypertrophy | Hypertrophy | Strength | Hypertrophy | Hypertrophy |
Powerlifter
| Block 1 | Block 2 | Block 3 | Block 4 | Block 5 | Block 6 |
| Hypertrophy | Strength | Strength | Power | Strength | Strength |
Olympic lifter
| Block 1 | Block 2 | Block 3 | Block 4 | Block 5 | Block 6 |
| Hypertrophy | Strength | Power | Strength | Power | Power |
Anaerobic athlete (e.g. hockey or football player)*
| Block 1 | Block 2 | Block 3 | Block 4 | Block 5 | Block 6 |
| Hypertrophy | Strength | Power | Hypertrophy | Strength | Power |
*This obviously excludes track and sport divisions which also play an important part in the planning process.
Conclusion
Obviously training planning, or periodization, can be more complex than that. But I believe that block training is an easier way to periodize one’s training. It is a much simpler method than a lot of other schemes and thus it makes periodization available to almost everybody.
By its simplicity this approach is sure to bring you optimal results. We know that periodization is one of the keys to optimal athletic performance; however, few really understand how to design a periodized program. With block training you can have access to the benefits of periodization without the complexity! It’s a win-win situation!
CHAPTER 8
Planning intensity
In this chapter …
- Selecting the proper intensity bracket for your goals
- Proper intensity for various types of exercises
“Intensity, intensiveness, and intense”
There are a lot of conflicting definitions of intensity. In some places you will find training intensity defined at the percentage of the maximum capacities. In others it will be equated to the amount of muscle fatigue produced by a set. Yet other sources will claim that intensity is associated with “the burn.”
One must make the distinction between training intensity, training intensiveness, and being intense. Training intensity refers to the load used compared to what you can use at your best. For example if you can bench press 400lbs for one rep and you are using 300lbs for your set you are working at an intensity level of 75% (300 x 100 /400). This is the official and accepted scientific definition of training intensity; it has nothing to do with muscle fatigue or the subjective feeling of training hard.
Intensiveness would refer to methods which cause a lot of fatigue (e.g. drop-sets, supersets, etc.). These methods are said to be intensive, however the intensity of the load is not necessarily high in the true sense of the word.
Being intense is a subjective feeling of how hard you are training and should not be confused with intensity.
When planning the training of athletes or bodybuilders you must always use the scientific definition of intensity. You do not have to use percentages though; the RM system is more adequate in my opinion. The RM system means that you should use as much weight as possible for a set number of reps. For example an intensity level of 6RM means a load that you can do 6 times (but not 7) in good form. This form of intensity planning is superior to the percentage system because it is autoregulating. Autoregulating means that the training intensity is adapted to your current capacities. If you were to use a percentage planning system and it calls for 3 x 6 at 80%, on a good day it can actually be too easy to give you optimal stimulation, while on other days, if you are tired or sick, it will be too heavy and you won’t actually be able to complete the sets. By using a 3 x 6RM planning, the training load is adjusted to your current capacities, which ensures optimal, but not excessive stimulation.
Another problem with the percentage system is that slow-twitch dominant and fast-twitch dominant individuals cannot perform the same number of reps at any given percentage. For example, 3 x 6 at 80% will be very easy for a slow-twitch dominant individual but almost impossible to a fast-twitch very dominant. As you can now see, the RM system is much better and makes training planification that much easier.
Still, some people like to use percentages. I use them myself sometimes for guideline purposes. Charles Poliquin had a rep/percentage chart in his “Poliquin Principles” book. While it was good, it was based on the average guy. It did not take into account that depending on the individual’s fiber dominance the percentages for each rep range will vary.
Here is a modified chart based on the most recent findings as well as the info presented earlier in the book:
| Number of Reps | % for Fast- twitch dominant | % for Balanced fiber ratio | % for Slow- twitch dominant |
| 1 | 100% | 100% | 100% |
| 2 | 92% | 95% | 98% |
| 3 | 87% | 90% | 96% |
| 4 | 82% | 87% | 94% |
| 5 | 79% | 84% | 92% |
| 6 | 76% | 83% | 90% |
| 7 | 73% | 80% | 88% |
| 8 | 70% | 77% | 86% |
| 9 | 67% | 74% | 84% |
| 10 | 64% | 71% | 82% |
| 11 | 61% | 69% | 80% |
| 12 | 58% | 67% | 78% |
| 13 | 55% | 65% | 76% |
| 14 | 52% | 63% | 74% |
| 15 | 50% | 61% | 72% |
| 16 | 48% | 59% | 70% |
| 17 | 46% | 57% | 68% |
| 18 | 44% | 55% | 66% |
| 19 | 42% | 53% | 64% |
| 20 | 40% | 52% | 62% |
| 21 | 39% | 51% | 61% |
| 22 | 38% | 50% | 60% |
| 23 | 37% | 49% | 59% |
| 24 | 36% | 48% | 58% |
| 25 | 35% | 47% | 57% |
Christian Thibaudeau, 2003
As you can see in this table, utilizing percentages is not as effective as using the RM system because of the large variability of the results depending on the athlete’s fiber type. However if you like to use percentages to plan your training I suggest that you use this table instead of the old one. At least you can tailor it to your (or your athlete’s) fiber dominance.
Intensity of the load for various types of exercises
The actual intensity to use is greatly influenced by the type of exercise you are using. Using 60% on the squat will probably be a breeze while it will probably get you killed if you use the same load on the jump squat.
| Type of exercise | Low intensity | Moderate intensity | High intensity | Very high intensity |
| Ballistic exercises
(jump squat, ballistic bench press, etc.) |
5-10% of
maximum corresponding full lift (e.g. jump squat = back squat, ballistic bench = bench press) |
10-15% | 15-20% | 20-25% |
| High acceleration classic exercises
(speed squat, speed bench) |
50% | 55% | 60% | 65% |
| Olympic lifts | 40-65% | 65-80% | 80-90% | 90-100% |
| Classic strength exercises | 55-70% | 70-85% | 85-95% | 95-100% |
Now, depending on your goal you may select one or several intensity brackets to use in your training.
An athlete should use all 4 intensity zones in his yearly program, not necessarily all at once though.
A bodybuilder should spend most of his training time in the moderate and high intensity zones with an occasional cycle of very high intensity loading.
An Olympic lifter or powerlifter should stay in the high and very high intensity zones for most of their training year, with some low and moderate intensity sessions to allow for maximal recovery.
CHAPTER 9
Training frequency
In this chapter …
- Full recovery versus loading/unloading
- Ideal training splits for athletes
- Ideal training splits for bodybuilders
- How-to-make twice-a-day workouts work for you
- Ideal rest intervals
“Should I stay or should I grow?”
A lot of authorities have been saying that after every training session a muscle needs 48 hours to recover, so 3 training sessions per week are optimal. I don’t really know where that 48 hours figure comes from. Oh, it’s been around for quite some time (Bompa’s books, Supertraining and many others talk about it). But from what I can remember this is based on extensive endurance work research, not strength training.
If you think about it, the 48 hours rule doesn’t make much sense at all. If it were true then any training session would require 48 hours before full recovery is accomplished. This isn’t so. Some sessions will require 48 hours, others might only require 12-24 hours and some may take as much as 72 hours. From experience, most athletes can train at a level that require 24-48 hours before full recovery is achieved.
But this brings two other points that I’d like to address:
- Is constant “full recovery” necessary, or even advisable? It would seem logical to say yes. But the recent work of Verkhoshansky on concentrated loading indicate that a greater training effect can be achieved if the athlete never fully recovers during his loading weeks (first 3 weeks of a training block) and allowing a rebound adaptation during an unloading week (very low volume). Verkhoshansky indicated that the greater is the loss of capacities during the loading period (meaning imcomplete recovery during the training cycle) the greater will the rebound be after an a unloading week. So in that regard, only training when fully recovered is not optimal for the fastest gains. However, training without full recovery for more than 3-4 weeks is counterproductive. The real key is the succession of a loading phase and an unloading phase.
Using a succession of a 3 weeks high loading phase and a 1 week unloading phase
| Baseline | ||
| Loading period | Unloading period | Post-block period |
Allowing full recovery after each session
Training stress
Training stress
Baseline
- Is the 24-48 hours rules applicable to training the same muscles groups or the overall body? If one is to train the lower body on day 1 and upper body on day 2, even if there is less than 48 hours between both workouts is it possible to train with a high quality? You bet your ass that it is! That’s why with my athletes I use 4 weekly sessions. Two lower body sessions and two upper body sessions. There is 48-72 hours between both upper body sessions and 48-72 hours between both lower body sessions. However there will still be a systemic fatigue build-up (albeit lower than if you were to train the whole body at each time) which can trigger the rebound adaptation talked about earlier.
A very hot subject in the realm of Irondom is the number of training days per week should you devote to each muscle group when you want to gain as much muscle as possible. Some say train each muscle group once per week, others will say twice and some even recommend training each muscle group three times per week. Who’s right? Everybody is! However to progress optimally you must take some precautions when planning training frequency. The precautions will allow you to avoid the various pitfalls that await you.
First pitfall: Training too much and too often
You can either train a lot during a session or train often. Seldom can you do both! If you train a body part with a lot of sets and reps you will need more than a few days to recover. So somebody who likes to train a muscle group twice or three times per week should not use the same volume per session as someone who is only training each muscle group once per week. Simply put if you train with a high volume and do not give your body enough time to recover you will not progress. As you can see in the graphic, you only recover enough to avoid regressing but you do not have large gains.
Second pitfall: Not training enough or not frequently enough
If you have more than 5 days between workouts of a same muscle group you need to use a relatively large training volume per session. Why? Because if you allow too much rest for the stress you placed on your body, you will improve, but will soon return to baseline. This is called “involution”. If you allow too much rest between two training sessions for a same muscle group, you will loose much of your gains.
However the proper training frequency is dependant on the volume per session. If you use a very large training volume in one session you will not suffer from involution if you have 5-7 days between workouts for the same muscle group. On the other hand, as you increase the training frequency you must decrease volume. However if you choose to train each muscle group only once per week, the volume per session must be high. This is illustrated in the following graphic: during the training session your capacities diminish only to improve during the recovery period, but then the gains are lost because of involution/detraining.
Dividing volume not adding it
For maximum progress regardless of how many weekly sessions you have for each muscle group you should do the same weekly training volume. For example, if you do 120 total reps per muscle group per week you can do either 1 session of 120 total reps, 2 sessions of 60 reps or 3 sessions of 40 reps. When you add weekly training sessions do not double or triple total weekly volume, this will lead to stagnation.
The next three graphics shows how your body will react to properly planned once per week, twice per week and three times per week sessions.
- Properly planned once-per week session for each muscle groups
- Properly planned twice-per week sessions for each muscle groups
- Properly planned three times per week sessions for each muscle groups
How to plan volume
The following graphics illustrate how to set up training volume depending on your fiber type dominance and the number of weekly workouts per muscle group.
Step 1. Selecting the appropriate weekly volume.
Step 2. How to divide the total weekly volume into sessions
Step 3. Selecting the proper training split
- If you train each muscle group once per week
First option:
Second option:
Third option:
- If you train each muscle group twice per week
First option:
Second option:
- If you train each muscle group three times per week
First option:
The take-home message
The important thing to remember is that the optimal training volume in a single session will vary depending on how many times you train each muscle group per week. If you train it once the volume per session must be very high to prevent involution. On the opposite side, if you train each muscle group three times per week the volume must be very low to prevent overtraining.
When properly planned, each type of frequency will yield great results. But beware of the pitfalls that wait to stop your progress dead in its track!
“Two of a kind: How to make twice-a-day workouts work for you”
I have a confession to make: I don’t really like being in the gym. That’s right, despite the constant attention from the many vixens there and my love for the iron game, I just can’t wait to get out of there! That’s why I personally love to train twice a day. Wait a minute, you just said that you hated being in the gym, then why train two times in one day? Well, using twice-a-day workouts allow me to use very short sessions each time. I prefer to do the same amount of work (or only slightly more) in two short sessions than in one big workout. There are several advantages to this:
- It’s harder to loose motivation, being in the gym for only 25-30 minutes doesn’t give you time to get bored!
- Your overall work quality is much higher. By splitting your workload in two daily sessions you are fresher for the second half of the workout, which means greater gains.
- You burn more calories. A recent study by Almuzaini et al. (1998) found that when the same volume of work is divided into two sessions, the total amount of calories burned is greater (mostly due to a higher, more sustained post-exercise oxygen consumption). So for individuals wanting to gain a lot of muscle, this will make it possible to eat more good food without gaining as much fat. And for individuals looking to get ripped, well, the advantage is self-evident!
- When you perform the same amount of work divided into two sessions you can recover faster from the workload and thus progress at a more rapid pace.
- Fast-twitch individuals and peoples with an efficient nervous system seem to respond much better to split training than to one, longer session.
- You can see twice as many vixens in the same day!
Now, twice-a-day sessions seem to be the Holy Grail and in some sense it can be. However it’s easy to abuse such a method. Many peoples will make the mistake of actually doubling their workload, doing two big sessions instead of two small ones. This is one of the fastest ways to stagnation. When doing twice-a-day sessions the first workout should be no longer than 30-40 minutes and the second one between 20 and 30 minutes in length.
Another classic mistake is to work on the same physiological facet in both sessions. To make the most out of twice-a-day sessions you should vary the type of demand you place on your body. I found that having a functional emphasis in the morning session and a structural emphasis in the evening session to be the best way to train.
A final mistake that peoples make is to work different body parts on each of the two sessions of a same day. This is a mistake. All it does is actually reduce the recovery time
that each muscle group receives (each muscle’s turn comes back faster). Furthermore, since you only use a very low volume of work at each session, doing different body parts on each session will actually reduce the training effect.
So how can I make it work for me?
If you respect the following guidelines you should benefit greatly from twice-a-day sessions, if you do not respect them, well, train at your own peril! :
- Train for no more than 30-40 minutes in the first session and no more than 20-30 minutes in the second.
- Train the same muscle in both daily sessions.
- Include more functional-oriented training in the first session of the day. This means heavier weights, more acceleration or more complex exercises.
- Include more structural-oriented training in the second session of the day. This means more volume, less weight and a slower tempo.
- Use a good post-workout drink after every session. The best product available is Surge for this purpose.
- Train each muscle only once a week. You can pair muscles groups and train 4 days per week or only work one muscle per day and train 6 days per week.
A sample program
This is an example on how you can structure twice-a-day training for maximum muscle mass gains. This routine will be effective for 4 weeks, after which you should change the exercises around.
Day 1: Upper back
AM workout
| Exercises | Sets | Reps | Tempo | Rest interval |
| Weighted chin-ups | 5 | 5 | 20X | 90 sec. |
| Barbell rowing | 5 | 5 | 201 | 120 sec. |
| Seated rowing | 4 | 8 | 201 | 90 sec. |
PM workout
| Exercises | Sets | Reps | Tempo | Rest interval |
| 1-arm dumbbell rowing | 3 | 12 | 302 | 60 sec. |
| Pullover | 3 | 15 | 302 | 90 sec. |
| Incline rear delt raise | 3 | 15 | 302 | 90 sec. |
Day 2: Chest
AM workout
| Exercises | Sets | Reps | Tempo | Rest interval |
| Bench press | 5 | 5 | 201 | 120 sec. |
| Low incline dumbbell press | 5 | 5 | 201 | 90 sec. |
| Weighted dips | 4 | 8 | 201 | 90 sec. |
PM workout
| Exercises | Sets | Reps | Tempo | Rest interval |
| Flat dumbbell flies | 3 | 12 | 301 | 60 sec. |
| Low incline dumbbell
flies |
3 | 15 | 301 | 90 sec. |
| Machine chest press | 3 | 15 | 301 | 90 sec. |
Day 3: Legs
AM workout
| Exercises | Sets | Reps | Tempo | Rest interval |
| Power clean from blocks | 5 | 5 | Explosive | 120 sec. |
| Full back squat | 5 | 5 | 201 | 120 sec. |
| Romanian deadlift | 4 | 8 | 201 | 120 sec. |
PM workout
| Exercises | Sets | Reps | Tempo | Rest interval |
| 1-leg back extension | 3 | 12 | 301 | 60 sec. |
| Lunges | 3 | 15 | 301 | 90 sec. |
| Leg curl | 3 | 15 | 301 | 90 sec. |
Day 4: Biceps
AM workout
| Exercises | Sets | Reps | Tempo | Rest interval |
| Preacher curl | 5 | 5 | 201 | 90 sec. |
| Hammer curl | 5 | 5 | 201 | 90 sec. |
| Cable curl | 4 | 8 | 201 | 90 sec. |
PM workout
| Exercises | Sets | Reps | Tempo | Rest interval |
| Zottman curl | 3 | 12 | 301 | 60 sec. |
| Dumbbell curl | 3 | 15 | 301 | 60 sec. |
| Machine preacher curl | 3 | 15 | 301 | 60 sec. |
Day 5: Shoulders
AM workout
| Exercises | Sets | Reps | Tempo | Rest interval |
| Push press | 5 | 5 | Explosive | 120 sec. |
| Bent press | 5 | 5 | 201 | 120 sec. |
| Dumbbell shoulder press | 4 | 8 | 201 | 90 sec. |
PM workout
| Exercises | Sets | Reps | Tempo | Rest interval |
| Incline lateral raise | 3 | 12 | 301 | 60 sec. |
| 1 arm lateral raise | 3 | 15 | 301 | 60 sec. |
| Cable front raise | 3 | 15 | 301 | 90 sec. |
Day 6: Triceps
AM workout
| Exercises | Sets | Reps | Tempo | Rest interval |
| JM press | 5 | 5 | 201 | 90 sec. |
| Close grip bench press | 5 | 5 | 201 | 120 sec. |
| ½ dips | 4 | 8 | 201 | 90 sec. |
PM workout
| Exercises | Sets | Reps | Tempo | Rest interval |
| V-bar cable pressdown | 3 | 12 | 301 | 60 sec. |
| 1 arm cable pressdown | 3 | 12 | 301 | 60 sec. |
| Overhead cable triceps extension | 3 | 15 | 301 | 60 sec. |
This is a schedule suited for individuals who obviously have a lot of time to train. It looks like a lot of work, and in a sense it is. However each muscle group will have 7 days to recover so you can progress, and progress very well on this schedule.
If you only want to train 3-4 days per week you can couple some muscles together, as long as you stay within the duration guideline.
Conclusion on twice a day workouts
Twice-a-day workouts are an advanced technique and it is not for everybody. But if done properly it is very effective and will allow you to gain a lot of muscle mass while staying leaner. If you want to try this technique I suggest that you start with a 4-weeks test drive to see how your body handles it. From there you can decide if you can thrive on this method. From experience, individuals with a short temper and a boiling character do very well on this method while more “stable”, calmer individuals benefit a bit less from twice- a-day workouts. But if it suits you, it will help you reach an important level of muscular development much faster than you thought possible.
“Ideal rest intervals”
Recently a lot of attention has been given to rest intervals. Some experts advocating short rest intervals to maximize the hormonal response to training or to get an athlete used to producing force while fatigued. Another group will prefer to use longer rest interval to allow for maximum muscle and nervous system recovery between sets so that performance can be maximized. So which one is it?
Well, once again it depends on your fiber dominance and your training goal! A slow- twitch individual will require less rest for a similar workload than a fast-twitch one. Somebody who trains to gain muscle mass will benefit from shorter rest intervals than someone training for strength and power. The following tables will be helpful.
Table 1. Adequate rest intervals for a mixed fiber type
| Type of adaptation | Recommended rest intervals | Effect of RI on physical
recovery |
Effect of RI on neural
recovery |
Effect of RI on hormonal
response |
Overall effect |
| Hypertrophy work | 60 seconds | Incomplete: important accumulation of muscle fatigue | Incomplete: some residual CNS fatigue | Important increase in growth hormone | Very effective at stimulating sarcoplasmic hypertrophy, increasing fat loss and good to increase nutrient uptake by the
muscles |
| 90 seconds | Incomplete: some accumulation of
muscle fatigue |
Complete | Significant increase in growth hormone | Very effective at stimulation total hypertrophy | |
| 120 seconds | Complete | Complete | Slight increase in growth hormone | Most effective at increasing functional hypertrophy with some significant
strength gains |
|
| Strength work | 120 seconds | Incomplete: some accumulation of muscle fatigue | Incomplete: important residual CNS fatigue | Slight increase in growth hormone and free testosterone | Good to increase strength- endurance and get more hypertrophy gains from
strength work |
| 150 seconds | Complete | Incomplete: some residual CNS fatigue | Slight increase in free testosterone | Possible up- regulation of the neural drive to
palliate for the residual fatigue |
|
| 180 seconds | Complete | Complete | Significant
increase in free testosterone |
Maximum effort
potential on each set |
|
| Power work | 180 seconds | Complete | Incomplete: important residual CNS fatigue | Slight increase in growth hormone and free testosterone | Hyper-activation of the nervous system via a significant potentiation
effect |
| 210 seconds | Complete | Incomplete: some residual CNS fatigue | Slight increase in free testosterone | Possible up- regulation of the neural drive to palliate for the
residual fatigue |
|
| 240 seconds | Complete | Complete | Significant increase in free
testosterone |
Maximal effort potential on each
set |
Table 2. Adequate rest intervals for a fast-twitch dominant type
| Type of adaptation | Recommended rest intervals | Effect of RI on physical recovery | Effect of RI on neural recovery | Effect of RI on hormonal response | Overall effect |
| Hypertrophy work | 90 seconds | Incomplete: important accumulation of muscle fatigue | Incomplete: some residual CNS fatigue | Important increase in growth hormone | Very effective at stimulating sarcoplasmic hypertrophy, increasing fat loss and good to increase nutrient
uptake by the muscles |
| 1200 seconds | Incomplete: some accumulation of
muscle fatigue |
Complete | Significant increase in growth hormone | Very effective at stimulation total hypertrophy | |
| 150 seconds | Complete | Complete | Slight increase in growth hormone | Most effective at increasing functional hypertrophy with some significant
strength gains |
|
| Strength work | 150 seconds | Incomplete: some accumulation of muscle fatigue | Incomplete: important residual CNS fatigue | Slight increase in growth hormone and free testosterone | Good to increase strength- endurance and get more hypertrophy gains from
strength work |
| 180 seconds | Complete | Incomplete: some residual CNS fatigue | Slight increase in free testosterone | Possible up- regulation of the neural drive to
palliate for the residual fatigue |
|
| 210 seconds | Complete | Complete | Significant increase in free
testosterone |
Maximum effort potential on
each set |
|
| Power work | 210 seconds | Complete | Incomplete: important residual CNS fatigue | Slight increase in growth hormone and free testosterone | Hyper-activation of the nervous system via a significant potentiation
effect |
| 240 seconds | Complete | Incomplete: some residual CNS fatigue | Slight increase in free testosterone | Possible up- regulation of the neural drive to palliate for the
residual fatigue |
|
| 270 seconds | Complete | Complete | Significant
increase in free testosterone |
Maximal effort
potential on each set |
Table 3. Adequate rest intervals for a slow-twitch dominant type
| Type of adaptation | Recommended rest intervals | Effect of RI on physical
recovery |
Effect of RI on neural
recovery |
Effect of RI on hormonal
response |
Overall effect |
| Hypertrophy work | 30 seconds | Incomplete: important accumulation of muscle fatigue | Incomplete: some residual CNS fatigue | Important increase in growth hormone | Very effective at stimulating sarcoplasmic hypertrophy, increasing fat loss and good to increase nutrient uptake by the
muscles |
| 60 seconds | Incomplete: some accumulation of
muscle fatigue |
Complete | Significant increase in growth hormone | Very effective at stimulation total hypertrophy | |
| 90 seconds | Complete | Complete | Slight increase in growth hormone | Most effective at increasing functional hypertrophy with some significant
strength gains |
|
| Strength work | 90 seconds | Incomplete: some accumulation of muscle fatigue | Incomplete: important residual CNS fatigue | Slight increase in growth hormone and free testosterone | Good to increase strength- endurance and get more hypertrophy
gains from strength work |
| 120 seconds | Complete | Incomplete: some residual CNS fatigue | Slight increase in free testosterone | Possible up- regulation of the neural drive to
palliate for the residual fatigue |
|
| 150 seconds | Complete | Complete | Significant
increase in free testosterone |
Maximum effort
potential on each set |
|
| Power work | 150 seconds | Complete | Incomplete: important residual CNS fatigue | Slight increase in growth hormone and free testosterone | Hyper-activation of the nervous system via a significant potentiation
effect |
| 180 seconds | Complete | Incomplete: some residual CNS fatigue | Slight increase in free testosterone | Possible up- regulation of the neural drive to palliate for the
residual fatigue |
|
| 210 seconds | Complete | Complete | Significant increase in free
testosterone |
Maximal effort potential on each
set |
As you can see any type of rest interval can have a positive effect on the training effect. The trick is to choose rest intervals that better suit the needs and goals of each exercise.
CHAPTER 10
Bodybuilding tips
In this chapter …
- Short tips that you can use in any training program to increase muscle mass
“And now for something completely different”
Phew! Those last few chapters sure were dense in information weren’t they? By now your head is either spinning out of control or you’re about to figure out the secret of the universe! Being the good guy that I am, I thought that I would give your brain a short break before we go on. Therefore, this section is going to be a little bit on the light side. I’m going to give you a few tips that may help you in your quest to gain more muscle.
How many times have I heard “to get bigger, simply increase the amount of weight you can lift during your sets,” I’ll tell you, plenty of times! Ironically most of the time it comes out of the mouth of a fat slob who will not get laid in the next century. The guy dresses like a bodybuilder but actually looks like a tubbybuilder! His training style is characterized by using way too much weight on his sets, using sloppy form. Oh, he can lift a lot of weight (if you can call it that) but he has a physique reminiscent of Homer Simpson, our favorite cartoon character.
On the other hand you will see some other guys, minding their own business, with a fantastic physique; huge rippling muscles, density to no end. Yet when you see them train they do not seem to heave as much iron as our plump friend from earlier. What gives? Well it turns out that our muscular chum has understood that quality of muscle contraction is often more important than the load used, when gaining muscle mass is concerned.
Now, I’m not diminishing the importance of using heavy weights; if you keep using those pink, fuchsia, and mauve weights forever chances are that you will develop about as much muscle mass as a coat rack. I do believe that phases of heavy lifting are necessary to stimulate maximum muscle gain. However, I also believe that increasing the quality of every single repetition of every single set is the absolute fastest way to a muscular physique.
Increasing the quality of each muscle contraction requires a lot of focus because you must truly concentrate on fully contracting the muscle during every inch of every set. I will recommend five simple methods to help you maximize training quality. I truly believe that using these methods when training for size (strength and power are another animal altogether) can cut in half the time it takes you to add a lot of muscle to your frame. Intrigued? Well read on!
Method 1: Maximal Static Contraction (MSC)
Don’t worry, I’m not talking about that goofy “Power Factor” method in which you are supposed to grow like a weed using only partial repetitions (the authors themselves must have been inhaling the above-mentioned weed). What I am talking about is maximizing intramuscular tension during the whole contraction. One way to do so has long been known as “the peak contraction” (or Weider principle no.24721). It’s quite simple. In the fully contracted portion of the range of motion you must flex your muscle as hard as
possible (maximum static contraction) and hold that contraction for 2-3 seconds. You must contract so hard that your muscle is almost cramping! This maximal contraction greatly increases the average intramuscular tension during the set because you can generate more force in a maximal static contraction than during a sub-maximal (and even maximal) concentric contraction. When training for size you should include this maximal static contraction (MSC) on every rep of every set of your isolation exercises: compound movements (bench press, squats, deadlifts, etc.) do not lend themselves to this principle as well as isolation exercises.
Method 2: Constant maximal tension (CMT)
This method is closely related to the first one in that it also targets maximal intramuscular tension during the whole set. The premise of this method is relatively simple. During the whole range of motion you must flex your muscle as hard as possible. A lot of people (like our tubby buddy) simply heave the weight; as long as it goes up they feel that it’s a good rep. When training for size this way of doing things is not okay! To get a maximal hypertrophy stimulus you must contract your muscles as hard as possible during the whole range of motion. To do so, imagine that your whole set is one big pose down. You must use an intense focus to make sure that your muscle never relaxes one bit during the set. That means contracting hard on the concentric portion, contracting hard in the fully flexed position and contracting hard even as you lower the weight under control. Simply lifting and lowering the weight, even heavy weights, just won’t cut it as far a building a huge amount of muscle is concerned.
Method 3: Include some stretch movements
I’m not talking about regular stretching exercises, but rather lifting exercises in which the range of motion is very important and in which the target muscle is fully stretched at one point in the movement. Recent neuromuscular research has found that the nervous system will activate more motor units in a muscle following a stretch. I’m not only talking about the stretch (or myotatic) reflex, but rather the effect of controlled stretching of a muscle on its activation. If you can innervate more motor units, more muscle fibers will receive a growth producing stimulus making your progress that much faster.
To apply this method you should include at least 2-3 full range of motion exercises for each muscle and really stretch out at the beginning of each rep, you must feel a stretch in the target muscle for this technique to be effective.
On top of increasing muscle activation, there is some evidence that loaded stretching (as in this method) is a powerful muscle hypertrophy and hyperplasia stimulus. It is theorized that this might be due to fascia stretching or an important tension on the stretched muscle fibers.
Method 4: The importance of the pump
I’m going to kick a sacred cow here. If all you want is to gain quality muscle size, and lots of it, achieving a good pump is important. A lot of people will argue that a pump is not necessary to stimulate growth. They’re right! To stimulate growth it’s not necessary. But to stimulate maximal growth it certainly is!
Understand that during a pump the blood flow to the specific muscle being worked is greatly increased. Provided that you are smart people and read John Berardi’s stuff on pre-workout nutrition you will have a lot of amino acids floating around in your blood stream. Well guess what? An increased blood flow to a specific muscle will increase the amount of amino acids being pumped into that muscle and it will significantly increase amino uptake. This means a much greater anabolic (muscle building) response from training.
This doesn’t mean that you should go for a maximal pump on all sets of all exercises. But I do find that including a “pump set” at the end of a workout for a specific body part greatly increases the rate of muscle gain. My favorite method to achieve a great pump is extended sets (extreme drop sets). So one could focus on heavier weights early on in the training session and work up to more “pump stimulating” methods in the last portion of the workout.
Method 5: Include some heavy lifting
As I mentioned in methods 1 and 2, the load is not the most important factor in stimulating hypertrophy; the quality of the execution of a movement is actually more important then the load. That having been said, including some form of heavy lifting periodically in a bodybuilding program is necessary for maximal gains. It increases neural efficiency, which means that when you get back to your normal bodybuilding routine you will be able to recruit and stimulate more muscle fibers for the same exercise. Obviously this will lead to more growth. It is my experience that after a period of focusing on strength, the gains from a subsequent bodybuilding program are a lot more important than if only a bodybuilding program is followed year-round.
Method 6: Quality, quality, quality!
For maximum hypertrophy gains as many reps as possible must be high quality. Thus you must respect methods 1 and 2 as much as possible. This demands an intense focus, just standing there pumping away is a complete and utter waste of your time. You must focus on having a maximal contraction on every inch of every rep of every set. On top of providing for a greater hypertrophy stimulus, this will greatly enhance the mind-muscle link and will give you greater muscle control.
To recap …
In brief, follow these guidelines if you want to stimulate maximum size gains:
- Include a maximum static contraction in the fully contracted portion of isolation movements.
- Flex your muscles as hard as you can during every single inch of each and every rep.
- Some of your exercises should include a loaded stretch in the starting position.
- On your last exercise you should use whatever method you can to get as big a pump as you can.
- Despite all this advice, still include some heavy lifting in your training plan.
CHAPTER 11
Examples of bodybuilding
programs
In this chapter …
- Optimized Volume Training
- Insider Contrast Training
- Bench press specialization program
“Enough with the science Thibaudeau, show me something practical”
I will present several routine that I have used with my clients. This includes several effective bodybuilding programs. I have also included a complete 12 weeks off-season program that I have used with my football players. That program alone is around 27 pages, so you can’t say that you’re not getting your money’s worth!
“Optimized volume training”
Somewhere in the dreaded 1990s, around 1995 to be precise, the training world was introduced to a new form of bodybuilding training: German Volume Training. That article was written by an (at the time) up-and-coming star (Charles Poliquin) and really changed the way peoples train to gain mass. The premise was relatively simple: Pick a few exercises and do 10 sets of 10 reps. Simple, yes, but very effective.
However the program had some weaknesses. Some of which were pointed out in TC’s “German Volume Training 2000”. To name a few of those weaknesses:
- Possible overuse injuries from such a high volume of the same exercises.
- Very high level of boredom. Call me crazy, but for me to stay motivated I must have at least some fun in the gym!
- Not enough emphasis on some muscles and some muscle functions. With GVT you cannot use many exercises because of the sheer volume would be too much! As a result you might develop some muscle imbalances.
- This one is a new one: GVT neglects strength. In fact I’ve known several athletes who actually got weaker (in regard to their 1RM) on GVT even if they gained a lot of mass. The reason is that the super high volume, but low intensity causes mostly non-functional hypertrophy and doesn’t require an intense neuromotor involvement.
For these reasons, the second generation of GVT: GVT2K, was a step forward and still remains a top of the line bodybuilding program. However it’s the last weakness that got me thinking, experimenting and tinkering. That’s how I came up with a variation of volume training that will increase strength and functional hypertrophy alike. Enter Optimized Volume Training!
The overview
For OVT I kept the basic premise of doing 100 total reps per muscle group, as it’s a time proven approach. However the distribution of those reps is vastly different from the original GVT program.
First difference: Every set is in fact a superset of two exercises working the same muscle group(s). The first exercise in the superset is a big compound exercise (e.g. bench
press, squat, deadlift, rowing, even clean or snatch) and it’s done for 5 reps using as much weight as possible. The second exercise in the superset is an isolation exercise for the main muscle being worked in the first exercise. This second exercise is also done for 5 reps, but with a small load and a very slow tempo.
Second difference: While in GVT all the 10 sets were on the same exercise, we will employ two different supersets per muscle. Each superset being performed 5 times (50 total reps per superset). This will allow us to use 4 different exercises for a muscle group, which should take care of boredom and imbalances.
Third difference: In the original program the prescribed rest interval is 60 seconds. Since we want to be able to lift a bit more weight we’re going to take 120 seconds in OVT. But there is no rest between exercises in the same superset.
Training split
Because of the high demands of the program, each body part is only worked once per week. The following split is to be used:
Day 1: Chest and back Day 2: Legs and abs Day 3: OFF
Day 4: Biceps and triceps
Day 5: OFF
Day 6: Anterior/medial deltoid and rear deltoid
Day 7: OFF
While exercise selection can vary according to your preferences, the following has been proven very effective:
Day 1: Chest and back
| Exercise | Sets | Reps | Tempo | Rest intervals |
| A1. Bench press | 5 | 5 | 201 | None |
| A2. Flat dumbbell flies | 5 | 5 | 602 | 120 seconds |
| B1. Incline bench
press |
5 | 5 | 201 | None |
| B2. Incline dumbbell flies | 5 | 5 | 602 | 120 seconds |
| C1. Lat pulldown | 5 | 5 | 201 | None |
| C2. 1 arm rowing | 5 | 5 per arm | 602 | 120 seconds |
| D1. Bent-over barbell rowing | 5 | 5 | 201 | None |
| D2. Seated cable
rowing |
5 | 5 | 602 | 120 seconds |
Day 2: Leg and abs
| Exercise | Sets | Reps | Tempo | Rest intervals |
| A1. Front squat | 5 | 5 | 201 | None |
| A2. Lunges | 5 | 5 per leg | 602 | 120 seconds |
| B1. 1-leg back extension | 5 | 5 per leg | 201 | None |
| B2. Leg curl | 5 | 5 | 602 | 120 seconds |
| C1. Sumo deadlift | 5 | 5 | 201 | None |
| C2. Romanian deadlift | 5 | 5 | 602 | 120 seconds |
Abs are done according to individual preferences.
Day 4: Biceps and Triceps
| Exercise | Sets | Reps | Tempo | Rest intervals |
| A1. Barbell curl | 5 | 5 | 201 | None |
| A2. Dumbbell curl | 5 | 5 | 602 | 120 seconds |
| B1. Preacher curl | 5 | 5 | 201 | None |
| B2. Hammer curl | 5 | 5 | 602 | 120 seconds |
| C1. Weighted dips | 5 | 5 | 201 | None |
| C2. Decline
triceps extension |
5 | 5 | 602 | 120 seconds |
| D1. Lying triceps extension | 5 | 5 | 201 | None |
| D2. Cable pressdown | 5 | 5 | 602 | 120 seconds |
Day 6: Anterior/medial deltoid and posterior deltoid
| Exercise | Sets | Reps | Tempo | Rest intervals |
| A1. Military press | 5 | 5 | 201 | None |
| A2. Incline lateral raise | 5 | 5 | 602 | 120 seconds |
| B1. Alternate dumbbell
shoulder press |
5 | 5 | 201 | None |
| B2. Cable front raise | 5 | 5 | 602 | 120 seconds |
| C1. Seated cable row to neck | 5 | 5 | 201 | None |
| C2. Incline rear delt raise | 5 | 5 | 602 | 120 seconds |
Changing the exercises
Exercise variation is important. For OVT I recommend using blocks of 4 weeks of training. Perform the same exercises for 4 weeks, then choose other exercises and complete another 4 weeks block. A complete cycle of OVT lasts 8 week. After which you should engage in an easier form of training for 1-2 weeks to allow for the maximal delayed effect.
Here is the second 4 weeks block:
Day 1: Chest and back
| Exercise | Sets | Reps | Tempo | Rest intervals |
| A1. Low incline dumbbell press | 5 | 5 | 201 | None |
| A2. Low incline dumbbell flies | 5 | 5 | 602 | 120 seconds |
| B1Weigthed dips | 5 | 5 | 201 | None |
| B2. Flat dumbbell flies | 5 | 5 | 602 | 120 seconds |
| C1. Pullover | 5 | 5 | 201 | None |
| C2. 1 arm cable rowing | 5 | 5 per arm | 602 | 120 seconds |
| D1. T-bar rowing | 5 | 5 | 201 | None |
| D2. Seated cable rowing | 5 | 5 | 602 | 120 seconds |
Day 2: Leg and abs
| Exercise | Sets | Reps | Tempo | Rest intervals |
| A1. Front squat | 5 | 5 | 201 | None |
| A2. Step-ups | 5 | 5 per leg | 602 | 120 seconds |
| B1. Natural glute- ham raise | 5 | 5 | 201 | None |
| B2. Leg curl | 5 | 5 | 602 | 120 seconds |
| C1. Deadlift | 5 | 5 | 201 | None |
| C2. 1-leg deadlift | 5 | 5 per leg | 602 | 120 seconds |
Abs are done according to individual preferences.
Day 4: Biceps and Triceps
| Exercise | Sets | Reps | Tempo | Rest intervals |
| A1. EZ bar curl | 5 | 5 | 201 | None |
| A2. Zottman curl | 5 | 5 | 602 | 120 seconds |
| B1. Preacher curl | 5 | 5 | 201 | None |
| B2. 1 arm cable curl | 5 | 5 per arm | 602 | 120 seconds |
| C1. Overhead rope triceps
extension |
5 | 5 | 201 | None |
| C2. 1-arm cable triceps pressdown | 5 | 5 per arm | 602 | 120 seconds |
| D1. Lying triceps extension | 5 | 5 | 201 | None |
| D2. Cable
pressdown |
5 | 5 | 602 | 120 seconds |
Day 6: Anterior/medial deltoid and posterior deltoid
| Exercise | Sets | Reps | Tempo | Rest intervals |
| A1. Push press | 5 | 5 | 201 | None |
| A2. 1-arm lateral raise | 5 | 5 per arm | 602 | 120 seconds |
| B1. Standing dumbbell
shoulder press |
5 | 5 | 201 | None |
| B2. Barbell front raise | 5 | 5 | 602 | 120 seconds |
| C1. Seated cable
row to neck |
5 | 5 | 201 | None |
| C2. Incline rear delt raise | 5 | 5 | 602 | 120 seconds |
Load progression
One of the keys to OVT success is the constant drive to increase the load on the first exercise of all supersets from week to week. This will literally make or break the program! Strive to increase the load but not at the expense of proper form! For the second exercise of each superset, load progression is not as important, its role is mostly to increase training volume and total time under tension. If you can increase the load in this exercise, great! But as long as you are progressing on the heavy exercise you’ll be fine.
The important thing is to go as heavy as possible for the first exercise of a superset while using a light, controllable load for the second one.
Conclusion
I firmly believe that with OVT a new door has been opened as far as gaining size is concerned. Not only will it give you a lot of new muscle, that new muscle will be functional and you’ll have the strength to go with your size!
“Variable load sets: How to gain size, strength and speed all at once”
Now I’m going to present to you a relatively simple training technique along with two of its variants. It’s a method that’s very effective because it can target several different muscular and neuromuscular capacities at the same time. The method comes from the work of Gilles Cometti, a French sport scientist. Now, don’t go out screaming how there’s no strong Frenchmen! I must say that the method has been proven effective in several athletes. And if you can get past the Frenchman barrier, it will be very effective for you too!
The method is an adaptation of what’s known as contrast training which refers to alternating between a slow set and a high speed set. The new method is called Insider Contrast. Simply because you do not alternate between slow and fast sets, but between slow and fast reps. Read on, it’s not as crazy as you think!
Some logic
We know that slow and fast training can have drastically different training effects. And we also know that light and heavy loads promote different adaptations. Fast training has a more important neuromotor component than slow training and heavy training increases strength more so than light training. In the old school method an athlete/bodybuilder would alternate periods of various types of training to develop his power, size and strength. Well, by combining explosive reps with heavy, slow reps and light slow reps you can get it all in one time!
Furthermore, we also know that fast and slow exercises can lead to the recruitment of different muscles. An article by Dr.Tim Ziegenfuss (Short Topics no.2, T-mag issue 228) demonstrated how a fast curl increases biceps activation twice as much as the brachialis’ while a slow rep will have the opposite activation pattern.
The Big Kahuna of insider contrast training
This is my favourite variation of the IC method and it can develop power, strength and size all at the same time. Basically you do 2 reps with 85-90% of your max, followed by 3 explosive reps at 60% and by slow reps to failure with the same 60%.
An example could be:
| The Big Kahuna | ||
| Bench press (max 400lbs) | ||
| Rep | Load | Type of contraction |
| Rep no.1 | 340-360lbs (85-90%) | Maximum effort |
| Rep no.2 | 340-360lbs (85-90%) | Maximum effort |
| Rep no.3 | 240lbs (60%) | Explosive rep |
| Rep no.4 | 240lbs (60%) | Explosive rep |
| Rep no.5 | 240lbs (60%) | Explosive rep |
| Rep no.6 to failure | 240lbs (60%) | Slow tempo reps (312) |
This method is very effective for individuals wanting to add size, strength and power at the same time. With this method 3-5 sets per exercise should be used.
The painful extended variation
This variation of the IC method is truly an example of masochism! It is a great shock method to stimulate your body out of a plateau, but it should only used infrequently because it’s so hard on the body.
The progression is: 2 reps at 85-90%, 3 explosive reps at 60%, slow reps to failure at 60%, 3 explosive reps at 30%, slow reps to failure at 30%, static hold (sticking point) with 30%.
A set could look like this:
| The painful extended variation | ||
| Bench press (max 400lbs) | ||
| Rep | Load | Type of contraction |
| Rep no.1 | 340-360lbs (85-90%) | Maximum effort |
| Rep no.2 | 340-360lbs (85-90%) | Maximum effort |
| Rep no.3 | 240lbs (60%) | Explosive rep |
| Rep no.4 | 240lbs (60%) | Explosive rep |
| Rep no.5 | 240lbs (60%) | Explosive rep |
| Reps no.6 – 12 | 240lbs (60%) | Slow tempo reps (312) |
| Rep no.13 | 120lbs (30%) | Explosive rep |
| Rep no.14 | 120lbs (30%) | Explosive rep |
| Rep no.15 | 120lbs (30%) | Explosive rep |
| Rep no.16-20 | 120lbs (30%) | Slow tempo rep (312) |
| Rep no.21 | 120lbs (30%) | Static hold |
*Obviously the number of reps can change depending on where you reach failure.
This is a very intense method, one that should be used with care. Only 1-2 such sets are performed per exercise. The advantage of this method compared to the regular variation is that it will develop a little more muscle mass, more strength-endurance and power- endurance.
The lazy man’s insider contrast training
This variation is less painful but can still provide for a very powerful growth stimulus. I recommend this method as an introduction to insider contrast training as it’s easier to handle at first. You will still be able to develop good strength, size and power with this method.
A typical set will looks like this: 2 reps at 80%, 2 explosive reps at 50%, 2 reps at 80% and 2 explosive reps at 50%.
A set could look like this:
| The lazy man’s insider contrast | ||
| Bench press (max 400lbs) | ||
| Rep | Load | Type of contraction |
| Rep no.1 | 320lbs (80%) | Maximum effort |
| Rep no.2 | 320lbs (80%) | Maximum effort |
| Rep no.3 | 200lbs (50%) | Explosive rep |
| Rep no.4 | 200lbs (50%) | Explosive rep |
| Rep no.5 | 320lbs (80%) | Maximum effort |
| Rep no.6 | 320lbs (80%) | Maximum effort |
| Rep no.7 | 200lbs (50%) | Explosive rep |
| Rep no.8 | 200lbs (50%) | Explosive rep |
This form of IC training can be used for 3-5 sets easily. It is a great introduction to IC training and can provide for a very pleasing workout. For peoples simply interested in gaining a bit more strength, size and power this is certainly the best choice.
Can I periodize the approach?
Yes! A very good training cycle would look like this:
| Insider contrast block | |||
| Week 1 | Week 2 | Week 3 | Week 4 |
| Lazy man’s
4 sets of 4 exercises per session |
Big Kahuna
3 sets of 4 exercises per session |
Painful extended
2 sets of 3 exercises per session |
Regular training
2 sets of 10 reps for 4 exercises/session |
| Moderate difficulty | High difficulty | Very high difficulty | Low difficulty |
.
This is a typical progressive loading/unloading approach that has stood the test of time. It also provides for a great training variety and lots of pain!
I like to use an antagonist split for this method:
Day 1: Chest and back Day 2: Legs and abs Day 3: OFF
Day 4: Biceps and triceps
Day 5: OFF
Day 6: Anterior/medial deltoid and rear deltoid
Day 7: OFF
Obviously you can use a different split just as effectively.
Conclusion
This is yet one more weapon to add to your arsenal. A very hard, but powerful method which will bring you a lot of gains not only in muscle size, but also in physical capacities. Certainly a good option for somebody who wants it all!
“We have a lift off : Blast your bench press into outer space”
Hey man, how much do you bench? If you’ve spent any time at all in the gym and have a decent physique it’s likely that you’ve heard that one a million time already. It seems that sometime during the 70s or 80s it was decided that the bench press was going to be the reference in term of strength and manhood. As a guy who’s naturally much stronger in the lower part of my body I don’t necessarily like that bench press dogma. But a part of me just can resist having a big bench press … after all, we could all stand to be more manly couldn’t we?
Christian, you’re an olympic lifter, you might squat and clean a lot, but what do you know about building a big bench? Well my friend, it’s when you suck at something that you learn the most about it! Were I naturally gifted for the bench press everything would have worked. But since I’m not gifted, I had to experiment and find some special techniques than can make a huge difference.
The split
I’m suggesting an 8 weeks bench press specialization course. During that time bench pressing is going to be your number one priority. You will obviously perform other types of training, but mostly to maintain strength and size while blasting off your bench press.
The week is going to start and end with a bench press workout. The first workout of the week will be a high intensity session since your nervous system and muscles will be fresh from the weekend. The last workout of the week will be a high volume session to promote maximum supercompensation during the weekend.
On the bench press day, the triceps, pectorals and shoulders will be worked. So that leaves either 1 or 2 workouts to do back, biceps, abs and lower body.
The split might look like this:
A- 3 Workouts per week split Monday: Bench press high intensity, abs Tuesday: Off
Wednesday: Back, biceps, lower body Thursday: Off
Friday: Bench press high volume, abs Saturday: Off
Sunday: Off
B- 4 workouts per week split Monday: Bench press high intensity Tuesday: Back, biceps, abs Wednesday: Off
Thursday: Lower body, abs Friday: Bench press high volume Saturday: Off
Sunday: Off
Bench press high intensity workout
These workouts will generally revolve around lifting heavy weights on several movements. The goal is to train the CNS to handle and vanquish big loads. On this day you have one main exercise, one auxiliary exercise, one assistance exercise and one remedial exercise.
During the 8 weeks course you will have two training blocks lasting 4 weeks each. Both blocks have a similar structure, but the exercises will change.
Block 1: Week 1-4
Main exercise: 18” bench press
This is a semi-close grip bench press. The grip width is 18” (that is the width between both indexes when holding the bar). Lower the bar down to your lower chest and press it up in a straight line. On this exercise you do not control the tempo, the goal is simply to lift as much weight as possible for the prescribed number of repetitions.
| Week 1 | Week 2 | Week 3 | Week 4 | |
| Sets/ Reps | 3 x 5 | 3 x 5, 3 x 4 | 1 x 5, 1 x 3, 1 x 2
1 x 5, 1 x 3, 1 x 2 |
1 x 3, 1 x 2, 1 x 1
1 x 3, 1 x 2, 1 x 1 |
Auxiliary exercise: Static hold
The objective of this exercise is to get you used to holding very heavy weights at arms length. By holding sub-maximal weights you condition your nervous system and motor reflexes to accept this high form of loading and muscular tension. You see, you have an inhibitory reflex which is the “gift” of the Golgi Tendon Organ (GTO). When muscle tension is very high, it tells your muscles to stop producing force. This is a protective mechanism but in most individuals it is set too conservatively and can impair your lifting prowess. Reduced inhibition is one of the reasons why you see some small individuals handle big weights. So for this exercise you simply un-rack (with a partner) a load that is greater than your maximum and hold the load in the lock-out position for a certain period of time.
| Week 1 | Week 2 | Week 3 | Week 4 | |
| Sets/ Time | 3 x 10 seconds | 4 x 8 seconds | 5 x 6 seconds | 3 x 4 seconds |
| Load | 110% | 115% | 120% | 125% |
Assistance exercise: Bradford press
Start with the bar on your shoulders, press it just high enough so that it can clear the head and bring it to your clavicle. Press it just high enough so that it can clear the head and
bring it to the shoulders. That’s one repetition. This is a great exercise to develop the shoulders and the drive off the chest on a bench press.
| Week 1 | Week 2 | Week 3 | Week 4 | |
| Sets/ Reps | 3 x 5 | 6 x 4 | 4 x 3 | 2 x 5 |
Remedial exercise: Lying dumbbell triceps extension
Lie down on a bench, hold a dumbbell in each hand, arms fully extended, palms facing each other. Bring the dumbbells down with a flexion of the elbow only then bring them back up. For this exercise use a slow tempo, something in the line of 503 will do just fine.
| Week 1 | Week 2 | Week 3 | Week 4 | |
| Sets/ Reps | 3 x 10 | 5 x 8 | 3 x 6 | 2 x 10 |
That’s it for the first block as far as the high intensity workout is concerned.
Block 2: Week 5-8
This is the second exercises block and it’s performed after the first 4-weeks block. It’s also 4 weeks in duration.
Main exercise: 32” bench press
This is your regular bench press. The 32” is still the distance between your two index fingers when your hands are wrapped around the bar. Lower the bar down to your lower chest and press it up in a straight line. On this exercise you do not control the tempo, the goal is simply to lift as much weight as possible for the prescribed number of repetitions.
| Week 5 | Week 6 | Week 7 | Week 8 | |
| Sets/ Reps | 3 x 4 | 3 x 4, 3 x 3 | 1 x 4, 1 x 3, 1 x 2
1 x 4, 1 x 3, 1 x 2 |
1 x 2, 1 x 1, 1 x 1
1 x 2, 1 x 1, 1 x 1 |
Auxiliary exercise: ½ bench press (pin press in rack)
On this exercise you still continue to stress the CNS by using an overload (load higher than your max) but you add a dynamic facet by making it an half lift. Start the bar so that you have approximately 8” left for the lock out (or just a bit higher than your sticking point). Start the bar off the pins and press it up. Lower it all the way to the pins, rest 1-2 seconds than perform the next rep.
| Week 5 | Week 6 | Week 7 | Week 8 | |
| Sets/ Reps | 3 x 5 | 6 x 4 | 4 x 3 | 3 x 2 |
| Load | 105% | 110% | 115% | 120% |
Assistance exercise: Push press
This exercise is a great shoulder builder and will really improve your strength at the start of the bench press. It also teaches you to “explode” at the start of the movement. To perform it stand upright with the bar on your clavicle, dip down slightly and push the weight up explosively with a powerful leg and arm drive.
| Week 5 | Week 6 | Week 7 | Week 8 | |
| Sets/ Reps | 3 x 5 | 6 x 4 | 4 x 3 | 2 x 5 |
Remedial exercise: Lying dumbbell triceps extension
Lie down on a bench, hold a dumbbell in each hand, arms fully extended, palms facing each other. Bring the dumbbells down with a flexion of the elbow only then bring them back up. For this exercise use a slow tempo, something in the line of 503 will do just fine.
| Week 5 | Week 6 | Week 7 | Week 8 | |
| Sets/ Reps | 3 x 10 | 5 x 8 | 4 x 6 | 2 x 10 |
Bench press high volume workout
These workouts have a little less intensity in that you will lift lighter loads. But they are still hard workouts and will participate in your development and improvement.
On this day you also have one main exercise, one auxiliary exercise, two assistance exercises and one remedial exercise.
Contrary to the high intensity workout, you will not change the program after 4 weeks. You will only perform one 8-weeks block. That’s because of the nature of this workout which can be tolerated for a longer period of time, not to mention that the exercises used do not have their equivalent.
Block 1: Week 1-8
Main exercise: Ballistic bench press
This is the only exercise in which I consider using the Smith machine effective. The objective it to lower the bar to the chest and throw the load in the air, then you catch it
and start again. The load you use should be light, because the goal is not to just be explosive, but to be ballistic.
| Week 1 | Week 2 | Week 3 | Week 4 | Week 5 | Week 6 | Week 7 | Week 8 | |
| Sets/Reps | 8 x 4 | 12 x 3 | 8 x 2 | 6 x 1 | 8 x 5 | 12 x 4 | 8 x 3 | 6 x 2 |
| Load | 20% | 25% | 30% | 35% | 20% | 25% | 30% | 35% |
Auxiliary exercise: Quasi-isometric/Stop/Explosive bench press
This exercise is really a combination of 2 training methods: superslow eccentric training and stop-explosion training. The eccentric (lowering) portion of the bench press is slow, 5 seconds, you do a 2 seconds pause when the bar is on your chest, then blast the weight up as fast as possible. This exercise will build a lot of muscle mass as well as strength of the chest.
| Week 1 | Week 2 | Week 3 | Week 4 | Week 5 | Week 6 | Week 7 | Week 8 | |
| Sets/Reps | 3 x 10 | 6 x 8 | 4 x 6 | 3 x 4 | 3 x 12 | 6 x 10 | 4 x 8 | 3 x 6 |
| Load | 55% | 60% | 65% | 70% | 55% | 60% | 65% | 70% |
Assistance exercise: Dumbbell bent press
| Week 1 | Week 2 | Week 3 | Week 4 | Week 5 | Week 6 | Week 7 | Week 8 | |
| Sets/Reps | 2 x 10 | 6 x 8 | 3 x 6 | 2 x 4 | 2 x 8 | 6 x 6 | 3 x 4 | 2 x 2 |
Assistance exercise no.2: Iso-ballistic push-up
Another drill to increase upper body power. Lower yourself in a push up position. Project yourself in the air. Land in a “down” push up position and hold for 15 seconds, that’s one rep.
| Week 1 | Week 2 | Week 3 | Week 4 | Week 5 | Week 6 | Week 7 | Week 8 | |
| Sets/Reps | 3 x 5 | 6 x 5 | 4 x 5 | 2 x 5 | 3 x 6 | 6 x 6 | 4 x 6 | 2 x 6 |
Remedial exercise: Shoulder box
This exercise is a very effective shoulder builder. It will increase strength in all the deltoids’ heads and also develop your rotator cuff muscles. Using this exercise is a great insurance policy for your shoulders during an intense bench press program.
| Week 1 | Week 2 | Week 3 | Week 4 | Week 5 | Week 6 | Week 7 | Week 8 | |
| Sets/Reps | 2 x 8 | 2 x 10 | 2 x 12 | 1 x 15 | 2 x 10 | 2 x 12 | 2 x 15 | 1 x 20 |
So there you have a very explosive 8-weeks bench press specialisation program. It will greatly increase your bench press strength as well as chest, shoulder and triceps size. It’s not for the faint of heart; you must have a strong drive to succeed on this program. But if you give your best effort it will work wonders for you.
CHAPTER 12
Example of a 12-week football program
In this chapter …
- Exercise descriptions for the movements involved in the football program
- Illustration of the agility drills included
- Actual training program
FOOTBALL PERFORMANCE TRAINING
High Performance Training Football; Level 1
Phase 1
Weeks 1-12
Coach Christian Thibaudeau [email protected]
Introduction and explanations of the exercises
Javorek complex : Five drills performed one after another without any rest. This is a preparatory exercise complex and is used as a specific warm-up tool and a way to increase overall muscle mass.
- Power snatch pull x 6
- Power clean pull x 6
- Squat press x 6
- Goodmorning x 6
- Barbell row x 6
Power clean from blocks: This drill’s objective is the development of the athlete’s power output (power = force x velocity). The bar is brought from knee height up to the shoulders. The movement must be explosive.
Speed back squat: Using a moderate load (50-60% of the squat max) the athlete lifts the barbell as fast as possible. Once again, the objective is to generate a high rate of force production and power output.
Jump squat: This is one of the best exercises to build up a huge vertical jump. A light load is used (10-30% of the squat max) and the objective is to jump up as high as possible.
Back extension 1-leg: Fantastic hamstring exercise. The hamstrings are the key speed
muscles.
Plate drag: Another decent hamstring exercise used to emphasize the development of the concentric portion of the knee flexion/hip flexion function.
Leg curl: A general hamstring strengthening exercise to develop the knee flexion function of the hamstrings.
Push press: Great exercise to develop shoulder and arm strength. It’s basically a cheated military press. You use a slight leg drive at the beginning of the movement, just enough to get the bar going. The arms still do most of the work.
Iso bench press: Great drill to increase pectoral mass and pushing power. Lower the bar to the chest in 5 seconds, pause it on the chest for 2 seconds, and EXPLODE. The load to be used is between 50 and 70% to maximize acceleration.
Lower in 5 seconds
Pause 2 seconds
Explode!
Dumbbell bench press: General strengthening exercise for the arms, shoulders, and pectorals.
Triceps extension with dumbbells: General triceps strengthening exercise.
Zottman curl: General biceps, brachialis, and forearm strengthening exercise.
Preacher curl: General biceps, brachialis, and forearm strengthening exercise.
Cuban press: To help prevent shoulder injuries. Used as a warm-up exercise.
Power snatch from blocks: This drill’s objective is the development of the athlete’s power output (power = force x velocity). The bar is brought from knee height up to overhead. The movement must be explosive.
Lunges: Great exercise to increase lower body strength while stretching the hip muscles at the same time.
Front squat: Excellent quadricep and glute exercise.
Natural glute-ham raise: It’s a simple, yet humbling exercise. The goal is to kneel down and try to lower your torso to the ground under control then bring yourself back up. Very few athletes can actually bring themselves up at first, so you might want to help yourself with a little arm push to get you started off the ground. This is a great exercise to develop the knee flexion function of the hamstrings.
Push jerk: Similar to the push press, however you use a powerful leg drive to throw the bar up in the air.
Bench press: General strengthening exercise for the upper body pushing muscles.
Ballistic bench press: This drill focuses on the explosive capacity of the upper body. Using a light load (10-30% of max bench press), lower the bar to the chest and throw it in the air as high as possible. Use a Smith machine to perform this drill safely.
Iso ballistic push-ups: Another drill to increase upper body power. Lower yourself into a push-up position. Project yourself in the air. Land in a “down” push up position and hold for 15 seconds, that’s one rep.
Hold this position for 15 seconds
Sumo deadlift: Excellent exercise to strengthen the glutes, hamstrings, quads, and lower back.
Romanian deadlift: Excellent hamstring exercise. Lower the bar by bending the trunk forward and bringing the hips back. Knee angle stays the same during the whole movement.
Bulgarian deadlift: Exercise targeting unilateral lower back, hip, and leg development.
Shoulder box: Shoulder exercise used as a warm-up drill to help prevent shoulder injuries.
Stretching routine
1 x 30 seconds 1 x 30 seconds/side 1 x 30 seconds/side 1 x 30 seconds/side
1 x 30 seconds 1 x 30 seconds/side 1 x 30 seconds 1 x 30 seconds
1 x 30 seconds/side 1 x 30 seconds
Agility drills
Cone drills 1
- 10m between cones
- Do the patterns at 75% of your top speed
- Repeat each pattern twice (once in each direction)
- Box
Patterns
-
- Forward all
B. ‘’ X ‘‘
-
- Forward, sideways, forward
- Forward, sideways, backpedal
3
4
2
5
1
-
-
- Forward all
-
Pattern
C. Star
- Forward all
4
3
5
2
Patterns
- Forward, back, forward, back, forward, back
6 1
Cone drills 2
- 10m between cones
- Do the patterns at 75% of your top speed
- Repeat each pattern twice (once in each direction)
A. Chair
Patterns
- Forward all
- Forward, sideways, forward, forward
- Forward, sideways, forward, backpedal
B. ‘’M’’
- Forward all
3
2
Patterns
- Forward, back, forward, back
4 1
Ladder drills 1
- High knees short steps
- High knees long steps
- High knees short steps lateral (no cross-over)
- High knees long steps lateral (no cross-over)
- “High knees” jumps with both legs
Ladder drills 2
- High knees short steps (back pedal)
- High knees long steps (back pedal)
- “High knees” jumps with one leg (10 jumps per leg)
- “High knees” jumps with both legs (backwards)
Phase 1– Block A: Concentrated loading – Week 1
| Block | Monday | Wednesday | Thursday | Saturday | Sunday |
| Preparation | Shoulder warm-up Shoulder box
2 x 10 Cuban press 2 x 10 |
Javorek Complex Snatch power pull 1 x 6
Clean power pull 1 x 6 Squat press 1 x 6 Good morning 1 x 6 Barbell row 1 x 6 *No rest between exercises |
Shoulder warm-up Shoulder box
2 x 10 Cuban press 2 x 10 |
Javorek Complex Snatch power pull 1 x 6
Clean power pull 1 x 6 Squat press 1 x 6 Good morning 1 x 6 Barbell row 1 x 6 *No rest between exercises |
|
| Speed/Agility | Cone drills 1
4 x 200m 75% intensity 90 seconds of rest |
Ladder drills 1 | Ladder drills 2
4 x 300m Form running 120 seconds of rest |
Cone drills 2 | |
| Development | Upper body
strength Incline bench press 5 x 6 Lat pulldown or chin 5 x 6 Push press 5 x 6 Triceps extension 3 x 10 Zottman curl 3 x 10 |
Lower body strength
Back squat 5 x 6 Sumo deadlift 5 x 6 Lunges 3 x 10/leg Back extension 1-leg 3 x 10/leg Leg curl 3 x 10 |
Upper body strength & power
Bench press 5 x 6 Push jerk 5 x 6 Ballistic bench press 5 x 6 (15% max bench) Seated rowing 5 x 6 |
Lower body strength & power
Front squat 5 x 6 Power snatch block 5 x 6 Power clean block 5 x 6 Step-up 3 x 10/leg Single-leg leg press (feet high on board) 3 x 10/leg |
|
| Optional work | DB bench press 3 x 12
Preacher curl 3 x 12 |
Plate drag 3 x 12
Natural glute-ham raise 3 x 12 |
DB bench press 3 x 12
Preacher curl 3 x 12 |
Plate drag 3 x 12
Natural glute-ham raise 3 x 12 |
|
| Conditioning | Farmer’s walk 6 x 100m walking | Farmer’s walk 6 x 50m strutting | |||
| Cool down | Stretching routine | Stretching routine | Stretching routine | Stretching routine |
Phase 1– Block A: Concentrated loading – Week 2
| Block | Monday | Wednesday | Thursday | Saturday | Sunday |
| Preparation | Shoulder warm-up Shoulder box
2 x 10 Cuban press 2 x 10 |
Javorek Complex Snatch power pull 1 x 6
Clean power pull 1 x 6 Squat press 1 x 6 Good morning 1 x 6 Barbell row 1 x 6 *No rest between exercises |
Shoulder warm-up Shoulder box
2 x 10 Cuban press 2 x 10 |
Javorek Complex Snatch power pull 1 x 6
Clean power pull 1 x 6 Squat press 1 x 6 Good morning 1 x 6 Barbell row 1 x 6 *No rest between exercises |
|
| Speed/Agility | Cone drills 1
5 x 200m 75% intensity 90 seconds of rest |
Ladder drills 1 | Ladder drills 2
5 x 300m Form running 120 seconds of rest |
Cone drills 2 | |
| Development | Upper body
strength Incline bench press 3 x 6, 3 x 5 Lat pulldown or chin 3 x 6, 3 x 5 Push press 3 x 6, 3 x 5 Triceps extension 4 x 10 Zottman curl 4 x 10 |
Lower body strength
Back squat 3 x 6, 3 x 5 Sumo deadlift 3 x 6, 3 x 5 Lunges 4 x 8/leg Back extension 1-leg 4 x 8/leg Leg curl 4 x 8 |
Upper body strength & power
Bench press 3 x 6, 3 x 5 Push jerk 3 x 6, 3 x 5 Ballistic bench press 6 x 5 (20% max bench) Seated rowing 3 x 6, 3 x 5 |
Lower body strength & power
Front squat 3 x 6, 3 x 5 Power snatch block 3 x 6, 3 x 5 Power clean block 3 x 6, 3 x 5 Step-up 4 x 8/leg Single-leg leg press (feet high on board) 4 x 8/leg |
|
| Optional work | DB bench press 3 x 12
Preacher curl 3 x 12 |
Plate drag 3 x 12
Natural glute-ham raise 3 x 12 |
DB bench press 3 x 12
Preacher curl 3 x 12 |
Plate drag 3 x 12
Natural glute-ham raise 3 x 12 |
|
| Conditioning | Farmer’s walk 7 x 100m walking | Farmer’s walk 7 x 50m strutting | |||
| Cool down | Stretching routine | Stretching routine | Stretching routine | Stretching routine |
Phase 1– Block A: Concentrated loading – Week 3
| Block | Monday | Wednesday | Thursday | Saturday | Sunday |
| Preparation | Shoulder warm-up Shoulder box
2 x 10 Cuban press 2 x 10 |
Javorek Complex Snatch power pull 1 x 6
Clean power pull 1 x 6 Squat press 1 x 6 Good morning 1 x 6 Barbell row 1 x 6 *No rest between exercises |
Shoulder warm-up Shoulder box
2 x 10 Cuban press 2 x 10 |
Javorek Complex Snatch power pull 1 x 6
Clean power pull 1 x 6 Squat press 1 x 6 Good morning 1 x 6 Barbell row 1 x 6 *No rest between exercises |
|
| Speed/Agility | Cone drills 1
6 x 200m 75% intensity 60 seconds of rest |
Ladder drills 1 | Ladder drills 2
6 x 300m Form running 90 seconds of rest |
Cone drills 2 | |
| Development | Upper body
strength Incline bench press 3 x 6, 3 x 5 , 1 x 4 Lat pulldown or chin 3 x 6, 3 x 5 , 1 x 4 Push press 3 x 6, 3 x 5 , 1 x 4 Triceps extension 5 x 10 Zottman curl 5 x 10 |
Lower body strength
Back squat 3 x 6, 3 x 5 , 1 x 4 Sumo deadlift 3 x 6, 3 x 5 , 1 x 4 Lunges 5 x 6/leg Back extension 1-leg 5 x 6/leg Leg curl 5 x 6 |
Upper body strength & power
Bench press 3 x 6, 3 x 5 , 1 x 4 Push jerk 3 x 6, 3 x 5 , 1 x 4 Ballistic bench press 7 x 4 (25% max bench) Seated rowing 3 x 6, 3 x 5 , 1 x 4 |
Lower body strength & power
Front squat 3 x 6, 3 x 5 , 1 x 4 Power snatch block 3 x 6, 3 x 5 , 1 x 4 Power clean block 3 x 6, 3 x 5 , 1 x 4 Step-up 5 x 6/leg Single-leg leg press (feet high on board) 5 x 6/leg |
|
| Optional work | DB bench press 3 x 12
Preacher curl 3 x 12 |
Plate drag 3 x 12
Natural glute-ham raise 3 x 12 |
DB bench press 3 x 12
Preacher curl 3 x 12 |
Plate drag 3 x 12
Natural glute-ham raise 3 x 12 |
|
| Conditioning | Farmer’s walk 8 x 100m walking | Farmer’s walk 8 x 50m strutting | |||
| Cool down | Stretching routine | Stretching routine | Stretching routine | Stretching routine |
Phase 1– Block A: Concentrated loading – Week 4
| Block | Monday | Wednesday | Thursday | Saturday | Sunday |
| Preparation | Shoulder warm-up Shoulder box
2 x 10 Cuban press 2 x 10 |
Javorek Complex Snatch power pull 1 x 6
Clean power pull 1 x 6 Squat press 1 x 6 Good morning 1 x 6 Barbell row 1 x 6 *No rest between exercises |
Shoulder warm-up Shoulder box
2 x 10 Cuban press 2 x 10 |
Javorek Complex Snatch power pull 1 x 6
Clean power pull 1 x 6 Squat press 1 x 6 Good morning 1 x 6 Barbell row 1 x 6 *No rest between exercises |
|
| Speed/Agility | Cone drills 1
4 x 200m 75% intensity 60 seconds of rest |
Ladder drills 1 | Ladder drills 2
4 x 300m Form running 90 seconds of rest |
Cone drills 2 | |
| Development | Upper body
strength Incline bench press 1 x 5, 1 x 4 , 2 x 3 Lat pulldown or chin 1 x 5, 1 x 4 , 2 x 3 Push press 1 x 5, 1 x 4 , 2 x 3 Triceps extension 2 x 10 Zottman curl 2 x 10 |
Lower body strength
Back squat 1 x 5, 1 x 4 , 2 x 3 Sumo deadlift 1 x 5, 1 x 4 , 2 x 3 Lunges 3 x 4/leg Back extension 1-leg 3 x 4/leg Leg curl 3 x 4 |
Upper body strength & power
Bench press 1 x 5, 1 x 4 , 2 x 3 Push jerk 1 x 5, 1 x 4 , 2 x 3 Ballistic bench press 3 x 3 (30% max bench) Seated rowing 1 x 5, 1 x 4 , 2 x 3 |
Lower body strength & power
Front squat 1 x 5, 1 x 4 , 2 x 3 Power snatch block 1 x 5, 1 x 4 , 2 x 3 Power clean block 1 x 5, 1 x 4 , 2 x 3 Step-up 3 x 4/leg Single-leg leg press (feet high on board) 3 x 4/leg |
|
| Optional work | DB bench press 3 x 12
Preacher curl 3 x 12 |
Plate drag 3 x 12
Natural glute-ham raise 3 x 12 |
DB bench press 3 x 12
Preacher curl 3 x 12 |
Plate drag 3 x 12
Natural glute-ham raise 3 x 12 |
|
| Conditioning | Farmer’s walk 4 x 100m walking | Farmer’s walk 4 x 50m strutting | |||
| Cool down | Stretching routine | Stretching routine | Stretching routine | Stretching routine |
Phase 1– Block B: Conjugated-sequencing loading – Week 5
| Block | Monday | Wednesday | Thursday | Saturday | Sunday |
| Preparation | Shoulder warm-up Shoulder box
2 x 10 Cuban press 2 x 10 |
Javorek Complex Snatch power pull 1 x 6
Clean power pull 1 x 6 Squat press 1 x 6 Good morning 1 x 6 Barbell row 1 x 6 *No rest between exercises |
Shoulder warm-up Shoulder box
2 x 10 Cuban press 2 x 10 |
Javorek Complex Snatch power pull 1 x 6
Clean power pull 1 x 6 Squat press 1 x 6 Good morning 1 x 6 Barbell row 1 x 6 *No rest between exercises |
|
| Speed/Agility | Cone drills 1
4 x 100m 85% intensity 90 seconds of rest |
Ladder drills 1 | 10 x 20m
100% intensity 60 seconds of rest |
Ladder drills 2
4 x 150m 80% intensity 120 seconds of rest |
Cone drills 2 |
| Development | Upper body
Strength & power Incline bench press 4 x 4 Lat pulldown or chin 4 x 4 Push press 4 x 4 Ballistic bench press 5 x 6 (17% max bench) |
Lower body strength & power
Back squat 4 x 4 Romanian deadlift 4 x 4 Lunges 3 x 10/leg Back extension 1-leg 3 x 10/leg Power snatch block 4 x 4 |
Upper body strength & power
Bench press 4 x 6 Push jerk 4 x 6 Ballistic bench press 5 x 6 (17% max bench) Seated rowing 5 x 6 Iso ballistic push ups 4 x 4 |
Lower body strength & power
Front squat 4 x 6 Power snatch block 4 x 6 Power clean block 4 x 6 Jump squat 3 x 10 (15% squat max) |
|
| Optional work | DB bench press 3 x 12
Preacher curl 3 x 12 |
Plate drag 3 x 12
Natural glute-ham raise 3 x 12 |
DB bench press 3 x 12
Preacher curl 3 x 12 |
Plate drag 3 x 12
Natural glute-ham raise 3 x 12 |
|
| Conditioning | Farmer’s walk 6 x 100m walking | Farmer’s walk 6 x 50m strutting | |||
| Cool down | Stretching routine | Stretching routine | Stretching routine | Stretching routine |
Phase 1– Block B: Conjugated-sequencing loading – Week 6
| Block | Monday | Wednesday | Thursday | Saturday | Sunday |
| Preparation | Shoulder warm-up Shoulder box
2 x 10 Cuban press 2 x 10 |
Javorek Complex Snatch power pull 1 x 6
Clean power pull 1 x 6 Squat press 1 x 6 Good morning 1 x 6 Barbell row 1 x 6 *No rest between exercises |
Shoulder warm-up Shoulder box
2 x 10 Cuban press 2 x 10 |
Javorek Complex Snatch power pull 1 x 6
Clean power pull 1 x 6 Squat press 1 x 6 Good morning 1 x 6 Barbell row 1 x 6 *No rest between exercises |
|
| Speed/Agility | Cone drills 1
5 x 100m 85% intensity 90 seconds of rest |
Ladder drills 1 | 12 x 20m
100% intensity 60 seconds of rest |
Ladder drills 2
5 x 150m 80% intensity 120 seconds of rest |
Cone drills 2 |
| Development | Upper body
Strength & power Incline bench press 2 x 4, 2 x 3 Lat pulldown or chin 2 x 4, 2 x 3 Push press 2 x 4, 2 x 3 Ballistic bench press 6 x 5 (22% max bench) Medicine ball throw from chest (10-20lbs) 4 x 5 |
Lower body strength & power
Back squat 2 x 4, 2 x 3 Romanian deadlift 2 x 4, 2 x 3 Lunges 3 x 8/leg Back extension 1-leg 3 x 8/leg Power snatch block 2 x 4, 2 x 3 Power clean block 2 x 4, 2 x 3 |
Upper body strength & power
Bench press 2 x 6, 2 x 5 Push jerk 2 x 6, 2 x 5 Ballistic bench press 6 x 5 (22% max bench) Seated rowing 2 x 6, 2 x 5 Iso ballistic push ups 4 x 5 Iso bench press 4 x 5 (50% max bench press) |
Lower body strength & power
Front squat 2 x 6, 2 x 5 Power snatch block 2 x 6, 2 x 5 Power clean block 2 x 6, 2 x 5 Jump squat 4 x 8 (20% squat max) Jump lunges 4 x 5/leg (10% squat max) |
|
| Optional work | DB bench press 3 x 12
Preacher curl 3 x 12 |
Plate drag 3 x 12
Natural glute-ham raise 3 x 12 |
DB bench press 3 x 12
Preacher curl 3 x 12 |
Plate drag 3 x 12
Natural glute-ham raise 3 x 12 |
|
| Conditioning | Farmer’s walk 7 x 100m walking | Farmer’s walk 7 x 50m strutting | |||
| Cool down | Stretching routine | Stretching routine | Stretching routine | Stretching routine |
Phase 1– Block B: Conjugated-sequencing loading – Week 7
| Block | Monday | Wednesday | Thursday | Saturday | Sunday |
| Preparation | Shoulder warm-up Shoulder box
2 x 10 Cuban press 2 x 10 |
Javorek Complex Snatch power pull 1 x 6
Clean power pull 1 x 6 Squat press 1 x 6 Good morning 1 x 6 Barbell row 1 x 6 *No rest between exercises |
Shoulder warm-up Shoulder box
2 x 10 Cuban press 2 x 10 |
Javorek Complex Snatch power pull 1 x 6
Clean power pull 1 x 6 Squat press 1 x 6 Good morning 1 x 6 Barbell row 1 x 6 *No rest between exercises |
|
| Speed/Agility | Cone drills 1
6 x 100m 85% intensity 60 seconds of rest |
Ladder drills 1 | 14 x 20m
100% intensity 30 seconds of rest |
Ladder drills 2
6 x 150m 80% intensity 90 seconds of rest |
Cone drills 2 |
| Development | Upper body
Strength & power Incline bench press 2 x 4, 1 x 3, 1 x 2 Lat pulldown or chin 2 x 4, 1 x 3, 1 x 2 Push press 2 x 4, 1 x 3, 1 x 2 Ballistic bench press 7 x 4 (27% max bench) Medicine ball throw from chest (10-20lbs) 5 x 5 |
Lower body strength & power
Back squat 2 x 4, 1 x 3, 1 x 2 Romanian deadlift 2 x 4, 1 x 3, 1 x 2 Lunges 3 x 6/leg Back extension 1-leg 3 x 6/leg Power snatch block 2 x 4, 1 x 3, 1 x 2 Power clean block 2 x 4, 1 x 3, 1 x 2 Depth jumps 3 x 5 |
Upper body strength & power
Bench press 2 x 6, 1 x 5, 1 x 4 Push jerk 2 x 6, 1 x 5, 1 x 4 Ballistic bench press 7 x 4 (27% max bench) Seated rowing 2 x 6, 1 x 5, 1 x 4 Iso ballistic push ups 5 x 5 Iso bench press 5 x 4 (55% max bench press) |
Lower body strength & power
Front squat 2 x 6, 1 x 5, 1 x 4 Power snatch block 2 x 6, 1 x 5, 1 x 4 Power clean block 2 x 6, 1 x 5, 1 x 4 Jump squat 5 x 6 (25% squat max) Jump lunges 5 x 5/leg (10% squat max) Depth jumps 3 x 5 |
|
| Optional work | DB bench press 3 x 12
Preacher curl 3 x 12 |
Plate drag 3 x 12
Natural glute-ham raise 3 x 12 |
DB bench press 3 x 12
Preacher curl 3 x 12 |
Plate drag 3 x 12
Natural glute-ham raise 3 x 12 |
|
| Conditioning | Farmer’s walk 8 x 100m walking | Farmer’s walk 8 x 50m strutting | |||
| Cool down | Stretching routine | Stretching routine | Stretching routine | Stretching routine |
Phase 1– Block B: Conjugated-sequencing loading – Week 8
| Block | Monday | Wednesday | Thursday | Saturday | Sunday |
| Preparation | Shoulder warm-up Shoulder box
2 x 10 Cuban press 2 x 10 |
Javorek Complex Snatch power pull 1 x 6
Clean power pull 1 x 6 Squat press 1 x 6 Good morning 1 x 6 Barbell row 1 x 6 *No rest between exercises |
Shoulder warm-up Shoulder box
2 x 10 Cuban press 2 x 10 |
Javorek Complex Snatch power pull 1 x 6
Clean power pull 1 x 6 Squat press 1 x 6 Good morning 1 x 6 Barbell row 1 x 6 *No rest between exercises |
|
| Speed/Agility | Cone drills 1
4 x 100m 85% intensity 60 seconds of rest |
Ladder drills 1 | 10 x 20m
100% intensity 30 seconds of rest |
Ladder drills 2
4 x 150m 80% intensity 90 seconds of rest |
Cone drills 2 |
| Development | Upper body
Strength & power Incline bench press 1 x 3, 1 x 2, 1 x 1 Lat pulldown or chin 1 x 3, 1 x 2, 1 x 1 Push press 1 x 3, 1 x 2, 1 x 1 Ballistic bench press 3 x 3 (32% max bench) Medicine ball throw from chest (10-20lbs) 6 x 5 |
Lower body strength & power
Back squat 1 x 3, 1 x 2, 1 x 1 Romanian deadlift 1 x 3, 1 x 2, 1 x 1 Lunges 3 x 4/leg Back extension 1-leg 3 x 4/leg Power snatch block 1 x 3, 1 x 2, 1 x 1 Power clean block 1 x 3, 1 x 2, 1 x 1 Depth jumps 4 x 5 |
Upper body strength & power
Bench press 1 x 5, 1 x 3, 1 x 2 Push jerk 1 x 5, 1 x 3, 1 x 2 Ballistic bench press 3 x 3 (32% max bench) Seated rowing 1 x 5, 1 x 3, 1 x 2 Iso ballistic push ups 5 x 5 Iso bench press 6 x 5 (60% max bench press) |
Lower body strength & power
Front squat 1 x 5, 1 x 3, 1 x 2 Power snatch block 1 x 5, 1 x 3, 1 x 2 Power clean block 1 x 5, 1 x 3, 1 x 2 Jump squat 6 x 5 (30% squat max) Jump lunges 6 x 5/leg (12% squat max) Depth jumps 4 x 5 |
|
| Optional work | DB bench press 3 x 12
Preacher curl 3 x 12 |
Plate drag 3 x 12
Natural glute-ham raise 3 x 12 |
DB bench press 3 x 12
Preacher curl 3 x 12 |
Plate drag 3 x 12
Natural glute-ham raise 3 x 12 |
|
| Conditioning | Farmer’s walk 7 x 100m walking | Farmer’s walk 7 x 50m strutting | |||
| Cool down | Stretching routine | Stretching routine | Stretching routine | Stretching routine |
Phase 1– Block C: Delayed Transmutation of gains/Sports mastery – Week 9
| Block | Monday | Wednesday | Thursday | Saturday | Sunday |
| Preparation | Shoulder warm-up Shoulder box
2 x 10 Cuban press 2 x 10 |
Javorek Complex Snatch power pull 1 x 6
Clean power pull 1 x 6 Squat press 1 x 6 Good morning 1 x 6 Barbell row 1 x 6 *No rest between exercises |
Shoulder warm-up Shoulder box
2 x 10 Cuban press 2 x 10 |
Javorek Complex Snatch power pull 1 x 6
Clean power pull 1 x 6 Squat press 1 x 6 Good morning 1 x 6 Barbell row 1 x 6 *No rest between exercises |
|
| Speed/Agility | Cone drills 1
10 x 20m 100% intensity 60 seconds of rest |
Ladder drills 1
6 x 40m 100% intensity 90 seconds of rest |
6 x 50m
100% intensity 90 seconds of rest |
Ladder drills 2
6 x 60m 90% intensity 90 seconds of rest |
Cone drills 2
4 x 80m 90% intensity 120 seconds of rest |
| Development | Upper body
Strength & power Bench press 2 x 3, 2 x 2 Seated rowing 3 x 10 Push press 2 x 3, 2 x 2 Ballistic bench press 3 x 5 (20% max bench) |
Lower body strength & power
Back squat 2 x 3, 2 x 2 1-leg back extension 3 x 10 Jump squat 3 x 10 (20% max squat) Depth jumps 3 x 5 |
Upper body strength & power
Incline bench press 3 x 10 Push jerk 3 x 6 Ballistic bench press 3 x 5 (20% max bench) Lat pulldown 3 x 10 |
Lower body strength & power
Power snatch from blocks 2 x 3, 2 x 2 Power clean from blocks 2 x 3, 2 x 2 Jump squat 3 x 10 (20% squat max) Depth jumps 3 x 5 |
|
| Optional work | DB bench press 3 x 12
Preacher curl 3 x 12 |
Plate drag 3 x 12
Natural glute-ham raise 3 x 12 |
DB bench press 3 x 12
Preacher curl 3 x 12 |
Plate drag 3 x 12
Natural glute-ham raise 3 x 12 |
|
| Conditioning | |||||
| Cool down | Stretching routine | Stretching routine | Stretching routine | Stretching routine |
Phase 1– Block C: Delayed Transmutation of gains/Sports mastery – Week 10
| Block | Monday | Wednesday | Thursday | Saturday | Sunday |
| Preparation | Shoulder warm-up Shoulder box
2 x 10 Cuban press 2 x 10 |
Javorek Complex Snatch power pull 1 x 6
Clean power pull 1 x 6 Squat press 1 x 6 Good morning 1 x 6 Barbell row 1 x 6 *No rest between exercises |
Shoulder warm-up Shoulder box
2 x 10 Cuban press 2 x 10 |
Javorek Complex Snatch power pull 1 x 6
Clean power pull 1 x 6 Squat press 1 x 6 Good morning 1 x 6 Barbell row 1 x 6 *No rest between exercises |
|
| Speed/Agility | Cone drills 1
12 x 20m 100% intensity 60 seconds of rest |
Ladder drills 1
8 x 40m 100% intensity 90 seconds of rest |
8 x 50m
100% intensity 90 seconds of rest |
Ladder drills 2
8 x 60m 90% intensity 90 seconds of rest |
Cone drills 2
6 x 80m 90% intensity 120 seconds of rest |
| Development | Upper body
Strength & power Bench press 1 x 3, 1 x 2, 1 x 1 1 x 3, 1 x 2, 1 x 1 Seated rowing 3 x 10 Push press 1 x 3, 1 x 2, 1 x 1 1 x 3, 1 x 2, 1 x 1 Ballistic bench press 4 x 4 (25% max bench) |
Lower body strength & power
Back squat 1 x 3, 1 x 2, 1 x 1 1 x 3, 1 x 2, 1 x 1 1-leg back extension 3 x 10 Jump squat 4 x 8 (25% max squat) Depth jumps 4 x 5 |
Upper body strength & power
Incline bench press 3 x 8 Push jerk 3 x 4 Ballistic bench press 4 x 4 (25% max bench) Lat pulldown 3 x 8 |
Lower body strength & power
Power snatch from blocks 1 x 3, 1 x 2, 1 x 1 1 x 3, 1 x 2, 1 x 1 Power clean from blocks 1 x 3, 1 x 2, 1 x 1 1 x 3, 1 x 2, 1 x 1 Jump squat 4 x 8 (25% squat max) Depth jumps 4 x 5 |
|
| Optional work | DB bench press 3 x 12
Preacher curl 3 x 12 |
Plate drag 3 x 12
Natural glute-ham raise 3 x 12 |
DB bench press 3 x 12
Preacher curl 3 x 12 |
Plate drag 3 x 12
Natural glute-ham raise 3 x 12 |
|
| Conditioning | |||||
| Cool down | Stretching routine | Stretching routine | Stretching routine | Stretching routine |
Phase 1– Block C: Delayed Transmutation of gains/Sports mastery – Week 11
| Block | Monday | Wednesday | Thursday | Saturday | Sunday |
| Preparation | Shoulder warm-up Shoulder box
2 x 10 Cuban press 2 x 10 |
Javorek Complex Snatch power pull 1 x 6
Clean power pull 1 x 6 Squat press 1 x 6 Good morning 1 x 6 Barbell row 1 x 6 *No rest between exercises |
Shoulder warm-up Shoulder box
2 x 10 Cuban press 2 x 10 |
Javorek Complex Snatch power pull 1 x 6
Clean power pull 1 x 6 Squat press 1 x 6 Good morning 1 x 6 Barbell row 1 x 6 *No rest between exercises |
|
| Speed/Agility | Cone drills 1
14 x 20m 100% intensity 60 seconds of rest |
Ladder drills 1
10 x 40m 100% intensity 90 seconds of rest |
10 x 50m
100% intensity 90 seconds of rest |
Ladder drills 2
10 x 60m 90% intensity 90 seconds of rest |
Cone drills 2
8 x 80m 90% intensity 120 seconds of rest |
| Development | Upper body
Strength & power Bench press 1 x 2, 1 x 2, 1 x 1 1 x 2, 1 x 2, 1 x 1 Seated rowing 3 x 10 Push press 1 x 2, 1 x 2, 1 x 1 1 x 2, 1 x 2, 1 x 1 Ballistic bench press 5 x 3 (30% max bench) |
Lower body strength & power
Back squat 1 x 2, 1 x 2, 1 x 1 1 x 2, 1 x 2, 1 x 1 1-leg back extension 3 x 10 Jump squat 5 x 6 (30% max squat) Depth jumps 5 x 5 |
Upper body strength & power
Incline bench press 3 x 6 Push jerk 3 x 4 Ballistic bench press 5 x 3 (30% max bench) Lat pulldown 3 x 6 |
Lower body strength & power
Power snatch from blocks 1 x 2, 1 x 2, 1 x 1 1 x 2, 1 x 2, 1 x 1 Power clean from blocks 1 x 2, 1 x 2, 1 x 1 1 x 2, 1 x 2, 1 x 1 Jump squat 5 x 6 (30% squat max) Depth jumps 5 x 5 |
|
| Optional work | |||||
| Conditioning | |||||
| Cool down | Stretching routine | Stretching routine | Stretching routine | Stretching routine |
Phase 1– Block C: Delayed Transmutation of gains/Sports mastery – Week 12
| Block | Monday | Wednesday | Thursday | Saturday | Sunday |
| Preparation | Shoulder warm-up Shoulder box
2 x 10 Cuban press 2 x 10 |
Javorek Complex Snatch power pull 1 x 6
Clean power pull 1 x 6 Squat press 1 x 6 Good morning 1 x 6 Barbell row 1 x 6 *No rest between exercises |
Shoulder warm-up Shoulder box
2 x 10 Cuban press 2 x 10 |
Javorek Complex Snatch power pull 1 x 6
Clean power pull 1 x 6 Squat press 1 x 6 Good morning 1 x 6 Barbell row 1 x 6 *No rest between exercises |
|
| Speed/Agility | Cone drills 1
12 x 20m 100% intensity 60 seconds of rest |
Ladder drills 1
8 x 40m 100% intensity 90 seconds of rest |
8 x 50m
100% intensity 90 seconds of rest |
Ladder drills 2
8 x 60m 90% intensity 90 seconds of rest |
Cone drills 2
6 x 80m 90% intensity 120 seconds of rest |
| Development | Upper body
Strength & power Bench press 1 x 2, 1 x 2, 1 x 1 Seated rowing 2 x 10 Push press 1 x 2, 1 x 2, 1 x 1 Ballistic bench press 3 x 2 (35% max bench) |
Lower body strength & power
Back squat 1 x 2, 1 x 2, 1 x 1 1-leg back extension 2 x 10 Jump squat 3 x 6 (30% max squat) Depth jumps 3 x 5 |
Upper body strength & power
Incline bench press 2 x 4 Push jerk 2 x 4 Ballistic bench press 3 x 2 (35% max bench) Lat pulldown 2 x 4 |
Lower body strength & power
Power snatch from blocks 1 x 2, 1 x 2, 1 x 1 Power clean from blocks 1 x 2, 1 x 2, 1 x 1 Jump squat 3 x 6 (30% squat max) Depth jumps 3 x 5 |
|
| Optional work | |||||
| Conditioning | |||||
| Cool down | Stretching routine | Stretching routine | Stretching routine | Stretching routine |
CHAPTER 13
Learning the Olympic lifts
In this chapter …
- How to correct the most basic mistakes in the power clean
- A beginner’s Olympic lifting program
“Clean up that mess: Correcting the 9 most common mistakes in the power clean”
There’s this stigma around the Olympic lifts that they are impossible to learn without a coach. As a result, a lot of athletes who’d like to try the lifts simply do not. It’s understandable though. Go to any gym in the country and you’ll be lucky to see one person perform a power clean. You’ll be even luckier to find one person who is capable enough to teach the lift and correct the mistakes that people make.
Well, I’m about to make a lot of lucky bastards because I’m going to make an Olympic lifting expert out of you! That’s right, I am going to show you the 9 most frequent mistakes made while performing a power clean and exactly how to correct them. This will prove to be very valuable if you are yourself a coach, or simply want to try the Olympic lifts for fun.
Perfect practice makes perfect … practice makes permanent
I said it before I’ll say it again, the simpler variations of the Olympic lifts (power clean from blocks/from hang and power snatch from blocks/from hang) can be learned very easily and safely. An athlete, or somebody training for himself, should thus stay with these easier lifts, they are just as effective as the full Olympic lifts as far as strength and power development is concerned.
However, even if the lifts are easy to learn, the slightest mistake can really slow down your progress and the gains you’ll get from the lifts. Furthermore, since the Olympic lifts are skill movements (more complex structure than regular lifts, more timing involved), practicing a mistake will create a bad habit that is hard to correct.
To become efficient at the Olympic lifts you must practice a lot. Not only that, you must do a lot of perfect reps. Motor learning science suggests that a movement of the complexity of a power clean needs around 500 perfect reps to be automatized; each bad rep increasing that number slightly. That’s why knowing what the most common mistakes and how to correct them will go miles toward making a better athlete or more powerful human being.
First type of errors: The starting position
A house can only be as solid as its foundation! A lot of people focus so much on learning the explosion part of the power clean that they forget to learn the proper starting position. It is impossible to perform a technically efficient rep from a bad starting position. Before correcting anything else you must make sure that, at the start, the athlete is perfectly placed. Note that I’m talking about the power clean from the hang and from blocks as they are the variations I recommend you use in your training.
- Rounded lower back in the starting position
This is a very common mistake. And I find it to be even more widespread among young athletes. There’s something about the chillin’ attitude that makes it hard to get a proper position at the start of the clean.
You’ll notice how the tailbone is turned inwards and the lower back has lost its arch (in fact, it’s even reverse-arched). This will absolutely kill your efforts to be explosive with the legs. It will place a huge toll on your lower back and it will encourage arm pull. It is capital that an athlete learns that the proper position is with the lower back arched and the hips back. For some people it’s hard to get into that position simply because they have a relaxed attitude and never arch their backs. If your athlete cannot take the position by himself, don’t hesitate to place the hips in the proper position for him. Illustrated below is a good starting position.
- Insufficient leg flexion in the starting position
This is also quite common. The legs are almost straight in the starting position and the hips are too high. This prevents any form of explosive lower body action and shifts all the workload to the lower back. As athletes, we want to use the Olympic lifts to develop more powerful legs. Taking them out of the action is thus not very productive.
The knees should be flexed enough so that the legs can do most of the work. In most people that means an angle of 100-120 degrees. Excessive leg bend is not better because it changes the lever arm and makes the lift more difficult. The ideal position has the lifter with bent knees and the shoulders just above the bar (if you bend the knees too much, the bar will be in front of the shoulders). This position places you in the most advantageous pulling position possible. Once again refer to the picture of the correct starting position.
- Looking down/rounding upper back in the starting position
This mistake is frequent especially with rank beginners who lack confidence. When they are not sure about what they have to do they will invariably look down and bundle on themselves. This is a horrendous pulling position! It is impossible to develop a lot of force this way and it’s dangerous for the back.
The athlete must look slightly above his eyes level and keep the upper back tight. I always tell my athletes to take a “beach position”. The chest is out, shoulder blades pulled back and back tight. Obviously you must make the technical corrections, but also consider that if the athlete doesn’t understand the movement he will have a tendency to adopt this starting position. So it’s your duty to make sure the he understands the task at hand.
- Bent arms in the starting position
This is a big no-no. Nothing will cut your power short more than having the arms bent in the starting position. However, understand that it is a natural reaction when an athlete first learns the movement and the load seems excessive to him. Bending the arms is a protective reaction. In the starting position think of your arms as ropes, they are only there to attach the bar to your body.
It is important that you teach your athlete that having the arms bent in the starting position makes it hard to utilize your legs maximally. You will have the tendency to pull with the arms and that is no good. Teach your athlete to let his arms hang down. The explosion comes from the hips and legs, not the arms.
Second type of errors: Execution
Once the proper starting position is mastered, execution should be facilitated. Nonetheless certain problems may arise. Quite often these are hard to correct if spotted late. Unfortunately, the execution of the movement is fast, so it’s harder to detect any mistakes. That’s why it’s important to keep a keen eye while in the gym!
- Weak/slow full extension
This error has two representations:
- the athlete doesn’t fully extend on the pull
- the extension is slow
At the end of the pull you should be able to see a full knee extension, ankle extension and some back extension. Teach your athlete to think “calves and traps.” At the end of the pull he must focus on contracting the traps and calves. Illustrated below is the proper extension during a power clean.
If extension is complete (full knee and ankle extension, some back extension), but too slow the problem is either that the load is too high or that the athlete lacks explosive strength. The solution is quite easy for the first case. For the second it’s a bit more complex and it requires time to correct. Inclusion of jump squats with 10-15% of the squat max will help increase explosion and will lead to a faster pull. But most of all you
must emphasize acceleration! A lot of athletes pull slowly because they have never been taught to explode. Do not let your athlete do a low acceleration pull.
If the extension is incomplete (either knees or ankles do not fully extend) the problem is often a lack of limit strength in the lower body or an unconscious shut down because the athlete feels that the load is too heavy. But much like the previous problem, a shortened pull can simply be a learned habit; in that case simply emphasize reaching a full extension. A simple key I use is to have the athlete focus on “calves and traps.” Feel the calves and traps contracting fully at the end of the pull. Most of the time this will solve the problem.
- Bar is lifted forward
This mistake can be easily detected. The athlete will either jump forward to catch the bar or he will catch it with the shoulders in front of the knees. This problem is very often associated with an incomplete extension on the pull or is due to the weight being too far forward (on the toes) during the early portion of the movement.
Depending on the source of the problem you want to either work on completing the pull (calves and traps) or have the lifter focus on keeping his weight evenly distributed over the whole of each foot.
- Bar is lifted backward
This is also easy to spot. The athlete will either jump backward or will catch the bar with the shoulders behind the hips. This is like the hook in golf, it’s the problem of good pullers. In fact, in the execution of the full Olympic lifts jumping backwards is actually used by Bulgarian lifters (who use more back pull than most other lifters). But for athletic development it is not adequate. This type of execution shifts much of the workload onto the lower back and away from the legs.
9 out of 10 cases of backward pulling are caused by excessive lower back extension. To solve the problem have the lifter focus on getting tall during the pull; he must try to stretch his body upwards as much as possible. Here is the correct receiving position for the power clean.
- Early arm pull
This is also quite common, especially as the load gets high. When the weight feels heavy in your hands you will have the tendency to pull with the arms first. This is a mistake! It greatly reduces acceleration potential and can lead to elbow injuries.
The arms should bend at the elbow when the body reaches full extension. If you notice a flexion before that, you must correct it!
In most cases, this problem has to be solved by relearning the movement focusing on keeping the arms straight. This means using lighter weights and really emphasizing lower body explosion. Once the lifter is solid and consistent you can gradually increase the load.
- Wrist too far in front of the body
The closer the bar is to your body, the easier the lift will be. One of the most common mistakes in the power clean is to use a reverse curl action with the arms. This can really limit your potential on the clean. The arm action during a clean is more similar to an upright row than to a reverse curl. The bar is kept close to the body at all times and the shoulders, elbows, and wrists should be in line during the pull.
An athlete’s perspective
Nicolas Roy is a 60m sprinter and future strength and conditioning expert. Since he is new to the lifts I decided to let him tell you about his experience learning the power clean from the hang. If you are yourself learning the lifts these tips will undoubtedly provide you with a lot of ways to make the learning experience faster and more efficient.
Learning trick no. 1
First of all, when I began to learn how to do Olympic lifts I had to deal with a dilemma. I was wondering if I had to jump with the bar or if I only had to do a plantar flexion. Some people were telling me not to jump with the bar and some others were telling me to jump with it. After discussing this with Christian Thibaudeau, I realized that it depends on your needs. If you are practicing the Olympic lifts to develop your power output for sports then you shouldn’t hesitate to jump. If you are learning the
Olympic lifts to have the perfect technique for weightlifting then you shouldn’t jump. In my case, I was learning the lifts to improve my power output for sports so I learned to jump.
Learning trick no. 2
Another detail that would help me to increase my power was to begin my lifts from the hang. Why is it more effective then a complete Olympic lift for power development? Because if your starting position is over your knee the bar has to travel a shorter distance before reaching its final position, giving you less time to impart speed on it. So, you have to accelerate the bar much faster.
Learning trick no. 3
When I began to do Olympic lifting I wasn’t using the power of my legs enough. In fact, it was almost only my back that was lifting the bar, so I wasn’t efficient at all. With some feedback I learned to flex my knees, and immediately after to powerfully extend them; explode! When you begin the lift, you have to use the elastic energy accumulated from the stretch-shortening cycle (SSC) like when you do plyometrics. Be careful not to wait between the flexion and the extension of the knee or else you’re going to lose your elastic energy and the bar won’t go up as well. When the bar reaches the knees explode immediately!
Learning trick no. 4
Keep your arms straight until you go under the bar so you won’t lose the energy generated by your legs. If you flex your elbows, the energy will be absorbed
by the deformation of the segment forearm-arm (Chris’ note: very good point and wellexplained).
Learning trick no. 5
Don’t hesitate to extend the trunk. This motion will help you to finish your lift with your weight on your heels. This way, the bar won’t have a tendency to fall forward because it will be over your center of gravity. Cutting my pull short is a mistake that I still sometimes do especially when I’m tired. Example: on the fifth rep when my CNS has difficulty recruiting motor units.
Learning trick no. 6
Keep the bar near your body to improve your mechanical efficiency. To illustrate this principle try to hold a 10lbs plate with your arm fully extended in front of you, then bring the plate close to your body. You will immediately see that the closer a load is to your center of gravity, the less effort the muscles must generate. If the bar is far from your body, your muscles have to generate a force greater than the resistance just to equilibrate
the lever (and you still have not begun to lift the resistance yet). So, to help your muscles lift the bar, keep the bar as close as you can to your body.
Learning trick no. 7
Finally, when you receive the bar, raise your elbows really high in the rack position so that you won’t have to fight against the bar to keep it elevated. Gravity will make the job of keeping the bar on your shoulders harder if it is not properly racked.
Conclusion
With this section you should be able to learn and teach the hang clean properly and to correct the basic technical mistakes that impair performance. With Nick’s tricks you also have a lot of important pointers to help you or your athletes improve faster.
Remember that even if this section gives you the proper tools to learn and correct technique, you still have to put in your time actively learning the power clean from the hang. Perfect practice makes perfect!
“A beginner’s Olympic lifting program”
Learn the basic Olympic lifts in 12 weeks
The various Olympic lifts have recently received a lot of praise from strength experts all over the world, and rightfully so; these exercises are a tremendous way of developing power, dynamic flexibility, and athletic ability. However, even if the Olympic lifts are used more and more by elite sport organizations, they still remain a relatively dark territory for the average trainee. The problem might come from the fact that these lifts can be hard to learn. Furthermore, the only available programs and videos on these lifts are designed with the competitive Olympic lifter in mind. There is nothing out there for the rank beginner who wants to learn the lifts and perform them in his training regimen. Oh, there are a few videos that teach technique out there. Most are very good. However, learning the lifts and designing an effective program are two different things!
So when an individual wants to start using the lifts he’s faced with three problems:
-
- Learning how to perform the lifts
- Learning how to plan an Olympic lifting routine adapted to his needs
- Developing the necessary flexibility to do the lifts properly
The program detailed in this chapter is an introductory phase to the Olympic lifts. The main focus is to develop the adequate utilizable range of motion to perform the Olympic lifts while introducing you to the concept of explosion by using the simpler forms of the lifts. You will start with the easier forms of the Olympic lifts and the movements will get more complex at each new 4-week training phase
The first phase of training will develop a lot of specific hypertrophy. By that I mean that you will gain lots of muscle mass and lots of strength in the muscles specific to Olympic lifting (traps, upper and lower back, quads, hamstrings, glutes, deltoids).
I’ll first present the warm-up routine you are going to use at the beginning of all the training sessions of the three training phases. The warm-up doesn’t change during the course of the 12-week program.
The Warm-up
This portion of the workout is crucial. The Olympic lifts are high acceleration and high force exercises. So the demands on the body are very high. It is thus very important that you are well prepared to face each training session. The warm-up to be used is the same for all the sessions of the week. It is divided into two parts, the articular preparation and the muscular preparation.
Articular preparation
The objective of this part of the workout is to prepare your body to reach the joint positions involved in Olympic lifting. You only use a bar for these drills. This portion of the workout includes four exercises. Do all of these exercises in succession, do not rest more than 15 seconds.
- Snatch stance bar stretch
This drill is relatively simple. You take the bar with a snatch grip (wide grip) and squat down. While in the full squat position you place the bar on your quads and press down. Try to keep an arched lower back. Maintain that position for 30 seconds.
- Snatch rotations
This drill is relatively similar to the good ole Cuban press. Grab the bar with a snatch grip, upright row it until your arms are parallel to the ground, then rotate to the finished snatch position. Do this drill for 2 sets of 6 reps with an empty bar.
- Snatch press
This drill is a simple behind the neck press with an empty bar. Concentrate on pressing the bar in a straight line upward, the bar should not come forward during the movement. Once again, do 2 sets of 6 reps with an empty bar.
- Overhead squat
Okay, now we’ll see just how supple you really are! This drill seems simple, but it can be discouraging to some strong guys who will have trouble with only the bar! While the bar is held overhead in a finished snatch position, squat down in a straight line. The shoulders should not move, the bar should stay in place and not drift forward and the trunk is kept upright. A lot of you will have problems going down low in the drill. Don’t get discouraged. Go as low as you can while keeping proper form. By practicing it you will eventually be able to reach the full squat position. Again, you perform 2 sets of 6 reps with the empty bar.
Muscular preparation
By now your joints are ready for the upcoming effort. You now need to get your muscles in gear! This phase uses the Javorek complex created by weightlifting coach Istvan Javorek. It is composed of five drills to be executed in a superset, no rest between exercises! Only one superset is performed. Keep the load low, the objective is to get ready for action, not drive yourself to the ground! This complex will give you a lot of muscle gain and will help you learn the Olympic lifts. I normally have my athletes start with 30-40kg and adjust the load from there.
- Snatch-grip power pull
Using a snatch grip, start the bar slightly above the knees. Using your whole body, bring the bar up to your sternum. Notice how the bar is kept close to the body and how the body is fully extended. Do 6 reps of this exercise.
- Clean-grip power pull
This drill is exactly like the snatch-grip power pull except that you use a narrower clean grip. You still want to use your whole body and finish fully extended. Also do 6 reps of this exercise.
- Squat-press
This is a hybrid exercise. It combines a full back squat with a behind the neck press. Squat down, quickly stand up, and use the momentum to help you press the bar overhead. Use an intermediate grip spacing (between clean and snatch grip). Do 6 reps of this movement.
- Straight-leg Goodmorning
Stand upright like you would at the beginning of a back squat, use an intermediate grip. While keeping the legs straight, bend the trunk forward and bring the hips backward. Do 6 reps of this exercise.
- Barbell rowing
This is the last exercise of the complex. Place the bar on the ground and bring it up to your abs. The back should remain flat during the whole movement and the head should be in line with the spine (not looking forward which would hyperextend the neck). Do 6 reps of this last drill.
Learn to master all of these warm-up drills, as they will be a part of all your workouts for the next 12 weeks. Besides being a very thorough and specific warm-up routine, it will improve your dynamic flexibility and help you learn the proper form for the Olympic lifts faster.
Main workouts
This section includes the exercise prescription for the whole training month. Each training day will be described individually and all of the exercises will be explained and illustrated.
First phase of training: Introduction (4 weeks)
Monday (Snatch emphasis)
Objectives:
-
- To learn and master the explosion phase of the snatch
- To strengthen the muscles involved in the snatch
- To increase dynamic flexibility in the specific snatch positions
- Power snatch from blocks
The power snatch from blocks is one of my favorite exercises to teach an athlete how to explode. Since the bar is placed on blocks in the starting position (slightly above the knees) the movement becomes easier technically (so you can focus on exploding) and the acceleration path is short (so you must explode to complete the lift). Lifting from the blocks also has the advantage of placing your body in the optimal pulling position.
Starting position:
- Feet are hip width, toes are turned slightly outward
- Legs are flexed at the knees slightly (around 130-140 degrees)
- Trunk is flexed, back is tightly arched
- Shoulders are in front of the bar
- Arms are straight
- Traps are stretched
- Head is looking forward
Pull:
-
- Explode upward with a powerful leg and back extension
- The bar should be kept close to the body at all times
- The traps contract forcefully to further accelerate the bar
- Basically, what we are looking for is for the body to look like a bow (hips forward, back and legs extended)
Catch:
-
-
- Catch the bar with a slight knee flexion (do not catch it with straight legs, learn to squat under it)
- Catch the bar with the arms locked, do not press the weight
- Keep the traps tight to help hold the bar
-
The loading parameters for the power snatch from blocks are as follows:
Week 1: 1 x 5, 1 x 4, 1 x 3, 1 x 5
Week 2: 1 x 5, 1 x 4, 1 x 3, 1 x 5, 1 x 4
Week 3: 1 x 5, 1 x 4, 1 x 3, 1 x 5, 1 x 4, 1 x 3
Week 4: 3 x 3
Note: You may have noticed that I did not give a percentage or load to use. Well, since most of you have never performed a power snatch before, it would be pretty pointless to use percentages to plan your training load! Simply remember that sets of 5 are light, sets of 4 slightly heavier and sets of 3 are moderate weight. We do not want to use big weights during this phase. Focus on learning the proper technique and explosion, loading will follow!
- Snatch-grip deadlift
The snatch-grip deadlift is useful when a trainee is learning the Olympic lifts. It strengthens the muscles involved in the snatch and teaches proper positioning for the lift. It is not specific to the snatch in the sense that it is a slower movement. However, it does increase strength in the starting position of the snatch, which can be helpful while the lifter is focusing on lifts from blocks.
Starting position:
Pull:
- Feet are hip width, toes are turned slightly outward
- The grip is wide (approximately twice shoulder width)
- Legs are flexed at the knees slightly (around 100-110 degrees)
- Trunk is flexed, back is tightly arched
- Shoulders are in front of the bar
- Arms are straight
- Traps are stretched
- Head is looking forward and down
- From the ground up to the knees the bar is lifted via a knee extension, back angle remains the same
- The back stays tight and arched
- The arms stay long and keep the bar close to the body
- From the knees up to the standing position the bar is lifted with a combined back extension and knee extension.
- Back stays tight
- The arms stay long
- The lift is completed when you are standing up completely
The loading parameters for the snatch-grip deadlift are as follows:
Week 1: 1 x 5, 1 x 4, 1 x 3, 1 x 5
Week 2: 1 x 5, 1 x 4, 1 x 3, 1 x 5, 1 x 4
Week 3: 1 x 5, 1 x 4, 1 x 3, 1 x 5, 1 x 4, 1 x 3
Week 4: 3 x 3
Once again, I give no specific percentage. Although a good starting point is 50% of your regular deadlift or full squat maximum. You should not go too heavy on this drill. The objective is to learn the proper pulling sequence in the snatch (knee extension followed by a combined knee and lower back extension) and develop the capacity to maintain a tight back during the whole movement. For the sets of 4 you add a little weight and the sets of 3 can be fairly heavy if you are able to maintain the proper pulling sequence and back position. This is not a competition deadlift, do not sacrifice form for weight. You’re much better off trying to lift the weight faster than increasing the load.
- Overhead squat
This is a great exercise for any athlete and it’s capital to the beginning Olympic lifter. It is fantastic for increasing the level of dynamic flexibility in the hip, knee, and ankle joints, and really teaches you how to use your whole body at the same time! To properly execute this drill your lower body must remain loose and flexible and you must use your upper body muscles to “brace” the position; your trunk, shoulders, upper back, and traps should be tight to hold the bar in place. Your upper body must become one single piece. The bar should be kept above the ears during the whole movement, do not let the bar drift forward.
Starting position:
- Stand up in the finished snatch position
- Feet are slightly wider than the hips, toes turned outward a bit
- Trunk is solid, traps are contracted
- Arms are solid, trying to “push out” (like if you were trying to rip the bar apart) will help you keep your shoulders and arms tight.
Squat:
-
- Start to squat down, the body should go down in a straight line
- Avoid trunk flexion, if you start bending forward you will lose the bar
- As you squat down try pushing the bar up (to contract the traps and stabilize the bar)
- The heels must stay on the ground
- When you reach the lowest position, stand up in a straight line, avoid excessive trunk movement
Note: Some people will have flexibility problems at first. Some people will have trouble going lower than a ¼ squat without starting to bend forward or have their heels come off the ground. Only go as low as you can while maintaining proper form. However, at each workout, try to go down a bit more.
The loading parameters for the overhead squat are as follows:
Week 1: 4 x 5
Week 2: 3 x 5
Week 3: 2 x 5
Week 4: 4 x 5
Ideally, you want to be able to do your sets of 5 with the same load you used on the power snatch from blocks. However, few will be able to do this from the get go. Start light; use just the bar if you need to, until you feel comfortable in the movement. At the end of the month you should be using the same load (or more) for the overhead squat as in the power snatch from blocks.
- Overhead shrugs
The overhead shrugs are an exceptional trap builder and a great way to increase your capacity to hold loads at arms length.
Starting position:
-
- Hold the bar overhead (intermediate grip) as if you had just completed a shoulder press
- Stretch your traps by brining your shoulders down. Keep the arms locked and the bar overhead
- The trunk must be tight
Shrug:
- While keeping a tight posture, bring the shoulders up by contracting the traps, the shoulders must go up in a straight line
- Hold the highest position for 2 seconds
The loading parameters for the overhead shrug are as follows:
Week 1: 4 x 5
Week 2: 3 x 5
Week 3: 2 x 5
Week 4: 4 x 5
Start with a load you can comfortably press over your head. Loading is not all that important as you will feel this exercise even at low to moderate weights. On top of being a great trap builder, this exercise is fantastic for developing the capacity to stabilize the trunk under loading conditions.
- Snatch Cuban press
This exercise is a very effective shoulder builder. It will increase strength in all of the deltoids’ heads and also develop your rotator cuff muscles. Using this exercise is a great insurance policy for your shoulders!
Starting position:
-
- Stand up, a dumbbell in each hand, arms at your sides
- Keep a good posture, look forward
Shrug:
- The initial lift of the dumbbells is a semi upright row
- Contract the traps and arms
Rotation:
- Rotate your shoulders so that your arms end up overhead, pointing outward and up
- Hold that position for 2 seconds
The loading parameters for the snatch Cuban press are as follows:
Week 1: 2 x 15
Week 2: 2 x 15
Week 3: 1 x 15
Week 4: 2 x 15
Tuesday (Jerk emphasis)
Objectives:
-
- To learn and master the explosion phase of the jerk
- To strengthen the muscles involved in the jerk
- To increase dynamic flexibility in the specific jerk positions
- Push jerk
The push jerk is another of my favorite exercises. This is an absolutely formidable whole body strengthening exercise! It really teaches how to synchronize lower body and upper body explosion into one big powerful action.
Starting position:
- Take the bar from the rack
- Place it on your clavicle and shoulders
- The bar is held with a clean grip or an intermediate grip
- Hold the bar with the full hand, not just the fingertips
- The elbows are pointed forward and down, not just down
- The body is straight and tight
The dip:
-
- Lower your body in a straight line (imagine that your back is sliding on a wall)
- The dip is controlled, but not too slow
- You dip into a quarter squat, no more
The explosion:
- When you complete the dip quickly reverse your movement and explode upward!
- You should go for a very hard push with the legs (so that the bar will leave your shoulders at the top)
- Just as you reach the upright position, press your hands up as fast as possible
- Try to “throw” the bar upwards, not press it
The catch:
-
- Much like in the power snatch from blocks, catch the bar with a
slight squat under the bar
-
- The trunk remains tight
- The arms are immediately locked (you receive the bar with locked arms, no pressing of the weight)
The loading parameters for the push jerk are:
Week 1: 1 x 5, 1 x 4, 1 x 3, 1 x 5
Week 2: 1 x 5, 1 x 4, 1 x 3, 1 x 5, 1 x 4
Week 3: 1 x 5, 1 x 4, 1 x 3, 1 x 5, 1 x 4, 1 x 3
Week 4: 3 x 3
Start conservatively until you learn to use a synchronized explosive action of the lower and upper body. A weight equivalent to what you use on the shoulder press is adequate at first. As you begin to feel more comfortable with the movement you can increase the load (as long as proper technique and explosion are maintained).
- Bradford press
The Bradford press takes its name after former American lifting champion Jim Bradford. It is an unparalleled shoulder builder and it will help with the initial arm drive during the jerk.
Starting position:
-
- The bar is held on the traps with an intermediate grip, much like in the starting position of the back squat
Execution:
- Press the bar until it’s just above the head, using the arms only
- Bring the bar over your head and onto the front of your shoulders
- Press the bar until it’s just above the head, using the arms only
- Bring the bar over your head and onto the back of your shoulders
The loading parameters for the Bradford press are:
Week 1: 4 x 5 (5 front, 5 back)
Week 2: 3 x 5 (5 front, 5 back)
Week 3: 2 x 5 (5 front, 5 back)
Week 4: 4 x 5 (5 front, 5 back)
You can go relatively heavy on this movement. Start with a load you would normally use on the military press and go from there. Use a weight as heavy as you can without cheating with your legs.
- Loaded jump squat
This exercise really helps develop the powerful leg drive involved in the jerk! It is also a very effective way to develop vertical jumping ability.
Starting position:
-
- Standing up with the bar on the bar of your shoulders.
- A box (50-70cm) is placed about a foot away from your feet
Execution:
- Dip into a quarter squat and explode upward
- Jump onto the box
Note: You don’t have to use a box, you can simply jump up and land on the ground. However, using an elevated box will decrease the stress on your back and knees (because there will be less kinetic energy built-up during the descent).
The loading parameters for the loaded jump squat are:
Week 1: 3 x 5
Week 2: 4 x 5
Week 3: 5 x 5
Week 4: 2 x 5
The load to use is approximately 15% of your best back squat. Some very explosive individuals can use are much as 20% of their best back squat. Individuals with very low back squats can start with around 65lbs on this exercise.
- Bar jump squat
This exercise is much like the preceding one, except that the load is minimal. Because of the lighter load you will be able to impart more acceleration to the bar and thus develop a different portion of the force-velocity curve. It is also a great way to increase vertical jumping ability.
Starting position:
-
- Standing up with the bar on the back of your shoulders.
Execution:
- Dip into a quarter squat and explode upward
- Land on the ground, flex your knees to absorb the shock
The loading parameters for the bar jump squat are:
Week 1: 4 x 6
Week 2: 3 x 6
Week 3: 2 x 6
Week 4: 4 x 6
The following loads are appropriate:
500lbs+ squat: 55lbs
300-500lbs squat: 45lbs (bar only) 200-300lbs squat: 35lbs (smaller bar)
100-200lbs squat: 25lbs (still smaller bar)
The load is kept constant during the whole cycle. The aim is to increase jump height, not the weight used.
Thursday (clean emphasis)
Objectives:
- To learn and master the explosion phase of the clean
- To strengthen the muscles involved in the clean
- To increase dynamic flexibility in the specific clean positions
- Power clean from blocks
Yes! Here’s one of the bread and butter lifts for all athletes! The power clean from blocks is almost untouched when it comes to increasing pulling power. Since the bar is placed on blocks in the starting position (slightly above the knees) the movement becomes easier technically (so you can focus on exploding) and the acceleration path is short (so you must explode to complete the lift). Lifting from the blocks also has the advantage of placing your body in the optimal pulling position.
Starting position:
- Feet are hip width, toes are turned slightly outward
- Legs are flexed at the knees slightly (around 140-150 degrees)
- Trunk is flexed, back is tightly arched
- Shoulders are in front of the bar
- Arms are straight
- Traps are stretched
- Head is looking forward
Pull:
-
- Explode upward with a powerful leg and back extension
- The bar should be kept close to the body at all times
- The traps contract forcefully to further accelerate the bar
- Basically, what we are looking for is for the body to look like a bow (hips forward, back and legs extended)
Catch:
-
-
- Catch the bar with a slight knee flexion (do not catch it with straight legs, learn to squat under it)
- Catch the bar on your shoulders and whip your arms around so that the elbows are pointing forward, not down
-
The loading parameters for the power clean from blocks are as follows:
Week 1: 1 x 5, 1 x 4, 1 x 3, 1 x 5
Week 2: 1 x 5, 1 x 4, 1 x 3, 1 x 5, 1 x 4
Week 3: 1 x 5, 1 x 4, 1 x 3, 1 x 5, 1 x 4, 1 x 3
Week 4: 3 x 3
Note: You may have noticed that I did not give a percentage or load to use. Well, since most of you have never performed a power clean before, it would be pretty pointless to use percentages to plan your training load! Simply remember that sets of 5 are light, sets of 4 slightly heavier, and sets of 3 are moderate weight. We do not want to use big weights during this phase, focus on learning the proper technique and explosion, loading will follow!
-
- Clean-grip deadlift
The clean-grip deadlift is useful when a trainee is learning the Olympic lifts. It strengthens the muscles involved in the clean and teaches proper positioning for this lift. It is not specific to the clean in the sense that it is a slower movement. However, it does increase strength in the starting position, which can be helpful while the lifter is focusing on lifts from blocks. Remember that this is not a powerlifting deadlift. The objective is not to max out on the lift, but to use the same pulling technique and sequence as during a clean.
Starting position:
Pull:
- Feet are hip width, toes are turned slightly outward
- The grip is narrow (approximately shoulder width)
- Legs are flexed at the knees slightly (around 110-120 degrees)
- Trunk is flexed, back is tightly arched
- Shoulders are in front of the bar
- Arms are straight, traps are stretched
- Head is looking forward and down
- From the ground up to the knees the bar is lifted via a knee extension, back angle remains the same
- The back stays tight and arched
- The arms stay long and keep the bar close to the body
- From the knees up to the standing position, the bar is lifted with a combined back extension and knee extension.
- Back stays tight
- The arms stay long
- The lift is completed when you are standing up completely
The loading parameters for the snatch-grip deadlift are as follows:
Week 1: 1 x 5, 1 x 4, 1 x 3, 1 x 5
Week 2: 1 x 5, 1 x 4, 1 x 3, 1 x 5, 1 x 4
Week 3: 1 x 5, 1 x 4, 1 x 3, 1 x 5, 1 x 4, 1 x 3
Week 4: 3 x 3
Once again I’ll say that the goal is not to lift as much as possible, but to use proper Olympic lifting technique. That having been said, you should still try to increase your training load each week.
-
- Muscle clean
This exercise is not so much for the development of the clean technique as its very different from a clean. However, it serves its purpose as a general strengthening exercise for the shoulders, forearms, and traps. All of which are included in the clean. It does serve one technical objective; it helps you learn the value of keeping the bar close to your body.
Starting position:
-
-
- Stand upright, holding the bar with a clean grip
- Keep the legs straight
-
Pull:
- Execute an upright row
- Keep the elbows high and the bar close to your body
Catch:
-
- Once that the bar reaches its highest point in the upright row, squat down under it to complete the lift
The loading parameters for the muscle clean are:
Week 1: 4 x 5
Week 2: 3 x 5
Week 3: 2 x 5
Week 4: 4 x 5
You don’t need a lot of weight to make this exercise difficult! Start with the weight you can upright row in good form for 5-8 reps and adjust the load from there. You can use as much weight as you can, as long as you can complete the lift without cheating. Bending the back backwards and using your legs in the pull are considered cheating.
Friday (Remedial exercises)
Objective:
1. General strengthening of the muscles involved in the Olympic lifts
- Dumbbell bench press
This exercise will increase your triceps and shoulder strength, which is very useful while holding heavy jerks or snatches. I prefer to use dumbbells over a barbell because the range of motion is greater. In Olympic lifting you need good joint mobility, so exercises with a greater range of motion should be prioritized.
I trust that you already know how to perform this movement as it’s fairly common in most gyms, so I won’t go into more detail about proper form.
The loading parameters for the dumbbell press are:
Week 1: 3 x 5
Week 2: 4 x 5
Week 3: 5 x 5
Week 4: 2 x 5
Use heavy weights for this exercise, but do not cut your range of motion short. Try to get a good pectoral stretch in the bottom position. This will help you improve shoulder mobility for the snatch and jerk.
- Military press
The military press is another great triceps and shoulder strengthening exercise. A proper military press is executed with straight legs and no cheating to get the bar up. Like other overhead lifts, the military press is also a great way to develop the stabilizing capacities of the trunk muscles. Once again, no need to describe this exercise in detail, as it’s a fixture in most gyms.
The loading parameters for the military press are:
Week 1: 3 x 5
Week 2: 4 x 5
Week 3: 5 x 5
Week 4: 2 x 3
- Reverse curl
I’m personally not a big fan of biceps exercises, but the reverse curl has some value because it’s a great way to strengthen the forearms and gripping strength, which are useful for the weightlifter. Beware though; do not use a reverse curl motion during your cleaning exercises!
The loading parameters for the military press are:
Week 1: 4 x 5
Week 2: 3 x 5
Week 3: 2 x 5
Week 4: 4 x 5
- Full back squat
The back squat is probably the best assistance exercise for the Olympic lifts. It is the best way to increase leg and glute strength. When properly performed it’s also very effective as a lower body flexibility exercise and a trunk stabilization powerhouse!
I always advocate going as low as possible as long as the heels can be kept on the ground and the lower back stays arched.
Starting position:
- Stand up, bar on the lower portion of the traps (intermediate grip)
- The feet are shoulder width and pointing slightly outward
- The chest is out and the head is looking forward
Squat down:
- Squat down under control
- Keep the trunk upright during the whole movement
- Keep the upper back and lower back tight
- Go as low as possible while maintaining proper form
Stand up:
- Do not pause in the bottom position, immediately stand up
- Try to accelerate the bar as you are standing up
- Avoid bending forward, use your legs to stand up, not your back
The loading parameters for the full back squat are:
Week 1: 3 x 5
Week 2: 4 x 5
Week 3: 5 x 5
Week 4: 2 x 3
You can try to lift big weights in the back squat but you must do so while maintaining proper form and going low. There is no sissy quarter or half squatting in Olympic lifting!
Second phase of training: technical learning (4 weeks)
Monday (Snatch emphasis)
Objectives:
- To learn the full snatch sequence
- To strengthen the muscles involved in the snatch
- To increase dynamic flexibility in the specific snatch positions
- Half-squat snatch from the floor
This is the first step in learning the full competitive snatch. You start to integrate the first hard technical part of the lift, the switch from below the knees (slow controlled pull) to above the knees (explosion). You will catch the bar into a half squat, to get used to dropping under the bar.
Starting position:
-
-
- Feet are hip width, toes are turned slightly outward
- Legs are flexed at the knees (around 90-100 degrees)
- Trunk is flexed, back is tightly arched
- Shoulders are in front of the bar
- Arms are straight
- Traps are stretched
- Head is looking forward
-
Pull:
- From the ground to the knees the lifting is controlled, the back angle stays the same, the bar is lifted only via leg extension.
- Once the bar is above the knees, explode upward with a powerful leg and back extension
- The bar should be kept close to the body at all times
- The traps contract forcefully to further accelerate the bar
- Basically, what we are looking for is for the body to look like a bow (hips forward, back and legs extended)
Catch:
- Catch the bar in a half squat position
- Catch the bar with the arms locked, do not press the weight
- Keep the traps tight to help hold the bar
The loading parameters for the half-squat snatch from the floor are as follows:
Week 1: 2 x 4, 2 x 3
Week 2: 3 x 4, 3 x 3, 1 x 2
Week 3: 1 x 3, 1 x 2, 1 x 1, 1 x 3, 1 x 2, 1 x 1
Week 4: 3 x 3
Note: You may have noticed that I did not give a percentage or load to use. Well, since most of you have never performed a snatch before, it would be pretty pointless to use percentages to plan your training load! But after the first phase of training you should have a good idea of the weight you can handle. Start with a load equivalent to what you used on the power snatch from the blocks.
-
- Snatch pull
The snatch pull is the logical progression from the snatch-grip deadlift. Ideally, you want to use the exact same pulling motion as during the half-squat snatch. Concentrate on rising up on the toes and contracting the traps at the same time.
The loading parameters for the snatch pull are as follows:
Week 1: 2 x 4, 2 x 3
Week 2: 3 x 4, 3 x 3, 1 x 2
Week 3: 1 x 3, 1 x 2, 1 x 1, 1 x 3, 1 x 2, 1 x 1
Week 4: 3 x 3
Ideally, you want to use the exact same load you used on the half-squat snatch, at the most 10% above what you used in that exercise. Many people make the mistake of going way too heavy on pulls. If the load is significantly greater than during a snatch, there will be no positive transfer.
-
- Drop snatch
Just like the snatch pull is the progression from snatch-grip deadlifts, the drop snatch is the progression from overhead squats. This drill has the same benefits as the overhead squat, but it also teaches the lifter how to drop under the bar.
Starting position:
-
-
- Stand up with the bar on your shoulders with a snatch grip
- Feet are slightly wider than the hips, toes turned outward a bit
- Trunk is solid, back is tight
- Elbows are pointing down.
-
Drop:
- You must drop directly under the bar, try not to allow the bar to drop a lot. The key is to lock the arms as you go down. You must go down very fast to beat the gravity that will pull the bar down
- Avoid trunk flexion. If you start bending forward you will lose the bar
- As you squat down, try pushing the bar up (to contract the traps and stabilize the bar)
- The heels must stay on the ground
- When you reach the lowest position stand up in a straight line, avoid excessive trunk movement
The loading parameters for the drop snatch are as follows:
Week 1: 2 x 5
Week 2: 5 x 5
Week 3: 3 x 3, 1 x 2
Week 4: 3 x 5
At first this drill is going to be very hard as you are not used to dropping under the bar. So you may want to start very light. Hopefully by now you have the proper flexibility to do an overhead squat, and a good objective is to be able to use the same load on the drop- snatch as you did for the overhead squat. Not an easy task, but everybody needs a challenge!
-
- Slow-speed snatch
This exercise was a staple in Alexeyev’s training program. After that it became a widely used exercise by Soviet superheavy lifters. It is a good exercise to build the strength of the traps, arms, and shoulders. Plus, it is a good teaching tool to learn the full squat snatch.
The drill is performed much like a regular half-squat snatch except that you lift the bar slowly, under control and once it reaches the sternum you quickly drop under the bar (much like in a drop-snatch).
The loading parameters for the slow-speed snatch are as follows:
Week 1: 3 x 3
Week 2: 5 x 3
Week 3: 2 x 3, 2 x 2
Week 4: 2 x 3
The load is really not all that relevant for this exercise. A good starting point is half of what you used for the half-squat snatch. Concentrate on a slow pull and a fast drop under the bar.
Tuesday (Jerk emphasis)
Objectives:
-
-
- To learn the split jerk
- To strengthen the muscles involved in the jerk
- To increase dynamic flexibility in the specific jerk positions
-
- Split jerk
The split jerk is basically the same as the push jerk, which I already covered. The only difference is that once you jerk the bar off your shoulders you drop under the bar while doing a split (one leg forward, one leg backward).
Starting position:
- Take the bar from the rack
- Place it on your clavicle and shoulders
- The bar is held with a clean grip or an intermediate grip
- Hold the bar with the full hand, not just the fingertips
- The elbows are pointed forward and down, not just down
- The body is straight and tight
The dip:
-
- Lower your body in a straight line (imagine that your back is sliding on a wall)
- The dip is controlled, but not too slow
- You dip into a quarter squat, no more
The explosion:
- When you complete the dip quickly reverse your movement and explode upward!
- You should go for a very hard push with the legs (so that the bar will leave your shoulders at the top)
- Just as you reach the upright position, press your hands up as fast as possible
- Try to “throw” the bar upwards, not press it
The catch:
-
- You catch the bar with one leg split forward and one leg back. Experiment to see which leg forward feels more comfortable.
- The trunk remains tight
- The arms are immediately locked (you receive the bar with locked arms, no pressing of the weight)
The loading parameters for the split jerk are:
Week 1: 2 x 4, 2 x 3
Week 2: 3 x 4, 3 x 3, 1 x 2
Week 3: 1 x 3, 1 x 2, 1 x 1, 1 x 3, 1 x 2, 1 x 1
Week 4: 3 x 3
At first use the same load you used on the push jerk. However, as you become better at the split style you should be able to handle slightly heavier loads than in a push jerk.
- Push press
The push press is best described as a “cheated” military press. You use a slight leg drive to get the bar started off the shoulders, but the arms still do most of the work. This is different than the push jerk, in which the legs do most of the work.
The loading parameters for the push press are:
Week 1: 2 x 5
Week 2: 5 x 5
Week 3: 3 x 3, 1 x 2
Week 4: 2 x 3
You can go relatively heavy on this movement. Start with a load you would normally use on the military press and go from there. Use a weight as heavy as you can with only a slight leg drive (do not turn it into a push jerk).
- ¼ Front squat
The objective of this drill is to strengthen the leg muscles as well as to get you used to holding a big weight on your shoulders in preparation for a jerk. A lot of times a jerk is missed because the load feels heavy and the athlete gives up. Well, by practicing the ¼ front squat you will get used to holding weights way heavier than you can jerk. This has a very important psychological impact on your lifting.
I recommend doing this drill in the power rack with the bar starting at the same height as the end of the dipping phase in your jerk. Be careful to keep your torso straight in this movement, we want to emulate a jerk motion as much as possible.
The loading parameters for the ¼ front squat are:
Week 1: 2 x 5
Week 2: 5 x 5
Week 3: 3 x 3, 1 x 2
Week 4: 2 x 3
Since this is a limited range of motion exercise you will be able to use a lot of weight on this drill. I suggest starting with your back squat max and adjusting the load from there.
- Bar jump squat
This exercise is much like the preceding one, except that the load is minimal. Because of the lighter load you will be able to impart more acceleration to the bar and thus develop a different portion of the force-velocity curve. It is also a great way to increase vertical jumping ability.
Starting position:
-
- Standing up with the bar on the back of your shoulders.
Execution:
-
- Dip into a quarter squat and explode upward
- Land on the ground, flex your knees to absorb the shock
The loading parameters for the bar jump squat are:
Week 1: 2 x 10
Week 2: 5 x 10
Week 3: 3 x 6
Week 4: 2 x 6
The following loads are appropriate:
500lbs+ squat: 55lbs
300-500lbs squat: 45lbs (bar only) 200-300lbs squat: 35lbs (smaller bar)
100-200lbs squat: 25lbs (still smaller bar)
The load is kept constant during the whole cycle. The aim is to increase jumping height, not the weight used.
Thursday (clean emphasis)
Objectives:
- To learn the proper clean sequence
- To strengthen the muscles involved in the clean
- To increase dynamic flexibility in the specific clean positions
- Half-squat clean from the floor
This is much like the half-squat snatch in that it uses the same lifting sequence as during a competitive full squat clean. Once again, you lift the load under control up to the knees, then, explode! Catch the bar in a half-squat to get used to going under the bar.
Starting position:
-
- Feet are hip width, toes are turned slightly outward
- Legs are flexed at the knees slightly (around 100-120 degrees)
- Trunk is flexed, back is tightly arched
- Shoulders are in front of the bar
- Arms are straight
- Traps are stretched
- Head is looking forward
Pull:
-
-
- From the ground to the knees lift the bar under control while keeping a stable torso angle.
- At the knees explode upward with a powerful leg and back extension
- The bar should be kept close to the body at all times
- The traps contract forcefully to further accelerate the bar
-
Catch:
- Catch the bar in a half-squat
- Catch the bar on your shoulders and whip your arms around so that the elbows are pointing forward, not down
The loading parameters for the half-squat clean from the floor are as follows:
Week 1: 2 x 4, 2 x 3
Week 2: 3 x 4, 3 x 3, 1 x 2
Week 3: 1 x 3, 1 x 2, 1 x 1, 1 x 3, 1 x 2, 1 x 1
Week 4: 3 x 3
Note: You may have noticed that I did not give a percentage or load to use. Well, since most of you have never performed a clean before, it would be pretty pointless to use percentages to plan your training load! But after the first phase of training you should have a good idea of the weight you can handle. Start with a load equivalent to what you used on the power clean from the blocks
- Clean pull
The clean pull is the logical progression from the clean-grip deadlift. Ideally, you want to use the exact same pulling motion as during the half-squat snatch. Concentrate on rising up on the toes and contracting the traps at the same time.
The loading parameters for the snatch pull are as follows:
Week 1: 2 x 4, 2 x 3
Week 2: 3 x 4, 3 x 3, 1 x 2
Week 3: 1 x 3, 1 x 2, 1 x 1, 1 x 3, 1 x 2, 1 x 1
Week 4: 3 x 3
- Romanian deadlift
The biggest difference between a Romanian deadlift and other deadlifts is that the starting position is the other deadlifts’ completed position; standing fully upright. From that position you will lower the bar with a knee flexion and trunk flexion then bring it back up for a complete rep.
Start position: Feet are hip width, toes are pointing straight forward. The grip is narrow (approximately shoulder width). Legs are very slightly bent and the torso is fully extended. Back is tightly arched. Shoulders are back (beach position). Arms are straight, traps are stretched. Head is looking forward.
Lowering: Lower the bar until it’s 2-3” below the knees. The knees only bend slightly more than in the starting position, the back becomes parallel to the ground and the hips are brought back. Back stays tight. The arms stay long.
Pull: Bring the bar back up in the reverse of the way you lowered it; mostly through trunk extension with a slight extension of the knees. Back stays tight. The arms stay long. The lift is completed when you are standing up completely.
The loading parameters for the Romanian deadlift are:
Week 1: 2 x 5
Week 2: 5 x 5
Week 3: 3 x 3, 1 x 2
Week 4: 2 x 3
- ½ deadlift
This consists of a partial deadlift with the bar starting at, or slightly above the knees. You can use really heavy weights for this exercise, which will do wonders for your dynamic lower back strength and isometric trap and back strength. For competitive powerlifters this can really help develop a strong lock out.
Start position: The bar is set on pins (or blocks) so that it’s at knee level, or slightly above. Feet are hip width, toes are turned slightly outward. The grip is narrow (approximately shoulder width). Legs are slightly bent. Trunk is flexed, back is tightly arched. Shoulders are in front of the bar. Arms are straight, traps are stretched. Head is looking forward.
Pull: From the pins up to the standing position the bar is lifted with a combined back extension and knee extension. Back stays tight. The arms stay long. The lift is completed when you are standing up completely.
The loading parameters for the 1/2 deadlift are:
Week 1: 2 x 5
Week 2: 5 x 5
Week 3: 3 x 3, 1 x 2
Week 4: 2 x 3
Friday (Remedial exercises)
Objective:
-
- General strengthening of the muscles involved in the Olympic lifts
- Bench press
This exercise will increase your triceps and shoulder strength, which is very useful while holding heavy jerks or snatches.
I trust that you already know how to perform this movement as it’s fairly common in most gyms, so I won’t go into more details about proper form.
The loading parameters for the bench press are:
Week 1: 2 x 5
Week 2: 5 x 5
Week 3: 3 x 3, 1 x 2
Week 4: 3 x 3
Use heavy weights for this exercise, but do not cut your range of motion short. Touch the chest and explode upwards!
- Military press
The military press is another great triceps and shoulder strengthening exercise. A proper military press is executed with straight legs and no cheating to get the bar up. Like other overhead lifts, the military press is also a great way to develop the stabilizing capacities of the trunk muscles. Once again, no need to describe this exercise in detail, as it’s a fixture in most gyms.
The loading parameters for the military press are:
Week 1: 2 x 5
Week 2: 5 x 5
Week 3: 3 x 5
Week 4: 2 x 3
- Zottman curl
You curl the weight with the palms up and lower it with the palms down, making the muscle work hard on both the concentric and eccentric portion of the movement. This drill will strengthen all of the arm flexor muscles. Although not of capital importance in Olympic lifting, the fact is that a chain will always break at its weakest link.
The loading parameters for the Zottman curl are:
Week 1: 2 x 5
Week 2: 5 x 5
Week 3: 3 x 5
Week 4: 2 x 5
- Front squat
The front squat is a fantastic quad and glute builder. It also has the added benefit of preparing you to catch a full squat clean.
I always advocate going as low as possible as long as the heels can be kept on the ground and the lower back stays arched.
Starting position:
- Stand up, bar on the clavicle, elbows are high
- The feet are shoulder width and pointing slightly outward
- The chest is out and the head is looking forward
Squat down:
-
- Squat down under control
- Keep the trunk upright during the whole movement
- Keep the upper back and lower back tight
- Go as low as possible while maintaining proper form
Stand up:
-
-
- Do not pause in the bottom position, immediately stand up
- Try to accelerate the bar as you are standing up
- Avoid bending forward, use your legs to stand up, not your back
-
The loading parameters for the front squat are:
Week 1: 2 x 5
Week 2: 5 x 5
Week 3: 3 x 3, 1 x 2
Week 4: 3 x 3
You can try to lift big weights in the front squat, but you must do so while maintaining proper form and going low. This will give you a lot of confidence for when you are ready to do full squat cleans.
Third phase of training: technical mastery (4 weeks)
Monday (Snatch emphasis)
Objectives:
- To learn the full snatch sequence
- To strengthen the muscles involved in the snatch
- To develop an efficient lifting technique
- Half-squat snatch from the floor
This is the first step in learning the full competitive snatch. You start to integrate the first hard technical part of the lift, the switch from below the knees (slow controlled pull) to above the knees (explosion). You will catch the bar in a half squat, to get used to dropping under the bar.
Starting position:
- Feet are hip width, toes are turned slightly outward
- Legs are flexed at the knees (around 90-100 degrees)
- Trunk is flexed, back is tightly arched
- Shoulders are in front of the bar
- Arms are straight
- Traps are stretched
- Head is looking forward
Pull:
-
- From the ground to the knees the lifting is controlled, the back angle stays the same, the bar is lifted only via leg extension. 2.Once the bar is above the knees, explode upward with a powerful leg and back extension
- The bar should be kept close to the body at all times
- The traps contract forcefully to further accelerate the bar
- Basically, what we are looking for is for the body to look like a bow (hips forward, back and legs extended)
Catch:
- Catch the bar in a half squat position
- Catch the bar with the arms locked, do not press the weight
- Keep the traps tight to help hold the bar
The loading parameters for the half-squat snatch from the floor are as follows:
Week 1: 2 x 3, 2 x 2
Week 2: 2 x 3, 2 x 2, 1 x 1
Week 3: 1 x 3, 1 x 2, 2 x 1,
Week 4: 2 x 2
Note: You may have noticed that I did not give a percentage or load to use. Well, since most of you have never performed a snatch before, it would be pretty pointless to use percentages to plan your training load! But after the first and second phase of training you should have a good idea of the weight you can handle and by now your technique should be good, so you can begin to lift interesting weights.
-
- Full squat snatch from the floor
The first 8 weeks of training have all being leading to this, the optimal test of functional strength! By now you should be pretty good at the pulling part of the snatch and are at ease in the overhead squat position. You also learned to receive the bar in the full squat position. So now it’s time to blend it all into one smooth, but explosive movement!
Starting position:
-
-
- Feet are hip width, toes are turned slightly outward
- Legs are flexed at the knees (around 90-100 degrees)
- Trunk is flexed, back is tightly arched
- Shoulders are in front of the bar
- Arms are straight
- Traps are stretched
- Head is looking forward
-
Pull:
- From the ground to the knees the lifting is controlled, the back angle stays the same, the bar is lifted only via leg extension.
- Once the bar is above the knees, explode upward with a powerful leg and back extension
- The bar should be kept close to the body at all times
- The traps contract forcefully to further accelerate the bar
- Basically, what we are looking for is for the body to look like a bow (hips forward, back and legs extended)
Catch:
- Catch the bar in a full squat position
- Catch the bar with the arms locked, do not press the weight
- Keep the traps tight to help hold the bar
The loading parameters for the full squat snatch from the floor are as follows:
Week 1: 2 x 3, 2 x 2
Week 2: 2 x 3, 2 x 2, 1 x 1
Week 3: 1 x 3, 1 x 2, 2 x 1,
Week 4: 2 x 2
Note: At first, start with the same load as you would in the half-squat snatch. But as you get more comfortable with the full snatch you should be able to use 10-20% more on this exercise.
-
- Snatch pull
The snatch pull is the logical progression from the snatch-grip deadlift. Ideally, you want to use the exact same pulling motion as during the half-squat snatch. Concentrate on rising up on the toes and contracting the traps at the same time.
The loading parameters for the snatch pull are as follows:
Week 1: 2 x 4, 2 x 3
Week 2: 3 x 4, 3 x 3, 1 x 2
Week 3: 1 x 3, 1 x 2, 1 x 1
Week 4: 3 x 3
In this phase you want to use the same load as you used for the full squat snatch, at the most 10% above what you used in that exercise. Many peoples make the mistake of going way too heavy on pulls. If the load is significantly greater than during a snatch, there will be no positive transfer.
-
- Drop snatch
Just like the snatch pull is the progression from snatch-grip deadlifts, the drop snatch is the progression from overhead squats. This drill has the same benefits as the overhead squat, but it also teaches a lifter how to drop under the bar.
Starting position:
-
-
- Stand up with the bar on your shoulders with a snatch grip
- Feet are slightly wider than the hips, toes turned outward a bit
- Trunk is solid, back is tight
- Elbows are pointing down.
-
Drop:
- You must drop directly under the bar, try not to allow the bar to drop a lot. The key is to lock the arms as you go down. You must go down very fast to beat the gravity that will pull the bar down
- Avoid trunk flexion, if you start bending forward you will lose the bar
- As you squat down, try pushing the bar up (to contract the traps and stabilize the bar)
- The heels must stay on the ground
- When you reach the lowest position stand up in a straight line, avoid excessive trunk movement.
The loading parameters for the drop snatch are as follows:
Week 1: 2 x 5
Week 2: 5 x 5
Week 3: 3 x 3, 1 x 2
Week 4: 3 x 5
You still need to use this valuable exercise because now you really need to be fast and stable under the bar! By now you should be able to use relatively heavy weights on this exercise.
Third phase of training: technical mastery (4 weeks)
Monday (Snatch emphasis)
Objectives:
-
- To learn the full snatch sequence
- To strengthen the muscles involved in the snatch
- To develop an efficient lifting technique
- Half-squat snatch from the floor
This is the first step in learning the full competitive snatch. You start to integrate the first hard technical part of the lift, the switch from below the knees (slow controlled pull) to above the knees (explosion). You will catch the bar in a half squat, to get used to dropping under the bar.
Starting position:
-
- Feet are hip width, toes are turned slightly outward
- Legs are flexed at the knees (around 90-100 degrees)
- Trunk is flexed, back is tightly arched
- Shoulders are in front of the bar
- Arms are straight
- Traps are stretched
- Head is looking forward
Pull:
1. From the ground to the knees the lifting is controlled, the back angle stays the same, the bar is lifted only via leg extension. 2.Once the bar is above the knees, explode upward with a powerful leg and back extension
- The bar should be kept close to the body at all times
- The traps contract forcefully to further accelerate the bar
- Basically, what we are looking for is for the body to look like a bow (hips forward, back and legs extended)
Catch:
- Catch the bar in a half squat position
- Catch the bar with the arms locked, do not press the weight
- Keep the traps tight to help hold the bar
The loading parameters for the half-squat snatch from the floor are as follows:
Week 1: 2 x 3, 2 x 2
Week 2: 2 x 3, 2 x 2, 1 x 1
Week 3: 1 x 3, 1 x 2, 2 x 1,
Week 4: 2 x 2
Note: You may have noticed that I did not give a percentage or load to use. Well, since most of you have never performed a snatch before, it would be pretty pointless to use percentages to plan your training load! But after the first and second phases of training you should have a good idea of the weight you can handle and by now your technique should be good, so you can begin to lift interesting weights.
- Full squat snatch from the floor
The first 8 weeks of training have all being leading to this, the optimal test of functional strength! By now you should be pretty good at the pulling part of the snatch and are at ease in the overhead squat position. You also learned to receive the bar in the full squat position. So now it’s time to blend it all into one smooth, but explosive movement!
Starting position:
- Feet are hip width, toes are turned slightly outward
- Legs are flexed at the knees (around 90-100 degrees)
- Trunk is flexed, back is tightly arched
- Shoulders are in front of the bar
- Arms are straight
- Traps are stretched
- Head is looking forward
Pull:
-
- From the ground to the knees the lifting is controlled, the back angle stays the same, the bar is lifted only via leg extension.
- Once the bar is above the knees, explode upward with a powerful leg and back extension
- The bar should be kept close to the body at all times
- The traps contract forcefully to further accelerate the bar
- Basically, what we are looking for is for the body to look like a bow (hips forward, back and legs extended)
Catch:
- Catch the bar in a full squat position
- Catch the bar with the arms locked, do not press the weight
- Keep the traps tight to help hold the bar
The loading parameters for the full squat snatch from the floor are as follows:
Week 1: 2 x 3, 2 x 2
Week 2: 2 x 3, 2 x 2, 1 x 1
Week 3: 1 x 3, 1 x 2, 2 x 1,
Week 4: 2 x 2
Note: At first, start with the same load as you would in the half-squat snatch. As you get more comfortable with the full snatch you should be able to use 10-20% more on this exercise.
- Snatch pull
The snatch pull is the logical progression from the snatch-grip deadlift. Ideally, you want to use the exact same pulling motion as during the half-squat snatch. Concentrate on rising up on the toes and contracting the traps at the same time.
The loading parameters for the snatch pull are as follows:
Week 1: 2 x 4, 2 x 3
Week 2: 3 x 4, 3 x 3, 1 x 2
Week 3: 1 x 3, 1 x 2, 1 x 1
Week 4: 3 x 3
In this phase you want to use the same load as you used for the full squat snatch, at the most 10% above what you used in that exercise. Many peoples make the mistake of going way too heavy on pulls. If the load is significantly greater than during a snatch, there will be no positive transfer.
- Drop snatch
Just like the snatch pull is the progression from snatch-grip deadlifts, the drop snatch is the progression from overhead squats. This drill has the same benefits as the overhead squat, but it also teaches a lifter how to drop under a bar.
Starting position:
-
- Stand up with the bar on your shoulders with a snatch grip
- Feet are slightly wider than the hips, toes turned outward a bit
- Trunk is solid, back is tight
- Elbows are pointing down.
Drop:
- You must drop directly under the bar, try not to allow the bar to drop a lot. The key is to lock the arms as you go down. You must go down very fast to beat the gravity that will pull the bar down
- Avoid trunk flexion, if you start bending forward you will lose the bar
- As you squat down, try pushing the bar up (to contract the traps and stabilize the bar)
- The heels must stay on the ground
- When you reach the lowest position stand up in a straight line, avoid excessive trunk movement.
The loading parameters for the drop snatch are as follows:
Week 1: 2 x 5
Week 2: 5 x 5
Week 3: 3 x 3, 1 x 2
Week 4: 3 x 5
You still need to use this valuable exercise because now you really need to be fast and stable under the bar! By now you should be able to use relatively heavy weights on this exercise.
Tuesday (Jerk emphasis)
Objectives:
- To learn the split jerk
- To strengthen the muscles involved in the jerk
- To increase technical mastery of the jerk
- ¼ Front squat
You will now use this exercise before the jerk so that it will have its maximal psychological benefit on the jerk. Once again, be careful to keep your torso straight in this movement, we want to emulate a jerk motion as much as possible.
The loading parameters for the ¼ front squat are:
Week 1: 2 x 3
Week 2: 5 x 3
Week 3: 3 x 3, 1 x 2
Week 4: 2 x 2
-
- Split jerk
The split jerk is basically the same as the push jerk, which I already covered. The only difference is that once you jerk the bar off your shoulders you drop under the bar while doing a split (one leg forward, one leg backward).
Starting position:
-
-
- Take the bar from the rack
- Place it on your clavicle and shoulders
- The bar is held with a clean grip or an intermediate grip
- Hold the bar with the full hand, not just the fingertips
- The elbows are pointed forward and down, not just down
- The body is straight and tight
-
The dip:
- Lower your body in a straight line (imagine that your back is sliding on a wall)
- The dip is controlled, but not too slow
- You dip into a quarter squat, no more
The explosion:
- When you complete the dip quickly reverse your movement and explode upward!
- You should go for a very hard push with the legs (so that the bar will leave your shoulders at the top)
- Just as you reach the upright position, press your hands up as fast as possible
- Try to “throw” the bar upwards, not press it
The catch:
-
- You catch the bar with one leg split forward and one leg back. Experiment to see which leg forward feels most comfortable.
- The trunk remains tight
- The arms are immediately locked (you receive the bar with locked arms, no pressing of the weight)
The loading parameters for the split jerk are:
Week 1: 2 x 3, 2 x 2
Week 2: 2 x 3, 3 x 2, 1 x 1
Week 3: 1 x 3, 1 x 2, 2 x 1
Week 4: 3 x 2
-
- Push jerk
Adding the push jerk to this phase of training completes the turn from a strength- dominant workout to a power-dominant workout. Expect great gains in overhead movements from now on!
Starting position:
- Take the bar from the rack
- Place it on your clavicle and shoulders
- The bar is held with a clean grip or an intermediate grip
- Hold the bar with the full hand, not just the fingertips
- The elbows are pointed forward and down, not just down
- The body is straight and tight
The dip:
-
- Lower your body in a straight line (imagine that your back is sliding on a wall)
- The dip is controlled, but not too slow
- You dip into a quarter squat, no more
The explosion:
- When you complete the dip quickly reverse your movement and explode upward!
- You should go for a very hard push with the legs (so that the bar will leave your shoulders at the top)
- Just as you reach the upright position, press your hands up as fast as possible
- Try to “throw” the bar upwards, not press it
The catch:
-
- Catch the bar with a slight squat under the bar
- The trunk remains tight
- The arms are immediately locked (you receive the bar with locked arms, no pressing of the weight)
The loading parameters for the push jerk are:
Week 1: 2 x 3, 2 x 2
Week 2: 2 x 3, 1 x 2, 1 x 1
Week 3: 1 x 3, 1 x 2, 1 x 1
Week 4: 3 x 2
-
- Bar jump squat
We will keep this fine power movement to ensure that you keep a high power production potential during this phase of training.
Starting position:
-
-
- Standing up with the bar on the back of your shoulders.
-
Execution:
- Dip into a quarter squat and explode upward
- Land on the ground, flex your knees to absorb the shock
The loading parameters for the loaded jump squat are:
Week 1: 2 x 10
Week 2: 5 x 10
Week 3: 3 x 6
Week 4: 2 x 6
The following loads are appropriate:
500lbs+ squat: 55lbs
300-500lbs squat: 45lbs (bar only) 200-300lbs squat: 35lbs (smaller bar)
100-200lbs squat: 25lbs (still smaller bar)
The load is kept constant during the whole cycle. The aim is to increase jumping height, not the weight used.
Thursday (clean emphasis)
Objectives:
- To learn the proper clean sequence
- To strengthen the muscles involved in the clean
- To increase technical mastery of the clean
- Half-squat clean from the floor
This is much like the half-squat snatch in that it uses the same lifting sequence as during a competitive full squat clean. Once again, you lift the load under control up to the knees then explode! Catch the bar in a half-squat to get used to going under the bar.
Starting position:
- Feet are hip width, toes are turned slightly outward
- Legs are flexed at the knees slightly (around 100-120 degrees)
- Trunk is flexed, back is tightly arched
- Shoulders are in front of the bar
- Arms are straight
- Traps are stretched
- Head is looking forward
Pull:
Catch:
-
- From the ground to the knees lift the bar under control while keeping a stable torso angle.
- At the knees explode upward with a powerful leg and back extension
- The bar should be kept close to the body at all times
- The traps contract forcefully to further accelerate the bar
- Catch the bar in a half-squat
- Catch the bar on your shoulders and whip your arms around so that the elbows are pointing forward, not down
The loading parameters for the half-squat clean from the floor are as follows:
Week 1: 2 x 3, 2 x 2
Week 2: 2 x 3, 2 x 2, 1 x 1
Week 3: 1 x 3, 1 x 2, 2 x 1,
Week 4: 2 x 2
Note: You may have noticed that I did not give a percentage or load to use. Well, since most of you have never performed a clean before, it would be pretty pointless to use percentages to plan your training load! But after the first and second phases of training you should have a good idea of the weight you can handle.
- Full squat clean from floor
We follow the same logic with the full squat clean as we did for the full squat snatch. You now must combine a powerful pull with a fast drop and catch under the bar. The key is to keep the torso solid as you catch the bar in the full squat position. Just like the full squat snatch, start with the same weight as you used for the half-squat snatch. With practice you will be able to handle 10-20% more weight in this exercise.
The loading parameters for the half-squat clean from the floor are as follows:
Week 1: 2 x 3, 2 x 2
Week 2: 2 x 3, 2 x 2, 1 x 1
Week 3: 1 x 3, 1 x 2, 2 x 1,
Week 4: 2 x 2
- Clean pull
The clean pull is the logical progression from the clean-grip deadlift. Ideally, you want to use the exact same pulling motion as during the half-squat snatch. Concentrate on rising up on the toes and contracting the traps at the same time.
The loading parameters for the snatch pull are as follows:
Week 1: 2 x 4, 2 x 3
Week 2: 3 x 4, 3 x 3, 1 x 2
Week 3: 1 x 3, 1 x 2, 1 x 1
Week 4: 3 x 2
- Front squat
You will now use two squat exercises per week to fine tune your leg strength and develop a certain comfort in the full squat clean position.
The loading parameters for the front squat are:
Week 1: 2 x 5
Week 2: 5 x 5
Week 3: 3 x 3. 1 x 2
Week 4: 2 x 3
Friday (Remedial exercises)
Objective:
- General strengthening of the muscles involved in the Olympic lifts
- Bench press
We will keep on using the bench press so that you can maintain upper body pressing strength. However, you can substitute in the incline bench press if you want more variation.
The loading parameters for the bench press are:
Week 1: 2 x 5
Week 2: 5 x 5
Week 3: 3 x 3, 1 x 2
Week 4: 3 x 3
Use heavy weights for this exercise, but do not cut your range of motion short. Touch the chest and explode upwards!
-
- Back squat
We reintroduce the back squat into our routine to give a little “boost” in leg strength. As you gain technical mastery in the full Olympic lifts you will become more and more able to use your leg strength to its greatest extent, hence the need to focus on leg strength at this point.
The loading parameters for the back squat are:
Week 1: 2 x 5
Week 2: 5 x 5
Week 3: 3 x 5
Week 4: 2 x 3
-
- Zottman curl
You curl the weight with the palms up and lower it with the palms down making the muscle work hard on both the concentric and eccentric portion of the movement. This drill will strengthen all the arm flexor muscles. Although not of capital importance in Olympic lifting, the fact is that a chain will always break at its weakest link.
The loading parameters for the Zottman curl are:
Week 1: 2 x 5
Week 2: 5 x 5
Week 3: 3 x 5
Week 4: 2 x 5
CHAPTER 14
Short topics
In this chapter …
- Pre- and post-workout nutrition to maximize the training effect
- Posing to get lean and gain muscle control
- Post-tetanic potentiation
- Running for losing: 3 effective fat loss strategies
- Swinging into condition
This chapter includes topics I either left out of this book, or those that did not warrant a full chapter or section, yet are still worth talking about. It’s also an easier way to finish your journey through the lair of the Ice Dog, hopefully giving you a positive outlook on it all. I’ll talk about a lot of different stuff that is not directly related, but those of you who like it short and sweet will find this chapter very refreshing.
Pre- and Post-workout nutrition to maximize the training effect
I’ll gladly admit that the nutritional strategies I currently use are based on the work of performance nutritionist extraordinaire and illustrious babe magnet international, John Berardi. I can honestly say that his recommendations in regard to pre- and post-workout meals (which I’ll give to you) have created an almost drug-like effect on my and my athlete’s performance. In fact, I have personally gained size twice as fast while using JB’s strategy, and I’m sure that you’ll get a lot out of it too!
The post-workout meal has long been known to potentiate the training effect and increase recovery after a grueling training session. This led many coaches (including myself at some point) to recommend huge amounts of nutrients post-workout to take full advantage of the increased nutrient uptake by the muscles following resistance training. While this strategy was certainly a step in the right direction, recent research and experience has found that splitting the post-workout meal into two smaller pre- and post-workout meals works much better. It leads to less muscle breakdown, more amino acid uptake by the muscle, and faster glycogen resynthesis. In layman’s terms, you grow big, fast!
The Berardi plan calls for one pre-workout shake immediately before each workout to flood the bloodstream with amino acids and glucose. As well as one post-workout shake immediately after each workout to jump-start the recovery processes.
The simpler way of doing things is to take one serving of Biotest Surge pre-workout and one serving post-workout. This really takes the hassle out of mixing your shake together as it has all the right ingredients. But you can always mix a “home made” drink using whey protein, maltodextrin, and creatine. If that’s the case the following is adequate:
Protein: 25-35g Carbohydrates: 35-45g Creatine: 5-10g
Adding BCAAs to the mix would probably do wonders too.
Now, depending on your goals you may want to change the composition of the drinks.
If you want to maximize muscle gain (and are not too concerned with getting leaner)
Protein: 25-35g Carbohydrates: 60-70g Creatine: 5-10g
If you want to get lean fast (and don’t care about not gaining a lot of muscle mass)
Protein: 35-45g Carbohydrates: 25-35g Creatine: 5-10g
If you are using the pre-mixed Surge and you want to use option 1 (muscle gain), simply add one serving of Gatorade powder to each drink. If you want to use option 2 (fat loss), cut the Surge in half and add one scoop of protein (preferably Low Carb Grow!).
Getting lean and muscular through posing
I vaguely remember being a frail 14 years old boy almost lost in a gym, hearing a big bodybuilder shouting, “Hey guys, today is mirror training.” For these guys, who were competitive bodybuilders, “mirror training,” or posing, was important because it could influence how they would do in their show.
One thing I noticed is that when they were practicing their posing they would seem to increase their muscle density and their degree of leanness at a much faster rate than usual. This intrigued me to no end. Now I understand that posing practice actually involves a lot of muscle control and maximal static and quasi-static muscle contractions. While not sufficient to stimulate hypertrophy gains, this type of training can increase energy expenditure as well as improve neural activation of the muscles (thus creating more tonus at rest).
Don’t get me wrong, I don’t recommend devoting a training day to posing in the gym (freaks!). However, when your goal is to get very lean and dense, including a weekly posing session lasting 30-45 minutes (preferably at home when you’re alone!) can really make a difference in your appearance. I would recommend holding each of the mandatory bodybuilding poses (there’s 7 of them, 8 if you count the “most muscular”) for 60 seconds and repeating the cycle 2 or 3 times. Concentrate on fully contracting the muscles at all times, the contraction must be maximal.
This advice may sound vain or narcissist, but it’s actually grounded in science! Muscle control really is improved and so is resting muscle tonus. In turns out that this will make you look denser, more muscular, and will actually help you with your lifting performance. Now, who’s up for some “mirror training?”
Post-tetanic facilitation/potentiation (say what?)
The strength training world was introduced to the term post-tetanic facilitation by strength coach and author Charles Poliquin in one of his articles (The 1-6 principle available at T-mag). Poliquin explains this phenomenon by saying that performing a heavy lift will enable you to perform better during later sets. Here is how Poliquin explains it:
“In a nutshell, if you do a 6RM (the maximum load you can lift for 6 reps) load within 3-10 minutes of doing a max single, you can use a greater weight that you could have if you hadn’t done the 1RM set.”
This is very true and it’s a very effective indeed. But lately many people have asked what exactly is this post-tetanic facilitation phenomenon, so here it is!
- Potentiation
A physical/muscular activity can have an effect on other subsequent activities. The prior activity can either decrease the muscular performance in the later exercise (mostly due to the fatigue factor) or it can increase the performance during the later exercise (Abbate et al. 2000).
In the second case the performance is enhanced via a phenomenon called potentiation. Potentiation refers to an increase in force output as a result of previous muscular activation (Abbate et al. 2000). There are many kinds of possible potentiation. The two best known ones are post-tetanic potentiation and high-frequency initial pulse potentiation.
- Post-tetanic potentiation
The tetanus refers to a state of muscular activation that occurs either during a long muscular contraction (so brought on by muscular fatigue) or a very intense contraction (so brought on by a maximum contraction). The tetanus can be explained as the summation of all the available motor-units.
It has been found that the force of the twitch of a muscle fiber is more important after than before the brief tetanus. This effect is present even 5 minutes after the tetanus (O’Leary et al. 1997). In fact, during a 7 second tetanus, the capacity to apply force decreases by 15% while this capacity is increased by 28% after 1 minute, 33% after 2 minutes and 25% after 5 minutes (O’Leary et al. 1997). So it appears that the capacity to produce force is greater 2-3 minutes after the cessation of the tetanic effort.
This increase in the capacity to produce force after a certain stimulation is called post- tetanic potentiation (PTP). The most effective way to promote a large PTP is to place an intense stimulation on a muscle via a maximal effort/maximal tension contraction for a length of 5-10 seconds (Brown and von Euler, 1938, Vandervoort et al. 1983).
PTP can increase contraction strength, especially in fast-twitch fibers (Bowman et al. 1969, Standeart, 1964). PTP also improves the rate of force development (Abbate et al, 2000).
PTP works by increasing the phosphorylation of the myosin light chains, which makes the actin-myosin more sensitive to calcium in the subsequent twitch (Grange et al. 1993, Palmer and Moore 1989, O’Leary et al. 1997). This is not chiefly important, but, if you
wish, you can grab a physiology textbook and review the sliding filament theory of muscular contraction to see how this would increase the capacity to produce force.
- High Frequency Initial Pulse Potentiation (HFIP)
While this phenomenon is outside the scope of this article, understand that HFIP occurs at the start of ballistic movements (Abbate et al. 2000) and that it increases the power output, the rate of force development, and peak force (Mardsen et al. 1971, Burke et al. 1981, Hennig and Lomo, 1985).
- Post-tetanic Facilitation (or post-tetanic potentiation)
Post-tetanic facilitation (PTF) is simply another term for post-tetanic potentiation. Both mean the same thing. PTF means that the tetanus facilitates a subsequent effort, while PTP means that the tetanus increases the potential for a subsequent effort. So it’s basically word play that means the same thing! Just to give you an idea, there is yet another term to describe that same phenomenon, post-activation potentiation (PAP). The terms are complex, but don’t let them fool you… the basic premise is simple:
A maximal/near maximal muscular contraction, or effort, increases the capacity to produce force and power for up to 5-10 minutes, with a peak occurring 2-3 minutes after the maximal effort.
- Applications of PTP
Coach Poliquin gives us a very good way to use PTP to increase size and strength with his 1-6 training. He also gives us a good way to use it for strength with his wave loading approach. But PTP can be used for other purposes.
For example, you can follow a maximal effort set with a set of explosive lifting (since PTP increase the rate of force development). For example, you could perform a heavy deadlift, rest 3 minutes, then perform a set of power cleans.
By understanding the basic premise of PTP you will be able to find your own ways to apply this phenomenon to your own training!
Running for losing
To get very lean and muscular you must have pretty much everything in order. From diet, to rest, to training. While a proper strength training program will help you get lean, it is really hard to get a high degree of leanness without some “road work.” As most of you probably already know, I’m not a big fan of low-intensity cardio work. While it’s adequate for fat loss, I feel that it can have a negative effect on strength and, ultimately, muscle mass. I believe that interval training and/or long distance sprints are optimal to maximize fat loss while retaining muscle mass. I am going to present to you three
possible methods to use for getting defined: 400m runs, interval running, and my personal favorite, interval build-up running.
400m running
I discovered the high fat burning potency of 400m sprints without really looking for it. I use a lot of 400m running with my hockey players, mostly because it develops the energy system they require the most during a game. However, I quickly noticed how lean they were getting shortly after starting 400m runs. Furthermore, they were getting leaner but stronger!
I then experimented with 400m for fat-loss purposes and found time after time how efficacious it truly was. To this day I still believe that few things can match up with 400m runs for fat loss.
The following table will give you a good starting point. Only perform one 400m workout per week.
| Condition | Week 1 | Week 2 | Week 3 | Week 4 | Week 5 | Week 6 | Week 7 | Week 8 |
| Bad shape | 2 x 400m
120 sec. RI* |
3 x 400m
120 sec. RI |
4 x 400m
120 sec. RI |
3 x 400m
120 sec. RI |
4 x 400m
90 sec. RI |
5 x 400m
90 sec. RI |
6 x 400m
90 sec. RI |
4 x 400m
90 sec. RI |
| Average shape | 3 x 400m
120 sec. RI* |
4 x 400m
120 sec. RI |
5 x 400m
120 sec. RI |
4 x 400m
120 sec. RI |
5 x 400m
90 sec. RI |
6 x 400m
90 sec. RI |
7 x 400m
90 sec. RI |
5 x 400m
90 sec. RI |
| Good shape | 3 x 400m
90 sec. RI* |
4 x 400m
90 sec. RI |
5 x 400m
90 sec. RI |
4 x 400m
90 sec. RI |
5 x 400m
70 sec. RI |
6 x 400m
70 sec. RI |
7 x 400m
70 sec. RI |
5 x 400m
70 sec. RI |
| Great shape | 4 x 400m
90 sec. RI* |
5 x 400m
90 sec. RI |
6 x 400m
90 sec. RI |
5 x 400m
90 sec. RI |
6 x 400m
70 sec. RI |
7 x 400m
70 sec. RI |
8 x 400m
70 sec. RI |
6 x 400m
70 sec. RI |
| Elite athlete | 5 x 400m
90 sec. RI* |
6 x 400m
90 sec. RI |
7 x 400m
90 sec. RI |
6 x 400m
90 sec. RI |
7 x 400m
60 sec. RI |
8 x 400m
60 sec. RI |
9 x 400m
60 sec. RI |
7 x 400m
60 sec. RI |
*RI: Rest Intervals
Interval running
Interval running is another great way of burning body fat without jeopardizing your efforts to gain muscle and strength. It combines low-intensity and high-intensity work for a very large fat-burning effect. Basically, you will alternate between slow-pace running (slow jog) and fast-pace running (sprint).
A good program to use is illustrated in the following table.
| Condition | Week
1 |
Week
2 |
Week
3 |
Week
4 |
Week
5 |
Week
6 |
Week
7 |
Week
8 |
| Bad shape | 60 s. jog
15 s. fast x 5 |
60 s. jog
15 s. fast x 6 |
60 s. jog
15 s. fast x 7 |
60 s. jog
15 s. fast x 6 |
60 s. jog
15 s. fast x 7 |
60 s. jog
15 s. fast x 8 |
60 s. jog
15 s. fast x 9 |
60 s. jog
15 s. fast x 6 |
| Average shape | 60 s. jog
15 s. fast x 6 |
60 s. jog
15 s. fast x 7 |
60 s. jog
15 s. fast x 8 |
60 s. jog
15 s. fast x 7 |
60 s. jog
15 s. fast x 8 |
60 s. jog
15 s. fast x 9 |
60 s. jog
15 s. fast x 10 |
60 s. jog
15 s. fast x 7 |
| Good shape | 60 s. jog
30 s. fast x 5 |
60 s. jog
30 s. fast x 6 |
60 s. jog
30 s. fast x 7 |
60 s. jog
30 s. fast x 6 |
60 s. jog
30 s. fast x 7 |
60 s. jog
30 s. fast x 8 |
60 s. jog
30 s. fast x 9 |
60 s. jog
30 s. fast x 6 |
| Great shape | 60 s. jog
45 s. fast x 6 |
60 s. jog
45 s. fast x 7 |
60 s. jog
45 s. fast x 8 |
60 s. jog
45 s. fast x 7 |
60 s. jog
45 s. fast x 8 |
60 s. jog
45 s. fast x 9 |
60 s. jog
45 s. fast x 10 |
60 s. jog
45 s. fast x 7 |
| Elite athlete | 60 s. jog
45 s. fast x 7 |
60 s. jog
45 s. fast x 8 |
60 s. jog
45 s. fast x 9 |
60 s. jog
45 s. fast x 8 |
60 s. jog
45 s. fast x 9 |
60 s. jog
45 s. fast x 10 |
60 s. jog
45 s. fast x 11 |
60 s. jog
45 s. fast x 8 |
Interval build-up running
This is my personal favorite fat-burning strategy. IBUR is based on many of the same principles as regular interval training, but with each cycle (or each interval) the duration of the sprint and jog phases increase in length.
Here’s an example:
| Interval portion Speed Duration | ||
| 1a | Jog | 30 seconds |
| 1b | Sprint | 20 seconds |
| 2a | Jog | 60 seconds |
| 2b | Sprint | 30 seconds |
| 3a | Jog | 90 seconds |
| 3b | Sprint | 40 seconds |
| 4a | Jog | 120 seconds |
| 4b | Sprint | 50 seconds |
| 5a | Jog | 150 seconds |
| 5c | Sprint | 60 seconds |
| 6a | Jog | 180 seconds |
| 6b | Sprint | 70 seconds |
| Total | 15 minutes | |
This is the workout I used myself. I used it 3 times per week and it led to a marked decrease in body fat. For athletes it may not be the most specific method available, but if all you’re interested is fat loss, give IBUR a try. You won’t be sorry!
Swinging into condition
In life I have only four certainties, four things that keep me grounded and remind me that regardless of what happens in my life I will always have at least something solid to hold on to:
- When I wake up in the morning, a new day begins
- I am particularly fond of big breasted vixens
- A solid workout should revolve around “multi-joint” exercises
- General Physical Preparation (GPP) work is one of the keys to athletic success
That’s it! Whatever happens in my life I can keep myself afloat by reminding myself of things that don’t change, things that are solid as a rock.
I would like to take time to address the fourth of my certainties, as it’s probably the hardest to understand and visualize as a concept.
Let me first tell you that regardless of how much specialized work you do, if you are not in good physical condition you will not be able to perform at your best. That’s true regardless of your sport or activity of choice. The objective of any training program is to bring you into peak condition. Well, it’s impossible to develop peak condition without a proper base constructed out of a rock solid general condition.
Furthermore, GPP work can actually help you recover and develop specific qualities needed for your sport.
Some of the most popular and most recent forms of GPP work include sled dragging, carrying objects, wheelbarrow, farmers walk, hill sprints, etc. These forms of training as well as their benefits are well documented. But a form of GPP work has been completely forgotten. Yet it is one of the best ways to develop sporting performance, flexibility, strength, and power. I won’t keep you waiting much longer, this “special” form of GPP work is none other than “swinging!”
By swinging I don’t mean going to special clubs where you can loan your wife to some other individual who will let you use his own loved one in return. I agree that this form of activity could also be a form of GPP work, but I digress…
Swinging refers to arm and torso swings while holding a source of resistance. The sources of resistance and the exercises that I am going to demonstrate include:
- Indian clubs
- Sledgehammers
- Kettlebells or dumbbells
The objective is to swing one of these objects for a specific length of time (3-15 minutes depending on your level of conditioning). These movements can build tremendous strength endurance, rotational strength, torso strength, and overall body power. Furthermore, swinging constitutes a form of dynamic flexibility training (both the training method and the lifestyle fits this last point).
Indian club GPP routine
An Indian club is a stick that looks like a big bowling pin. It can weigh anywhere between 2 and 20lbs (some are even heavier). The clubs have long been used to develop upper body musculature, shoulder flexibility, and shoulder stability. The exercises used were various types of arm circles while holding the clubs in your hands.
There are still some of these clubs around, and you can buy some on the internet. However, they are quite expensive. For our GPP purposes I suggest replacing the Indian clubs with plain old wooden baseball bats (the heavier the better), or even a pair of dumbbells (5-10lbs)
The routine to be used is similar in structure to Coach John Davies’ rope jumping program. Meaning that you do 4 different Indian club exercises, each for 30 – 60 seconds, and repeat the pattern until you have reached the total GPP time.
| Indian club exercise parameters | ||
| Exercise | Duration | Comments |
| Backward circles | 30 seconds | Reach back as far as possible, keep trunk stable |
| Front raises | 30 seconds | Cock wrist at the end of the movement |
| Alternate raises | 30 seconds | Emphasise full range of motion, slow pace |
| Small circle in front | 30 seconds | Rapid circles, keep arms fully extended |
Each 4-exercise cycle lasts 2 minutes. Beginners should strive to complete 3 cycles without resting (6 total minutes). A more advanced trainee (and a better conditioned one) should have the objective of completing 8 full cycles without rest (16 total minutes). This is a very hard task. Do not let the simplicity or apparent “sissy” look of these exercises fool you. This routine will give you:
-
- Iron clad shoulders
- Fantastic strength-endurance in the shoulder muscles
- Dynamic flexibility at the shoulder joint
- Greater shoulder stability in all planes of motion
- Tremendous rotator cuff strength
For those reasons, I believe that every athlete involved in a sport where shoulder/rotator cuff injuries are common should use this form of GPP training.
Sledgehammer GPP routine
I must credit Dr. Mike Hartle for this GPP idea. The good doctor wrote a 7-part article on how to use a sledgehammer for GPP work. I was immediately won over by this concept and contacted Mike right away to tell him how fantastic his idea was. The basic premise of sledgehammer work is that in the gym we often develop the capacity to apply force vertically. Rarely do we develop the capacity to develop it horizontally or diagonally. Sledgehammer work can thus be a fantastic complement to regular strength training by really putting a strong emphasis on lateral and rotational strength, both of which are very important in many sports.
Furthermore, sledgehammer work will build a grip of steel and the forearms of a bear!
I will give you a few basic examples of sledgehammer swinging, but you are encouraged to find your own ideas. Dr. Hartle recommends using a big tire as a target as this will absorb the blow without breaking.
| Sledgehammer exercise parameters | ||
| Exercise | Duration | Comments |
| Downward swing | 4 minutes | Initiate downswing with a trunk flexion |
| Right cross body | 3 minutes | Lead with right hand, left hand only helps to
bring up the hammer |
| Left cross body | 3 minutes | Lead with left hand, right hand only helps to bring up the hammer |
A complete cycle of those three exercises will last 10 minutes. If you can do 2 full cycles without any rest it’s time to either increase the weight of the sledgehammer or increase the density of your blows. The objective should be to do as much hitting as possible during the prescribed time frame.
Sledgehammer work will:
- Build a rock solid trunk
- Develop every muscle in the abdominal belt optimally
- Increase arm and torso strength
- Increase hand strength
Kettlebell or dumbbell GPP routine
A kettlebell is an old-time Russian training apparatus. It looks like a small bowling ball with a metal handle. It is one of the precursors of the modern dumbbell.
Kettlebell swinging has gained in popularity because of the work of Pavel Tsatsouline and Coach John Davies. Both are very successful kettlebell proponents. I am personally very fond of the kettlebell “exercises,” however I do not feel that doing them with a kettlebell carries a significantly greater advantage over using a dumbbell.
In fact, if anything, kettlebells have the drawback of only coming in certain weights (9, 18, 36, 53, 71, and 88lbs). And because of their high cost, few individuals can afford to buy one kettlebell, let alone a complete set.
I would say that the main reason for the success of kettlebells is that they are different from the usual gym material and thus can have a certain mystique that is very seductive.
I still feel that a GPP program based on kettlebell/dumbbell swings is very effective to build muscle endurance and muscle size. However you do not have to use kettlebells, dumbbells will do just fine.
| Dumbbell / Kettlebell exercise parameters | ||
| Exercise | Repetitions | Comments |
| Two arm swing | 30 | Lift with hips first and finish with shoulders |
| Left arm split swing | 10 | Split forward with the left leg |
| Right arm split swing | 10 | Split forward with the right leg |
All three exercises are done as a giant set (no rest between exercises). This will build cannonball shoulders and meaty traps like nothing else, PERIOD! You use the same load for all exercises. For the one arm split swings you start with your weaker arm.
For most individuals I recommend only one giant set per training session, you’ll find soon enough how hard it is! But Gung-Ho individuals, and guys with great recovery capacities, can perform up to 3 giant sets per workout.
Fitting swinging into a training week
There are three options for how to include swinging training in your weekly routine:
- Select all three methods and perform each one once per week on different days. You can add sled pulling on a fourth training day
- Only pick one of these methods and use it 2-3 times per week after your regular workouts
- Select all three methods and perform all three during a special “GPP training day,” during which you only do GPP work.
All three options will work quite well. It’s just a matter of finding which one suits your needs the best. If you want to emphasize overall athletic abilities then option 1 might be best. Option 2 is best suited for individuals who want to specialize in one type of GPP work, while option 3 is well adjusted for individuals who want to get in good physical condition while trying to gain as much strength as possible.
But the important point to remember is that this type of special GPP work will make a better athlete out of you and it will do wonders to help prevent injuries. And that’s a certainty!
CHAPTER 15
More sample programs
In this chapter …
- Beginner programs
- Intermediate programs
- Advanced programs
BEGINNER TRAINING PROGRAMS
Here are a few sample training programs for beginners wishing to gain muscle mass. Remember that without proper nutrition, rest, effort and supplementation; even the best training programs cannot build a significant amount of muscle. You’ll notice that the beginner level programs are somewhat basic in nature. They do not utilize a lot of advanced training techniques. It’s because beginners do not need advanced training to grow. In fact, using advanced methods too soon can limit future gains. Always use the least advanced methods as possible to get the maximum results and as your gains slow down, gradually increase the program level.
Beginner program level 1.
Training split
Monday: Whole body compound movements Tuesday: Abs
Wednesday: Whole body isolation work Thursday: Off
Friday: Whole body compound movements Saturday: Abs
Sunday: Off Monday
| Exercise | Name | Sets | Reps | Method | Tempo | Rest |
| A1. | Back squat | 4 | 15/12/10/8 | Alternate | Controlled | 45 sec |
| A2. | Romanian deadlift | 4 | 15/12/10/8 | Alternate | Controlled | 120 sec |
| B1. | Bench press | 4 | 12/12/10/10 | Alternate | Controlled | 45 sec |
| B2. | Seated rowing | 4 | 12/12/10/10 | Alternate | Controlled | 120 sec |
| C1. | Military press | 4 | 12/12/10/10 | Alternate | Controlled | 45 sec |
| C2. | Lat pulldown | 4 | 12/12/10/10 | Alternate | Controlled | 120 sec |
* Note that all exercises are illustrated in the annexe at the end of the book
Tuesday
| Exercise | Name | Sets | Reps | Method | Tempo | Rest |
| A1. | Serratus crunch | 5 | 12-15 | Triple set | Controlled | None |
| A2. | Kneeling cable crunch | 5 | 12-15 | Triple set | Controlled | None |
| A3. | Swiss ball crunch | 5 | maximum | Triple set | Controlled | 90 sec |
Wednesday
| Exercise | Name | Sets | Reps | Method | Tempo | Rest |
| A. | Bulgarian squat | 5 | 15/12/10/12/15 | Normal | Controlled | 90 sec |
| B. | Leg curl | 5 | 15/12/10/12/15 | Normal | Controlled | 60 sec |
| C. | Incline DB press | 5 | 12/10/8/10/12 | Normal | Controlled | 90 sec |
| D. | Straight-arms pulldown | 5 | 12/10/8/10/12 | Normal | Controlled | 60 sec |
| E. | Barbell curl | 3 | 10-12 | Normal | Controlled | 45 sec |
| F. | Cable triceps extension | 3 | 10-12 | Normal | Controlled | 45 sec |
| G. | Lateral raises | 3 | 12-15 | Normal | Controlled | 30 sec |
| F. | Bent over lateral | 3 | 12-15 | Normal | Controlled | 30 sec |
Friday
| Exercise | Name | Sets | Reps | Method | Tempo | Rest |
| A. | Leg press | 4 | 12/12/15/15 | Normal | Controlled | 120 sec |
| B. | Goodmorning | 4 | 12/12/15/15 | Normal | Controlled | 90 sec |
| C. | Incline bench press | 4 | 10/10/12/12 | Normal | Controlled | 90 sec |
| D. | Bent over barbell row | 4 | 10/10/12/12 | Normal | Controlled | 90 sec |
| E. | Seated DB press | 4 | 12/12/15/15 | Normal | Controlled | 90 sec |
| F. | Upright rowing | 4 | 12/12/15/15 | Normal | Controlled | 60 sec |
Saturday
| Exercise | Name | Sets | Reps | Method | Tempo | Rest |
| A. | Weighted crunch | 3 | 10-12 | Normal | Controlled | 60 sec |
| B. | Side bend | 3 | 10-12 per side | Normal | Controlled | 60 sec |
| C. | Pullover crunch | 3 | 12-15 | Normal | Controlled | 45 sec |
| D. | Russian twist on ball | 3 | 12-15 per side | Normal | Controlled | 45 sec |
| E. | Seated jacknife | 3 | Maximum | Normal | Controlled | 30 sec |
| F. | Double crunch | 3 | Maximum | Normal | Controlled | 30 sec |
Beginner program level 2.
Training split Monday: Lower body Tuesday: Abs
Wednesday: Upper body Thursday: Off
Friday: Whole body compound movements Saturday: Abs
Sunday: Off Monday
| Exercise | Name | Sets | Reps | Method | Tempo | Rest |
| A1. | Split squat | 3 | 8-10 per side | Post-fatigue | Controlled | None |
| A2. | Bulgarian squat | 3 | 12-15 per leg | Post-fatigue | Controlled | 120 sec |
| B1. | Romanian deadlift | 4 | 8-10 | Post-fatigue | Controlled | None |
| B2. | Leg curl | 4 | 12-15 | Post-fatigue | Controlled | 120 sec |
| C1. | Leg press | 2 | 12-15 | Post-fatigue | Controlled | None |
| C2. | Leg extension | 2 | 15-20 | Post-fatigue | Controlled | 120 sec |
Tuesday
| Exercise | Name | Sets | Reps | Method | Tempo | Rest |
| A. | Kneeling cable crunch | 4 | 12-6-6* | *Drop set | Controlled | 90 sec |
| B. | Seated cable crunch | 4 | 12-15 | Iso-dyn. | 3 sec. hold | 60 sec. |
| C. | Swiss ball crunch | 3 | maximum | Normal | Controlled | 45 sec |
Wednesday
| Exercise | Name | Sets | Reps | Method | Tempo | Rest |
| A1. | Incline DB press | 3 | 8-10 | Post-fatigue | Controlled | None |
| A2. | Cable flies | 3 | 12-15 | Post-fatigue | Controlled | 90 sec |
| B1. | Seated rowing | 3 | 8-10 | Post-fatigue | Controlled | None |
| B2. | 1-arm rowing | 3 | 12-15 per arm | Post-fatigue | Controlled | 90 sec |
| C1. | Seated DB press | 3 | 8-10 | Post-fatigue | Controlled | None |
| C2. | Lateral raises | 3 | 12-15 | Post-fatigue | Controlled | 90 sec |
| D1. | Preacher curl | 3 | 12-15 | Alternate | Controlled | None |
| D2. | Lying dumbbell triceps | 3 | 12-15 | Alternate | Controlled | 60 sec. |
Friday
| Exercise | Name | Sets | Reps | Method | Tempo | Rest |
| A. | Back squat | 6 | 10/10/8/8/12/12 | Normal | Controlled | 120 sec |
| B. | Bench press | 6 | 10/10/8/8/12/12 | Normal | Controlled | 120 sec |
| C. | Barbell rowing | 6 | 10/10/8/8/12/12 | Normal | Controlled | 120 sec |
Saturday
| Exercise | Name | Sets | Reps | Method | Tempo | Rest |
| A. | Serratus crunch | 4 | 10-12 | Normal | Controlled | 90 sec |
| B. | Standing cable crunch | 4 | 12-15 | Iso-dyn. | 3 sec. hold | 60 sec. |
| C. | Russian twist on ball | 4 | 12-15 per side | Normal | Controlled | 45 sec |
Beginner program level 3.
Training split
Monday: Lower body (load) Tuesday: Upper body (load) Wednesday: Abs (load) Thursday: Lower body (density) Friday: Upper body (density) Saturday: Abs (density) Sunday: Off
Monday
| Exercise | Name | Sets | Reps | Method | Tempo | Rest |
| A. | Back squat | 6 | 6-8 | Normal | Controlled | 150 sec |
| B. | Sumo deadlift | 6 | 6-8 | Normal | Controlled | 150 sec |
| C. | Leg press | 3 | 8-10 | Normal | Controlled | 90 sec |
| D. | Goodmorning | 3 | 8-10 | Normal | Controlled | 90 sec |
| E. | Leg extension | 2 | 12-15 | Normal | Controlled | 60 sec |
| F. | Leg curl | 2 | 10-12 | Normal | Controlled | 60 sec |
Tuesday
| Exercise | Name | Sets | Reps | Method | Tempo | Rest |
| A. | Decline bench press | 6 | 6-8 | Normal | Controlled | 150 sec |
| B. | Corner row | 6 | 6-8 | Normal | Controlled | 150 sec |
| C. | Incline press | 3 | 8-10 | Normal | Controlled | 90 sec |
| D. | Seated rowing | 3 | 8-10 | Normal | Controlled | 90 sec |
| E. | Military press | 2 | 12-15 | Normal | Controlled | 60 sec |
| F. | Lat pulldown | 2 | 10-12 | Normal | Controlled | 60 sec |
Wednesday
| Exercise | Name | Sets | Reps | Method | Tempo | Rest |
| A. | Seated cable crunch | 6 | 6-8 | *Drop set | Controlled | 90 sec |
| B. | Serratus crunch | 4 | 8-10 | Iso-dyn. | 3 sec. hold | 60 sec. |
| C. | Side bend | 4 | 8-10 per side | Normal | Controlled | 45 sec |
Thursday
| Exercise | Name | Sets | Reps | Method | Tempo | Rest |
| A1. | Front squat | 3 | 6-8 | Triple set | Controlled | None |
| A2. | Hack squat | 3 | 10-12 | Triple set | Controlled | None |
| A3. | Leg extension | 3 | 15-20 | Triple set | Controlled | 180 sec |
| B1. | Regular deadlift | 4 | 6-8 | Post-fatigue | Controlled | None |
| B2. | Leg curl | 4 | 12-15 | Post-fatigue | Controlled | 180 sec |
Friday
| Exercise | Name | Sets | Reps | Method | Tempo | Rest |
| A1. | Cable crossover | 3 | 12-15 | Pre/Post | Controlled | None |
| A2. | Flat dumbbell press | 3 | 6-8 | Pre/Post | Controlled | None |
| A3. | Cable triceps extension | 3 | 12-15 | Pre/Post | Controlled | 120 sec |
| B1. | Straight-arms pulldown | 3 | 12-15 | Pre/Post | Controlled | None |
| B2. | Barbell rowing | 3 | 6-8 | Pre/Post | Controlled | None |
| B3. | EZ bar curl | 3 | 12-15 | Pre/Post | Controlled | 120 sec |
Saturday
| Exercise | Name | Sets | Reps | Method | Tempo | Rest |
| A1. | Seated cable crunch | 4 | 6-8 | Circuit | Controlled | None |
| A2. | Weighted crunch | 4 | 8-10 | Circuit | Controlled | None |
| A3. | Side bend | 4 | 8-10 per side | Circuit | Controlled | None |
| A4. | Swiss ball crunch | 4 | Maximum | Circuit | Controlled | None |
| A5. | Seated jacknife | 4 | Maximum | Circuit | Controlled | 120 sec |
INTERMEDIATE PROGRAMS
We now continue our quest to muscledom with 3 other programs of a slightly higher difficulty level. I want to make it clear that for most peoples, even those who have been hitting the gym for quite some time, the beginner programs presented above will be very effective. These next three have the potential to give you more results, but only if you have already built a decent base of muscle mass and work capacity.
Intermediate program level 1.
Training split
Monday: Lower body (load) Tuesday: Upper body (load) Wednesday: Abs (load) Thursday: Lower body (density) Friday: Upper body (density) Saturday: OFF
Sunday: Off
Monday
| Exercise | Name | Sets | Reps | Method | Tempo | Rest |
| A. | Back squat | 5 | 5 x 1* | *Cluster | Controlled | 120 sec |
| B. | Romanian deadlift | 5 | 5 x 1* | *Cluster | Controlled | 120 sec |
| C. | Hack squat | 4 | 5+3+1* | *extended 5s | Controlled | 120 sec |
| D. | Leg press; feet high | 4 | 5+3+1* | *extended 5s | Controlled | 120 sec |
Tuesday
| Exercise | Name | Sets | Reps | Method | Tempo | Rest |
| A. | Bench press | 5 | 5 x 1* | *Cluster | Controlled | 120 sec |
| B. | Barbell rowing | 5 | 5 x 1* | *Cluster | Controlled | 120 sec |
| C. | Military press | 4 | 5+3+1* | *extended 5s | Controlled | 120 sec |
| D. | Lat pulldown | 4 | 5+3+1* | *extended 5s | Controlled | 120 sec |
Wednesday
| Exercise | Name | Sets | Reps | Method | Tempo | Rest |
| A. | Seated cable crunch | 6 | 10/7/5/10/7/5 | Normal | Controlled | 90 sec |
| B. | Serratus crunch | 6 | 10/7/5/10/7/5 | Normal | Controlled | 90 sec |
| C. | Side bend | 6 | 10/7/5/10/7/5 | Normal | Controlled | 90 sec |
Thursday
| Exercise | Name | Sets | Reps | Method | Tempo | Rest |
| A1. | Front squat | 4 | 4-6 | Post-fatigue | Controlled | None |
| A2. | Bulgarian squat | 4 | 12-15 | Post-fatigue | Controlled | 90 sec. |
| B1. | Goodmorning | 4 | 4-6 | Post-fatigue | Controlled | None |
| B2. | 1-leg curl | 4 | 12-15 | Post-fatigue | Controlled | 90 sec. |
| C1. | Standing calves | 4 | 6-8 | Post-fatigue | Controlled | None |
| C2. | Seated calves | 4 | 6-8 | Post-fatigue | Controlled | 60 sec |
Friday
| Exercise | Name | Sets | Reps | Method | Tempo | Rest |
| A1. | Decline bench press | 4 | 4-6 | Post-fatigue | Controlled | None |
| A2. | Cable flies | 4 | 12-15 | Post-fatigue | Controlled | 90 sec. |
| B1. | Seated rowing | 4 | 4-6 | Post-fatigue | Controlled | None |
| B2. | 1-arm rowing | 4 | 12-15 | Post-fatigue | Controlled | 90 sec. |
| C1. | Reverse curl | 4 | 6-8 | Post-fatigue | Controlled | None |
| C2. | Nosebreaker | 4 | 6-8 | Post-fatigue | Controlled | 60 sec |
Intermediate program level 2
Training split
Monday: Lower body (load & power) Tuesday: Upper body (load & power) Wednesday: Abs (load)
Thursday: Lower body (density) Friday: Upper body (density) Saturday: Off
Sunday: Off
Monday
| Exercise | Name | Sets | Reps | Method | Tempo | Rest |
| A. | Power clean from hang | 6 | 7/5/3/7/5/3 | Wave | Explosive | 120 sec |
| B. | Back squat | 6 | 7/5/3/7/5/3 | Wave | Controlled | 120 sec |
| C. | Stiff-legged deadlift | 5 | 5 | Iso-dynamic | 3 sec.pause | 120 sec |
| D. | Lunges | 4 | 6 | Iso-dynamic | 3 sec.pause | 120 sec |
Tuesday
| Exercise | Name | Sets | Reps | Method | Tempo | Rest |
| A. | Push press | 6 | 7/5/3/7/5/3 | Wave | Explosive | 120 sec |
| B. | Bench press | 6 | 7/5/3/7/5/3 | Wave | Controlled | 120 sec |
| C. | T-bar rowing | 5 | 5 | Iso-dynamic | 3 sec.pause | 120 sec |
| D. | Lat pulldown | 4 | 6 | Iso-dynamic | 3 sec.pause | 120 sec |
Wednesday
| Exercise | Name | Sets | Reps | Method | Tempo | Rest |
| A. | Kneeling cable crunch | 10 | 10 | Normal | Controlled | 60 sec |
| B. | Serratus crunch | 5 | 8 | Iso-dynamic | 3 sec.pause | 90sec |
| C. | Swiss ball crunch | 5 | maximum | Iso-dynamic | 3 sec.pause | 60 sec |
| D. | Side bend | 4 | 6 | Slow ecc. | 9 sec. eccentric | 90 sec |
Thursday
| Exercise | Name | Sets | Reps | Method | Tempo | Rest |
| A1. | Front squat | 4 | 4-6 | Triple set | Controlled | None |
| A2. | Lunges | 4 | 12-15 | Triple set | Controlled | None |
| A3. | Bodyweight squat | 4 | maximum | Triple set | Slow | 120 sec |
| B1. | Sumo deadlift | 4 | 4-6 | Triple set | Controlled | None |
| B2. | Goodmorning | 4 | 12-15 | Triple set | Controlled | None |
| B3. | Leg curl | 4 | 20-30 | Triple set | Controlled | 120 sec |
| C2. | Seated calves | 4 | 20-30 | Normal | Controlled | 60 sec |
Friday
| Exercise | Name | Sets | Reps | Method | Tempo | Rest |
| A1. | Weighted dips | 4 | 4-6 | Triple set | Controlled | None |
| A2. | Incline DB press | 4 | 12-15 | Triple set | Controlled | None |
| A3. | Crossover | 4 | 20-30 | Triple set | Controlled | 120 sec |
| B1. | Barbell rowing | 4 | 4-6 | Triple set | Controlled | None |
| B2. | Seated rowing | 4 | 12-15 | Triple set | Controlled | None |
| B3. | Straight-arm pulldown | 4 | 20-30 | Triple set | Controlled | 120 sec |
| C1. | Preacher curl | 3 | 15-20 | Superset | Controlled | None |
| C2. | Cable triceps extension | 3 | 12-15 | Superset | Controlled | 60 sec |
Intermediate program level 3
Training split
Monday: Chest (press)/ Back (horizontal) / Shoulders (raises) Tuesday: Quads (compound)/ Hamstrings (isolation) / Arms Wednesday: Abs (load)
Thursday: Chest (adduction)/ Back (vertical) / Shoulders (press) Friday: Hamstrings (compound)/ Quads (isolation) / Arms Saturday & Sunday: Off
Monday
| Exercise | Name | Sets | Reps | Method | Tempo | Rest |
| A1. | Bench press | 6 | 8/6/4/6/4/6 | Alternate | Controlled | 90 sec |
| A2. | Barbell rowing | 6 | 8/6/4/6/4/6 | Alternate | Controlled | 120 sec |
| B1. | Incline DB press | 4 | 8-10 | Alternate | Controlled | 90 sec |
| B2. | Seated row to neck | 4 | 12-15 | Alternate | Controlled | 120 sec |
| C1. | Lateral raise | 3 | 12-15 | Alternate | Controlled | 90 sec |
| C2. | Bent over lateral raise | 3 | 12-15 | Alternate | Controlled | 120 sec |
Tuesday
| Exercise | Name | Sets | Reps | Method | Tempo | Rest |
| A1. | Back squat | 6 | 8/6/4/6/4/6 | Alternate | Controlled | 90 sec |
| A2. | Leg curl | 6 | 8/6/4/6/4/6 | Alternate | Controlled | 120 sec |
| B1. | Leg press | 4 | 8-10 | Alternate | Controlled | 90 sec |
| B2. | 1-leg curl | 4 | 8-10 | Alternate | Controlled | 120 sec |
| C1. | Zottman curl | 3 | 12-15 | Alternate | Controlled | 90 sec |
| C2. | Nosebreaker | 3 | 12-15 | Alternate | Controlled | 120 sec |
Wednesday
| Exercise | Name | Sets | Reps | Method | Tempo | Rest |
| A. | Kneeling cable crunch | 10 | 10 | Normal | Controlled | 60 sec |
| B. | Serratus crunch | 5 | 8 | Iso-dynamic | 3 sec.pause | 90sec |
| C. | Swiss ball crunch | 5 | maximum | Iso-dynamic | 3 sec.pause | 60 sec |
| D. | Side bend | 4 | 6 | Slow ecc. | 9 sec. eccentric | 90 sec |
Thursday
| Exercise | Name | Sets | Reps | Method | Tempo | Rest |
| A1. | Cable flies | 6 | 12-15 | Alternate | Controlled | 90 sec |
| A2. | Lat pulldown | 6 | 8-10 | Alternate | Controlled | 120 sec |
| B1. | Cable crossover | 4 | 12-15 | Alternate | Controlled | 90 sec |
| B2. | Triangle lat pulldown | 4 | 8-10 | Alternate | Controlled | 120 sec |
| C1. | Military press | 3 | 6-8 | Alternate | Controlled | 90 sec |
| C2. | Upright rowing | 3 | 8-10 | Alternate | Controlled | 120 sec |
Friday
| Exercise | Name | Sets | Reps | Method | Tempo | Rest |
| A1. | Romanian deadlift | 6 | 8/6/4/6/4/6 | Alternate | Controlled | 90 sec |
| A2. | Bulgarian squat | 6 | 8-10 | Alternate | Controlled | 120 sec |
| B1. | Goodmorning | 4 | 12-15 | Alternate | Controlled | 90 sec |
| B2. | Leg extension | 4 | 8-10 | Alternate | Controlled | 120 sec |
| C1. | Reverse curl | 3 | 8-10 | Alternate | Controlled | 90 sec |
| C2. | Lying DB triceps | 3 | 6-8 | Alternate | Controlled | 120 sec |
ADVANCED PROGRAMS
Advanced trainees are closer to an ox than a human being! Their muscular development is significantly above that of their fellow men and their strength rivals that of a HEMI powered truck! As such specimen they require the use of high-stress methods to further stimulate gains in muscle mass. They must also change program more frequently than beginners and intermediate trainees. Beginners can stick to the same program for around 6-8 weeks and still make progress, intermediates can go for approximately 4 weeks on
the same regimen while the advanced trainee will need to change his program as often as every 2-weeks in some cases! Changing a training program doesn’t necessarily means using a completely different training program. You can modify a routine simply by changing one of the 9 accute training variables of the program. You’ll also notice that the training frequency for each muscle group is lower. This is because each individual workout is more stressful and thus a muscle will require more recovery time.
| Optimal frequency of program variation | |||||
| Beginner | Intermediate | Advanced | |||
| Strength | Hypertrophy | Strength | Hypertrophy | Strength | Hypertrophy |
| 4-6 weeks | 6-8 weeks | 3-4 weeks | 4-6 weeks | 1-2 weeks | 2-4 weeks |
Advanced program level 1
Training split
Monday: Quads/Hamstrings Tuesday: Chest/Back Wednesday: Off
Thursday: Biceps/Triceps Friday: Abs
Saturday: Shoulders Sunday: Off
Monday
| Exercise | Name | Sets | Reps | Method | Tempo | Rest |
| A. | Back squat | 5 | 5 x 1* | *Cluster | Controlled | 120 sec |
| B. | Deadlift | 5 | 5 x 1* | *Cluster | Controlled | 120 sec |
| C. | Leg press | 4 | 5+3+2 | Extended 5s | Controlled | 120 sec |
| D. | Goodmorning | 4 | 5+3+2 | Extended 5s | Controlled | 120 sec |
| E1. | Leg extension | 3 | 15-20 | Superset | Controlled | None |
| E2. | Leg curl | 3 | 6-8 | Superset | Controlled | 120 sec |
Tuesday
| Exercise | Name | Sets | Reps | Method | Tempo | Rest |
| A. | Bench press | 5 | 5 x 1* | *Cluster | Controlled | 120 sec |
| B. | Barbell rowing | 5 | 5 x 1* | *Cluster | Controlled | 120 sec |
| C. | Decline bench press | 4 | 5+3+2 | Extended 5s | Controlled | 120 sec |
| D. | Seated rowing | 4 | 5+3+2 | Extended 5s | Controlled | 120 sec |
| E1. | Cable crossover | 3 | 15-20 | Superset | 2 sec. squeeze | None |
| E2. | Lat pulldown | 3 | 6-8 | Superset | 3 sec. hold | 120 sec |
Thursday
| Exercise | Name | Sets | Reps | Method | Tempo | Rest |
| A. | Close-grip bench press | 5 | 5 x 1* | *Cluster | Controlled | 120 sec |
| B. | Barbell curl | 5 | 5 x 1* | *Cluster | Controlled | 120 sec |
| C. | Lying DB triceps | 4 | 5+3+2 | Extended 5s | Controlled | 120 sec |
| D. | Preacher curl | 4 | 5+3+2 | Extended 5s | Controlled | 120 sec |
| E1. | Cable triceps extension | 3 | 8-12 | Superset | Controlled | None |
| E2. | Reverse preacher curl | 3 | 8-12 | Superset | Controlled | 120 sec |
Friday
| Exercise | Name | Sets | Reps | Method | Tempo | Rest |
| A. | Serratus crunch | 5 | 8+4+2 | Drop set | Controlled | 60 sec |
| B. | Seated cable crunch | 5 | 8+4+2 | Drop set | Controlled | 60 sec |
| C. | Side bend | 4 | 8-12 | Normal | Controlled | 60 sec |
| D. | Weighted crunch | 4 | 8-12 | Normal | Controlled | 60 sec |
| E1. | Swiss ball crunch | 3 | maximum | Superset | Controlled | None |
| E2. | Seated knee-up | 3 | maximum | Superset | Controlled | 90 sec |
Saturday
| Exercise | Name | Sets | Reps | Method | Tempo | Rest |
| A. | Push press | 5 | 5 x 1* | *Cluster | Explosive | 120 sec |
| B. | Power clean from blocks | 5 | 5 x 1* | *Cluster | Explosive | 120 sec |
| C. | Seated DB press | 4 | 5+3+2 | Extended 5s | Controlled | 120 sec |
| D. | Barbell shrugs | 4 | 5+3+2 | Extended 5s | Controlled | 120 sec |
| E1. | Lateral raise | 3 | 8-12 | Superset | Controlled | None |
| E2. | Bent over lateral | 3 | 8-12 | Superset | Controlled | 120 sec |
Advanced program level 2
Training split
Monday: Quads/Hamstrings Tuesday: Chest/Back Wednesday: Off
Thursday: Biceps/Triceps Friday: Abs
Saturday: Shoulders Sunday: Off
Monday
| Exercise | Name | Sets | Reps | Method | Tempo | Rest |
| A. | Front squat 1 ½ * | 5 | 5 | *1 ½ | Controlled | 120 sec |
| B. | Romanian deadlift 1 ½ | 5 | 5 | *1 ½ | Controlled | 120 sec |
| C. | Hack squat | 3 | 8 | Tempo contrast** | See note | 120 sec |
| D. | Leg press feet high | 3 | 8 | Tempo contrast** | See note | 120 sec |
| E. | 1-Leg extension | 3 | 6×4*** | Rest-pause | Controlled | 90 sec. |
| F. | 1-Leg curl | 3 | 6×4*** | Rest-pause | Controlled | 90 sec. |
| * 1 ½ = perform one half rep followed by one full rep. This is equal to one repetition in the set
** Tempo contrast = 2 superslow reps; 2 fast reps; 2 superslow reps; 2 fast reps *** 1-leg rest-pause = Each set has 6 “mini-sets” of 4 reps each. Perform the 4 reps with one leg, then 4 with the other then back to 4 for the original leg. Perform this 6 times (total of 24 reps per leg). Use a weight that you can lift 8-10 times. |
||||||
Tuesday
| Exercise | Name | Sets | Reps | Method | Tempo | Rest |
| A. | Flat DB press | 5 | 5 | *1 ½ | Controlled | 120 sec |
| B. | Barbell rowing | 5 | 5 | Iso-dynamic | 3 sec. hold | 120 sec |
| C. | Decline bench press | 3 | 8 | Tempo contrast** | See note | 120 sec |
| D. | Lat pulldown | 3 | 8 | Iso-dynamic | 3 sec. hold | 120 sec |
| E. | Low incline DB press | 3 | 5+3+2 | Extended 5s | Controlled | 90 sec. |
| F. | 1-arm DB rowing | 3 | 6×4*** | Rest-pause | Controlled | 90 sec. |
| * 1 ½ = perform one half rep followed by one full rep. This is equal to one repetition in the set
** Tempo contrast = 2 superslow reps; 2 fast reps; 2 superslow reps; 2 fast reps *** 1-arm rest-pause = Each set has 6 “mini-sets” of 4 reps each. Perform the 4 reps with one arm, then 4 with the other then back to 4 for the original arm. Perform this 6 times (total of 24 reps per arm). Use a weight that you can lift 8-10 times. |
||||||
Thursday
| Exercise | Name | Sets | Reps | Method | Tempo | Rest |
| A. | Nosebreaker | 5 | 5 | *1 ½ | Controlled | 120 sec |
| B. | Barbell curl | 5 | 5 | *1 ½ | Controlled | 120 sec |
| C. | Lying DB triceps | 3 | 8 | Tempo contrast** | See note | 120 sec |
| D. | Hammer curl | 3 | 8 | Tempo contrast** | See note | 120 sec |
| E. | 1-arm rope triceps ext. | 3 | 6×4*** | Rest-pause | Controlled | 90 sec. |
| F. | 1-arm machine curl | 3 | 6×4*** | Rest-pause | Controlled | 90 sec. |
| * 1 ½ = perform one half rep followed by one full rep. This is equal to one repetition in the set
** Tempo contrast = 2 superslow reps; 2 fast reps; 2 superslow reps; 2 fast reps *** 1-arm rest-pause = Each set has 6 “mini-sets” of 4 reps each. Perform the 4 reps with one arm, then 4 with the other then back to 4 for the original arm. Perform this 6 times (total of 24 reps per arm). Use a weight that you can lift 8-10 times. |
||||||
Friday
| Exercise | Name | Sets | Reps | Method | Tempo | Rest |
| A. | Serratus crunch | 5 | 8+4+2 | Drop set | Controlled | 60 sec |
| B. | Kneeling cable crunch | 5 | 8+4+2 | Drop set | Controlled | 60 sec |
| C. | Side bend | 4 | 8-12 | Normal | Controlled | 60 sec |
| D. | Weighted crunch | 4 | 8-12 | Normal | Controlled | 60 sec |
| E1. | Swiss ball crunch | 3 | maximum | Superset | Controlled | None |
| E2. | Seated knee-up | 3 | maximum | Superset | Controlled | 90 sec |
Saturday
| Exercise | Name | Sets | Reps | Method | Tempo | Rest |
| A. | Military press | 5 | 5 | *1 ½ | Controlled | 120 sec |
| B. | Cable upright rowing | 5 | 5 | Iso-dynamic | 3 sec. hold | 120 sec |
| C. | Seated DB press | 3 | 8 | Tempo contrast** | See note | 120 sec |
| D. | Seated row to the neck | 3 | 8 | Iso-dynamic | 3 sec. hold | 120 sec |
| E. | 1-arm leaning lateral. | 3 | 6×4*** | Rest-pause | Controlled | 90 sec. |
| F. | 1-arm bent over lateral | 3 | 6×4*** | Rest-pause | Controlled | 90 sec. |
| * 1 ½ = perform one half rep followed by one full rep. This is equal to one repetition in the set
** Tempo contrast = 2 superslow reps; 2 fast reps; 2 superslow reps; 2 fast reps *** 1-arm rest-pause = Each set has 6 “mini-sets” of 4 reps each. Perform the 4 reps with one arm, then 4 with the other then back to 4 for the original arm. Perform this 6 times (total of 24 reps per arm). Use a weight that you can lift 8-10 times. |
||||||
Advanced program level 3
Training split
Monday: Quads/Hamstrings Tuesday: Chest/Back Wednesday: Off
Thursday: Biceps/Triceps Friday: Abs
Saturday: Shoulders Sunday: Off
Monday
| Exercise | Name | Sets | Reps | Method | Tempo | Rest |
| A. | Back squat | 6 | 5/4/3/5/4/3 | Normal | Controlled | 120 sec |
| B. | Sumo deadlift | 6 | 5/4/3/5/4/3 | Normal | Controlled | 120 sec |
| C1. | 2/1 leg press | 5 | 4 per leg | 2/1 tech.* | See note | None |
| C2. | 2/1 leg curl | 5 | 4 per leg | 2/1 tech.* | See note | 120 sec |
| * 2/1 technique = Lift explosively with 2 legs; lower slowly (5-6 seconds) with one leg. | ||||||
Tuesday
| Exercise | Name | Sets | Reps | Method | Tempo | Rest |
| A. | Bench press | 6 | 5/4/3/5/4/3 | Normal | Controlled | 120 sec |
| B. | Barbell rowing | 6 | 5/4/3/5/4/3 | Normal | Controlled | 120 sec |
| C1. | Variable incline DB press* | 5 | 8+8+8 | Var.incl.* | Controlled | None |
| C2. | 2/1 seated rowing | 5 | 4 per arm | 2/1 tech.** | See note | 120 sec |
|
||||||
Thursday
| Exercise | Name | Sets | Reps | Method | Tempo | Rest |
| A. | Close-grip decline bench | 6 | 5/4/3/5/4/3 | Normal | Controlled | 120 sec |
| B. | Barbell curl | 6 | 5/4/3/5/4/3 | Normal | Controlled | 120 sec |
| C1. | 2/1 rope triceps extension | 5 | 4 per arm | 2/1 tech.* | See note | None |
| C2. | 2/1 machine curl | 5 | 4 per arm | 2/1 tech.* | See note | 120 sec |
| * 2/1 technique = Lift explosively with 2 arms; lower slowly (5-6 seconds) with one arm. | ||||||
Friday
| Exercise | Name | Sets | Reps | Method | Tempo | Rest |
| A. | Serratus crunch | 10 | 10 | Normal | Controlled | 60 sec |
| B. | Seated cable crunch | 6 | 5+3+2 | Extended 5s | Controlled | 60 sec |
Friday
| Exercise | Name | Sets | Reps | Method | Tempo | Rest |
| A. | Push press | 6 | 5/4/3/5/4/3 | Normal | Explosive | 120 sec |
| B. | Barbell power shrugs | 6 | 5/4/3/5/4/3 | Normal | Explosive | 120 sec |
| C1. | Lateral raise | 5 | 6-8 | Normal | Controlled | None |
| C2. | Modified Hise shrugs | 5 | 6-8 | Normal | Controlled | 90 sec |
Luckily, you’re holding one of them in your hands right now. “I”liis is a great b‹iok because it was written by a g reat coach — Christian Thibandcaii. Like all respcctcd and influential coaches, Christian has u strong background in athletic trai ning, but lie’s not confined by it. He blends his education and his hands-on experienccs into a training philosophy thai can benefit anyone front elite athletes to weekend warriors to those of us who just want to look great naked.
The Black Book of Training Secrets
Enhanced Edition
By Christian Thibaudeau
Foreword by Chris Shugart Editor: Tony Schwartz
Photos: Patrick Lemieux, Jean Boutet Jr.
F.Lepine Publishing
ISBN 0-9781105-6-0
2006 e-Book Publication www.MuscleDriveThru.com