BRET CONTRERAS & KELLIE DAVIS
Preface
Genetically speaking, I was spoiled growing up. I had the skinny kid gene. I ran around in my youth from sun up to sun down, scraping my knobby knees on the pines I scaled in my Colorado backyard. I would break from a day spent running around the Rockies to feast on giant servings of fruit and cookies, and then it was back out for more exploration.
This was pretty much how I lived for the first twenty five years of my life—carefree, bonethin, and com pletely unaware of my fitness or nutritional needs. Sure, I was athletically gifted and spent most of my time mov ing rather than sitting. I played sports up until my fresh man year of college, and started going to the gym at age fourteen. However, after I graduated with my bachelor’s degree and settled into a desk job, my lifestyle started to catch up with me. I could no longer rely on genetics to help me beat out the effects of my poor diet. When I gave birth to my daughter, I lost the weight quickly— but not for the right reasons. The stress of being a new parent and starting a new career left little time for me to eat or take care of myself. I didn’t spend many sessions in the gym after she was born, and I rarely ate, uninten tionally starving myself thin.
When my daughter was two, I found out I was preg nant with my son. By this time, I started to pack on a little weight but was in complete denial of this whole process. I still squeezed myself into size five jeans and covered up the fat that spilled out over the top of them. A little more than three months into my pregnancy, I started showing pretty well. There was no guessing whether or not I was expecting. I steadily gained excess weight over the months and did little to control it. I ate my lunch as soon as I arrived to work and went out for another lunch in the afternoon.
Along with uncontrolled hunger and extra pounds came a bulk of pregnancy complications. I found my self in and out of the hospital more times than I care to remember, and I ended up on bed rest by month seven. I still haven’t exactly figured out what bed rest entails when you have a career and a busy toddler running around the house, but it was supposed to mean I sat
on my butt all day and did nothing. I tried my best but wasn’t very successful with it. My body could no lon ger carry my pregnancy, and I gave birth to my son on Christmas Eve, four weeks before my due date.
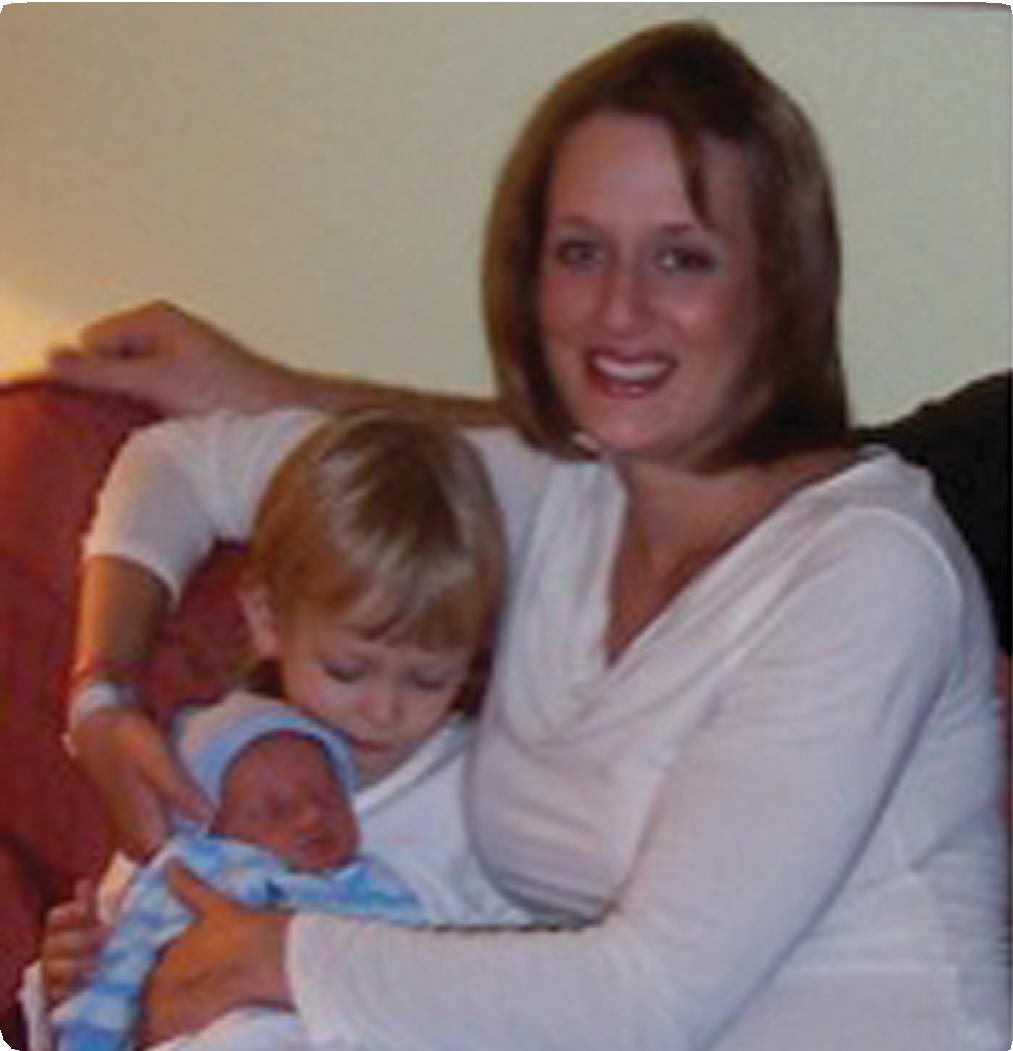
At this time, I thought little of my lifestyle having anything to do with pregnancy complications. I blamed nature as I sat with my son in the neonatal intensive care unit. My body just wasn’t designed to carry a preg nancy to term, or so I thought. Looking back now, I know in my gut that this could have all been prevented had I taken care of my body, giving it proper nutrition and exercising regularly. I brought my son home five days after he was born, and along with my new baby came an extra fifty pounds of weight.
I was overweight for the first time in my life. I had always been the skinny type; the kind most people wrinkle their nose at because it was hard for me to gain weight. I’m certain if my body fat had been measured at the time, I would have fallen in the obese category with a pathetic muscletofat ratio.
I learned to accept the extra weight rather than do anything about it. This was mostly driven by selfcon sciousness and embarrassment. After I gave my body enough time to heal, I stepped into the gym on a few occasions only to leave disappointed.
I stood in the mirrors by the dumbbell rack feeling hopeless. I couldn’t run due to weakened pelvic floor muscles and poor endurance, and I couldn’t lift weights because I had no strength. At that time, I was com pletely and utterly in the worst shape of my life. I had become the very definition of “out of shape.” But to me, it was the curse of being a mom. I believed what I had been told—that babies steal your beauty and ruin your body.
6 PREFACE
The Breaking Point
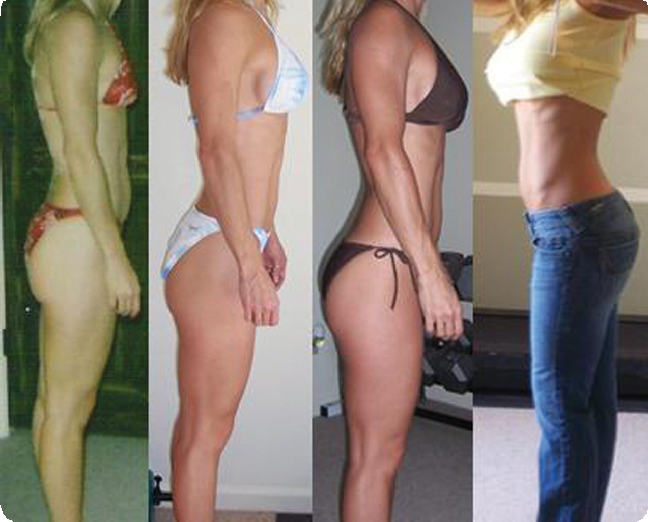
Over the next two years, I slowly lost the weight I gained with my pregnancy, but like my first pregnancy, it was mostly due to stress. I wasn’t eating a nutritious diet, and exercise didn’t extend beyond evening walks or play time with my kids. I looked great in clothes, but without them was a different story. A major turning point was when I decided to strip down to my bikini and take progress photos—or photos I thought would show progress.
I burst into tears when I uploaded the pictures onto my computer and saw my true physique for the first time rather than what I thought I looked like. I was completely disillusioned because I only focused on the scale numbers. I hadn’t seen my body for what it was. The skin on my belly sagged, and my thighs were chubby and shapeless. My glutes were completely flat and nonexistent other than the fat that hung from the bottom and sides of my hips.
My outlook completely changed from that moment. The fitness magazines I devoutly read every month were filled with models who were also moms. Those women proved it was possible to have children and be in great shape. So I stopped hanging my hat on excus es and signed up for classes at my gym. I devoted two nights a week to aerobic classes and one night to yoga. I went without fail to every single class. At first, I hid in the back, barely able to make it through twenty minutes of the aerobic weighttraining course. I sat out during lunges because I couldn’t do a stationary lunge with my own body weight. After two months, my strength in creased, and I moved to the front of the room near the instructor.
Nearly four months into my new, fitter lifestyle, I stepped foot into the weight room for the first time in six years. I remember when I could finally see a little bump of biceps pop up—a total confidence booster. I made it a point to hold things close to my chest so that my arms flexed in front of others. Pathetic, I know. But I was feeling really good by that point, and I kept striv ing to reach new goals by learning everything I could from fitness magazines and websites.
Raising the Bar Higher
After achieving results I never thought possible, I be came addicted to the gym—but in a good way. I was in better shape than I had been in before having children,
but I felt that innate competitive drive creeping back into my life. I decided I needed to take my physique to the next level, so I committed to a local figure competi tion. I felt utterly lost a mere three weeks into my train ing. I joined online forums filled with fitnessminded women—some were competitors themselves—and made great connections.
But the information still baffled me. Frustrated and confused, I hired a coach to get me on stage. By the time I hit my quarter turns in front of the judges, I weighed less than I had in high school. I felt completely drained and overtrained from the methods my coach asked me to use. The women in my circle all joked about how this feeling was normal, but deep down, I knew it wasn’t healthy.
I was hooked on competing but not on my coaching. By then, I felt confident enough to get to the stage on my own, and I did so the next time around. Physically, I felt less drained and I was more intact emotionally. I only gained back two pounds, though, because I still held onto the overtraining and undereating mentality my former coach engrained in my brain.
Finding The Glute Guy
One of my most reliable sources of fitness informa tion at the time was TNation, a site that regularly pub lished Bret’s work. After reading one of his articles, I scrolled down to his byline and realized that he lived in the Phoenix valley as well. I immediately contacted him with my story. He agreed to work with me to get me back on stage. He felt that while I had a great phy sique, I needed to take a couple of years to build muscle for the figure stage.
I was a little heartbroken, but I trusted his instincts. Within three weeks of starting his program, my phy sique completely changed. I was leaner, tighter, and carried more muscle than I ever thought possible. Pre viously, I believed my genetic limitations were set to “skinny” and I couldn’t carry enough muscle to make it as an elite competitor on stage. However, his programs proved me dead wrong. I made more progress in the first six weeks of working with him than I had in the previous year on my own.
Bret put together a compilation of my progress and sent it over after four months of working with him. I was astounded by the changes; I couldn’t believe I was looking at photos of my body. I went from a slender, average physique to a powerhouse stacked with muscle
STRONG CURVES 7
from head to toe. But the most rewarding part of the entire program was my strength gains. I was perform ing lifts at levels I thought only possible for competi tive powerlifters, and I consistently beat my own per sonal records every month. My husband, Josh, was so impressed with my results that he also hired Bret and worked with him for nearly a year.
Bret has served as a coach, mentor, educator, and friend for the past four years, and I attribute a large part of my success to his commitment. He saw within me the ability to reach elite athletic levels, and he wanted me to learn and grow inside the fitness industry. Since training with Bret, I’ve stood on the stage in three fig ure competitions, placing overall in one and fourth in another. In the gym, I’ve fullsquatted nearly one and a half times my own body weight, deadlifted close to two and a half times my own weight, hip thrusted more than two and a half times my body weight, and rival most men at my facility when it comes to pullups.
Setting the Bar Higher
The funny part about all of this is that when I start ed my journey five years ago, these feats never even came to mind. We all reach that breaking point when we’re tired of feeling hopeless. We either succumb to that hopelessness and give up on ourselves, or we take action. I imagine right now that you are standing some
where between where I started and where I am now. If you had gone down the other path and given up hope, you wouldn’t be holding this book in your hands. You want to take action and are seeking guidance toward reaching your personal health and fitness goals.
When I stepped foot in the gym in the worst shape of my life, I had one goal in mind: to look better. It was an aimless goal, and I lacked commitment. I had no clue where it would lead me, and had I not defined my goal even more, I likely would have given up on myself. But the more results I saw, the more pinpointed my goals became.
I want you to go into this program with the same in tentions. Start with a general goal, but as you progress, make it more concrete. Make it your own. We all want to get in shape, lose weight, gain confidence, grow stronger, and look good in a bikini. But those goals aren’t very personal. Make this program personal. Get selfish with your goals, and do whatever it takes to achieve them. Most importantly, never look back once your momentum picks up and you’re headed down that road toward a better you.
The other day, I was helping a friend with a project that forced me to pull out my before and after pictures. I found a photo taken on the day I brought home my son from the hospital. I hardly recognized myself, not just physically, but mentally as well. I couldn’t imagine ever getting to that place to begin with, and I never want to go back there. It had nothing to do with my physique but with my confidence and emotions.
8 PREFACE
Building Strong Curves isn’t just about creating physical changes, but emotional ones as well. Once you start achieving strength gains, shedding pounds of fat, and building the curves you have always dreamed of having, your outlook on life will completely change. As these changes take place and your confidence soars, check back with your goals and keep striving toward greater ones. You will find a great deal of improvement in all areas of your life when you take care of your body. It has been a great honor and privilege to work with Bret on this project. He has been a tremendous asset to my life over the past four years. I feel a deep attachment to this book and the Strong Curves movement because I wholeheartedly believe in this program. I have never met a person with more passion and commitment to his work than Bret. That passion shines in every chapter, as they are each catered toward improving your physique, lifestyle, and selfconfidence. Strong Curves is the cul mination of Bret’s research, fieldtesting, and practices implemented over the past fifteen years.
I can tell you firsthand that this program works and the results are nothing short of incredible. I will ad mit this program is tough. When I tested the Twelve Week Gluteal Goddess Program for Advanced Lifters, I emailed Bret the first week in and asked if he was trying to kill me. He advised me not to push myself so hard. So if I can give you a slice of wisdom, it’s this; don’t overdo it. The program on its own is tough enough. If you try to go allout every session, you will be cursing Bret in your sleep. Take every part of each phase in strides, and train at your current level of conditioning.
If it’s too tough, cater the workout to fit your fitness level. Scale back on the amount of repetitions per set or the intensity of your repetitions. If you aren’t able to perform a certain exercise, the Exercise Index offers a variety of supplemental exercises to help you reach your goals.
Bret and I put hundreds of hours of sweat into this book because we want you to commit to the program. No stone was left unturned, making it possible for you to achieve your desired results no matter where you stand today. If you feel like giving up, keep my story in the back of your mind (and carry my before and after photos with you for a little motivation). I want you to succeed for selfish reasons. I want you to know what it’s like to be a confident, sexy woman. It’s the most incredible feeling in the world when you can walk up to the power rack in the gym and pull more weight than the guy standing next to you. You can be that woman, and Strong Curves will teach you how.
STRONG CURVES 9
Chapter 1:
Introduction
If proverbial sayings were coined in the fitness world, “Abs are made in the kitchen” would likely be the most repeated phrase. The right nutrition will deliver a far more visible six-pack than performing endless sets of core exercises. Getting rid of belly fat reveals the muscle beneath, plain and simple.
While this is certainly true for the abs, it isn’t the same for the glutes. If you’ve ever dieted down to re veal great abs, you probably noticed at the same time that your butt flattened out. Dieting with minimal or no training doesn’t do the same justice for your booty. Abs are made in the kitchen, but glutes are made in the gym. Louie Simmons is a coach known for his ability to get powerlifters incredibly strong. Charles Glass home grows some of the biggest bodybuilders to ever step on stage. Celebrity trainers like Joe Dowell get the stars just right for the big screen. And coaches like Mike Boyle have mastered the art of building powerful ath letes while keeping them injuryfree.
I adopted the art of glutebuilding and have created the best program for sculpting a shapely backside while developing strong, powerful muscles. Since I’ve been at this so long, I can simply glance at a routine and deter mine whether or not it will deliver good gluteal results. Is this a program that calls for a couple sets of body weight lunges? Nope.
Anytime you begin an exercise program, you will see initial results, but if you give it a few weeks, the re sults will taper off, leaving you with lackluster results.
When a new client comes to me, I can determine in a single repetition whether or not she is properly using her glutes during the exercise. For example, squats and back extensions can be amazing glute exercises, but not the way you might be doing them. It isn’t just about doing the best glute exercises and going through the motions; it’s about getting incredibly strong at the best glute exercises while using perfect form and activating the glutes sufficiently.
I visit a lot of gyms around the world when I travel and can say that when many women train, they leave much room on the table for increased gluteal strength and shape. I wish I could travel to every commercial gym and show women how to properly train using the best bootybuilding exercises and the right programs. I would show them how to hit the glutes with the right frequency, use great technical form, and activate the glutes through a full range of motion.
Since I can’t be everywhere all at once, Strong Curves brings my expertise and coaching right to your living room or gym. You picked up this book because you want to see changes in your physique. You want to grow stronger, more powerful, and build shapelier curves. Think of this book as oneonone coaching from me. I put every bit of knowledge I’ve accumulated over the past fifteen years into these chapters so that you can walk into the gym or use your equipment at home with confidence.
My Big Break
It all started on September 16, 2009 with an article I published on the men’s fitness site, TNation, titled Dispelling the Glute Myth. From that moment, I trans formed from a local Arizona personal trainer into an online fitness personality. I was no longer the strength and conditioning coach secretly obsessed with the glute muscles. My obsession became public. There was no turning back because I was officially dubbed “The Glute Guy.” In fact, in recent years, I’m often approached by strangers who say, “Hey, you’re The Glute Guy!”
I’m okay with that, as there are far worse names. I’m just glad I didn’t develop an obsession for ankle flexibility. Imagine hearing, “Hey, you’re the Ankle Dorsiflexion Dude.” It just doesn’t have the same ring to it.
10 Chapter 1: INTRODUCTION
The status of “The Glute Guy” brings with it some incredible opportunities that I wouldn’t have found otherwise. In the past four years, I’ve had the honor of speaking at some of the most highly influential strength and conditioning and sports conferences around the globe. My byline has appeared on articles for the same magazines I read so much as a teen that I wore out the pages (no, not those magazines, ladies), including Muscle Mag, Men’s Fitness, and Men’s Health. I’ve also had the honor of being an expert in the Glute Edition of Oxygen Magazine and have regular features on sites like TNation and StrengthCoach.com.
But the most rewarding part of my entire career in the strength industry has been the incredible transfor mation I’ve helped my female clients achieve. I love working with women, and it isn’t just because I’m a man. If you polled fitness professionals, I think most would agree that training women is highly rewarding because they usually do exactly what you ask them to do to achieve their results. That is the very reason I wrote this book with you in mind. I knew from the moment I sat down to perfect the Strong Curves Pro gram that you would do everything I ask of you in this book to achieve the body you’ve always wanted. Then, when all is said and done, you would email me with huge thanks. Okay, you don’t have to do that, but I would seriously love to hear from you and learn about your results.
So, how did I go from the teenage kid who plastered my walls with the pages of bodybuilding magazines to the guy who molds, strengthens, and builds the best butts around the world? This story actually begins way back in 1992 with my own booty, or lack thereof. My quest to teach women how to build a perfect pair of glutes started when I realized that I didn’t have any glutes to call my own.
The Candid Birth of the Glute Guy
I learned about the importance of the glute muscles firsthand back in high school. My junior year, I de cided to join the football team after much coaxing from my friends who laced up their shoulder pads back when we were freshman. I was astounded by their strength in the weight room. My teammates, who had been training for a few years, could squat and power clean with such intensity, but I shied away from those big lifts. I was untrained when it came to weights and didn’t have the same great mentorships that they did with the coaches.
I stuck with lifts I knew I could perform easily like the leg press, pushups, and biceps curls.
I started seeing improvements in my physique from my routine and felt pretty confident with my new hot body (it’s okay to snicker at my expense), until that fateful day I walked behind my buddy, Cameron. At that moment, I happened to be escorting my crush to Physics class with my arms fully flexed while hold ing her books. Suddenly, she leaned into me. I thought I would finally get the chance to ask her out, but my world crashed down around me in the next four sec onds. Mind you, it was high school and I was overly sensitive, so this next part may seem trivial. But stick with me. As she leaned closer, she whispered, “Cam eron’s butt looks so good in those jeans.”
“His butt? Oh, love of my life that I thought I knew everything about?” I had no idea at the time that girls were even into the glutes. I guess I hadn’t grown with the times. In elementary school, it was all about who told the funniest jokes, and in middle school, the guy who looked like a 90210 character got the most girls. So I didn’t put an ounce of thought into my backside until that very mo ment in time. And it wasn’t that Cameron had a good pair of jeans on that day or that he just had a nicer butt than me. It was that I had no butt at all. None, nada, zilch, zip. My case of gluteal development was so bad that my sister’s boyfriend commented one afternoon on the golf course regarding my rather bleak situation. As I stepped up to the putting green, he blurted out, “Bret, your back goes right into your legs. You have no butt at all.”
Not only did the girls in high school know that guys should have nice butts, but the guys were now telling me the same thing. Somehow I had become the poster boy for the buttless pandemic that swept the male popu lation. With my ego still minutely intact, I began my quest to build the best butt possible. I realized I wasn’t genetically gifted with the posterior of an NFL wide receiver, but I did not want this to be my fate.
I started reading every publication on the glutes I could get my hands on. I spent hours in the bookstores reading how the bodybuilders trained their lower bod ies and how powerlifters built their posterior chains. In 1995, my cousin and training partner bought me The Complete Guide to Butt and Legs as a Christmas present and a way of thanking me for turning him into “Brian the Beast” over the past year of training. In his words, he’d never met someone so obsessed with glute training. At age eighteen, I began squatting, but not like the squats you will see in this book. No, they were the amateurish microsquats you see inexperienced lifters
STRONG CURVES 11
do. I loaded the bar up with two hundred seventyfive pounds of raw iron and eked down about five inches before I pushed back up. After a few bouts of this pa thetic attempt to build glutes, a solid lifter in the gym approached me and told me to squat deep like a real man. I racked the weight and turned to stand up to this “puny jerk,” only to see a mythical beast—if memory serves me correctly, he was in fact a centaur—making eye contact with his own reflection. I bowed my head in respect, understanding it was something I had yet to earn in the gym. I had to scale back and learn the dis cipline of squatting before I could lift at an elite level. I brought down my weight to about half of what I was using and squatted like a man.
I felt a good pain in my lower body the next day, so I stuck with this approach. My glutes grew slightly, but I was no Cameron from the varsity football squad. Even tually, I added in deadlifts and then lunges. The more proficient I got at lifting and the stronger I became, the better my glutes looked. Despite the intense amount of work I was putting into training, however, I never felt like my glutes were the limiting factor during a set. Other muscles burned out before my glutes, and they never felt completely taxed.
Prioritizing Exercise
By age twentytwo, I had graduated from college and prepared for my high school math teaching career. De spite the career path I chose, exercise was always a top priority with me. During this time, I also certified with ACE to be a personal trainer. I worked out with all of my friends and family at local gyms, teaching them the methods I was using for strength training.
I began printing out articles and studies on glute train ing on my home computer. I still need to pay back the IOUs for all the printer ink I used. My bedroom shelves soon had little room for anything but strength training material, namely focusing on gluteal development. I began collecting fitness equipment over time with any money I saved on my teacher’s salary (which is noth ing to boast about). Over the years, I purchased what amounted to a complete gym, which made my transition from teaching to fulltime trainer much easier.
When I was twentyeight, I left teaching for good to open Lifts, a gym I ran in Scottsdale, Arizona. This is where the bulk of my glute experimentation and testing happened.
Enter the Hip Thrust
I remember the evening I thought of the hip thrust like it was yesterday. It was October 13, 2006, and I was home watching Ken Shamrock get destroyed by Tito Ortiz in a UFC fight. I waited for Shamrock to buck Ortiz off, but he made no attempt to bridge his hips or get out from under Ortiz in any fashion.
At this time, I was already a certified strength and conditioning specialist from the National Strength & Conditioning Association, and this incident got my mind going. Why didn’t these fighters do exercises to help them build explosive power? It seemed the only practical way to get out from under what is known as a full mount in the mixed martial arts arena. The wheels in my head spun rapidly, and I headed to my garage to work on some new ideas.
After that night, I started experimenting with my cli ents in the gym. I began with bodyweight hip thrusts, and then singleleg hip thrusts. This all eventually led to the weighted hip thrusts and bridges that you’ll find in the Strong Curves workouts. My clients would show up to sessions asking to do these exercises, claiming that they never felt their glutes work as hard during a session than they did with the bridging exercises I introduced.
The results were positive all around. Women who had never trained before were building the strongest glutes
Client success story
I trained Rachel, age twenty-four, for several years before I figured out how to load up glute bridge patterns. I prescribed heavy squats, deadlifts, and lunges each week. She reached a point where she could deep squat 135 x 20 reps, deadlift 155 x 20 reps, and lunge with the thirty-pound dumbbells for forty steps. Her legs were phenomenal, but her glutes were always a bit lacking. Once I thought up the hip thrust exercise and had her start performing it, her glute size and shape took off. In just a month, her glutes looked better than ever. Clearly, the hip thrust required her to activate her glutes much more than the other exercises.
12 Chapter 1: INTRODUCTION
I had ever seen. Girls who previously relied solely on squats and lunges found glute bridges and hip thrusts to bring them to the next level. Of course, there is always the genetic aspect of glutes. Some women responded rapidly, seeing results right away, while others took lon ger. But they all walked away with a strong and perky set of glutes.
All of my friends and family were on board with my glute obsession after they saw the results of my clients at Lifts. I created a family of gluteal connoisseurs, and they couldn’t go to the grocery store without noting the lack of rears on most people. You will probably never find another family like us who can hang out at the air port while waiting for a flight and happily analyze butt shapes and sizes together.
Finding the Proof
I had clients come in all day advertising new and im proved glutes, but I wanted to learn more about why my training methods worked. Toward the end of my lease at the gym, I transitioned from trainer to writer and started investigating research for my eBook. I leased an electro myography (EMG) machine that measured the electrical activity of muscles and began working late into the night at my gym. Since my entire glute quest began with my own weak glutes, I was the perfect guinea pig for my ex periments. With all the doors locked and blinds drawn, I dropped my shorts to hook up electrodes to my glutes, quadriceps, hamstrings, and adductors.
I was the mad scientist of selfgluteal studies, hiding away until 1:00 a.m. most nights trying to discover the most effective means for building glute strength and size. Most guys my age spent their free time watching base ball, playing video games, chasing girls, or hanging out with friends. But I chose to hike up my underwear and test the glute activation of various exercises at all hours of the night. I even made an appointment with a local anatomy professor so that I could spend some time ex amining the gluteal anatomy of a cadaver. To each his own, right?
Well, to your advantage these experiments paid off, leading to the publication of my eBook, Advanced Tech niques in Glutei Maximi Strengthening. I received high praise from strength coaches and fitness profession als all over the world, and my methods proved well in other areas, including coaching for sprinters, patients of physical therapists, and sports athletes. Soon magazines both online and print were contacting me to pen articles on the glutes for their upcoming issues. Though I enjoy researching all aspects of strength training and biome chanics, the glutes seem to be what I do best.
My friends and colleagues thought I would finally be content with my achievements, but I decided to sell all of my worldly possessions and move halfway across the world to study at the prestigious sport science insti tution in New Zealand, AUT University. At AUT, I’ve been lucky to receive expertise and training from top researchers, scientists, and coaches who have helped me further improve upon my knowledge of the human body—especially the glutes.
The Strong Curves Method
Strong Curves is the apex of my research over the past fifteen years. My program designs have evolved markedly during this time, and over the past five years in particular I’ve blended creative art with cuttingedge science to create what I feel is the most effective female training system on the market.
Many women go into strength training with the same fears: growing big, bulky muscles that lack feminin ity. This program proves that the stronger you are, the curvier and more feminine your physique will become. My clients have shown time and again that this pro gram works. While in Auckland, New Zealand in prep aration for my PhD, I trained women on the other side of the world using my methods. Each one has seen the most incredible, lifealtering results. One client went on to win her fitness competition after not placing in any past shows. Another completely transformed her physique with astonishing results and recently won her very first competition. Her new confidence has im proved all aspects of her life.
Now that I’m back in Phoenix, guess what I’m up to? Training figure and bikini competitors. We’ve devel oped our own language. Training your glutes is referred to as “gluting.” We work our butts “on” rather than work our butts “off,” and each girl consistently reaches new levels of gluteal strength and development.
Strong Curves is so effective because it doesn’t take a linear approach to training. There is no single method that works best for everyone. What works for you may not work for the next woman. So in my approach, I use what is known as the “shotgun method,” covering ev ery single aspect possible to provide you with the most rewarding results.
You may respond well to high reps and moderate load, or you may respond better to low reps and heavy load. You may do well with one method this month and another next month. A certain exercise might bring you incredible results one year, while the next year you find that focusing on a different exercise helps you reach your goal. But if you are covering all of your bases month in and month out, you will respond well to the entire program. That is what I have learned after years of experimenting.
STRONG CURVES 13
Not only will this program teach you to fire your glutes during bridging exercises, but also during all ex ercises in the program. It may feel tough and awkward at first, but after a couple of months, you’ll take every opportunity to squeeze your glutes throughout the day. Though the aesthetic reward of the Strong Curves Program is in and of itself worthwhile, the incredible power you attain when you build strong glutes is like nothing you feel with any other muscle group. Your glutes are the center of your body. They are involved in nearly all movement patterns. I found this out for my self once I started building stronger glutes. Things in life are just easier when you have your glutes to power you through activities. You will find running is easier on your knees, your back feels less strained after a long workday, furniture is easier to move, and your kids are easier to keep up with. Your glutes are designed to be the strongest muscle in your body. Imagine how much power they will bring once you build up their strength. These full body workouts are designed to build the most powerful muscles and leanest physique in the least amount of time. You will hit your glutes multiple times during each session to guarantee the best results. You will train under heavier load with low reps and lighter load with high reps. This program will activate your glutes to their utmost potential, it will stretch them under heavy load, and it will work them through full ranges of motion in a variety of directions and angles. It is a well rounded program designed with every female body in mind.
How to Approach Strong Curves
This book is packed with information regarding strength training for women. Each section can be read on its own but was written to build your knowledge about the program. You can skip right to the workouts, but I en courage you to read the manual in its entirety from start to finish. The more knowledge you have about strength training, the more powerful you will become.
The goal of this book is to provide you with the most comprehensive look at female training so that you feel confident in your quest to build the strongest curves possible. This book offers all the right tools to help you develop a solid foundation for strength training and design your own programs for life. I want you to suc ceed not only with the twelveweek programs offered in these pages, but also with your commitment to training from this day forward.
The initial chapters invite you to explore why you should train differently than men. You don’t necessarily need to do different exercises, but your physique is en tirely unique from theirs, and you can’t expect to cater to your goals if you train like your male counterparts. You will also learn about two crucial muscle groups that will improve your quality of life, how and why muscles grow, and the importance of movement quality.
Strong Curves offers a simple nutrition guide in fluenced by the work of nutrition expert, Alan Ara gon, that is practical no matter what your goals are with this program. It was designed to complement the workouts in this book and help you achieve your goals even faster.
You will also find four twelveweek programs along with dozens of supplemental exercises in the Exercise Index. I provide more than two hundred exercises com plete with detailed photos to show how the exercises should be performed.
Throughout the book, Kellie gives great advice and tips on how to accomplish your goals while using the Strong Curves Program. As a woman who has gone through many struggles that you may face, her insight is invaluable for your journey.
My advice before beginning your quest for Strong Curves is to take everything in small strides. Have that end goal in mind, but set smaller goals along the way. I often find that if you are constantly striving for that big, lofty goal, you lose sight of why you began your journey in the first place. You will achieve the results you want no matter where you stand today. Just be relentless in your pursuits, and never give up on yourself.
Kellie and I look forward to hearing about your jour ney. I encourage you to write us during and after this program to share your experiences with us by email.
14 Chapter 1: INTRODUCTION
The Important Muscles No One Talks About
Chapter 3:
Strong Curves offers plenty of opportunities to work all the skeletal muscles in your body, but I want to devote an entire chapter to two key muscle groups because they play an integral role in your success. The first is the glutes (that came out of left field, huh?). But the second muscle is rarely talked about with women when it comes to strength training: the pelvic floor, which we will get to later on in the chapter.
Muscles Deserving of Your Attention
Brazilian models are known for their perky posteri ors, which are often thought to be purely a genetic gift. But it isn’t solely about genetics. The secret to their per fect pair of cheeks is simply their glute workouts. You see, it’s all about the booty in Brazil. It isn’t uncommon for these women to devote thirty to sixty minutes of time each workout session to building their glutes and nothing else. No upper body workouts, no abdominal training—just glutes.
I think they have it right. In my experience, most women should just work their butts in order to achieve the body they desire. A lifelong bootyspecialization program, if you will.
Leandro Carvahlo popularized the Brazilian Butt Lift Workout several years back, and his signature moves were thought to be the ultimate path to sculpt ing the behind of his super model clients. But it isn’t just his signature moves. It’s the frequency and volume of the glute workouts that make the largest difference, and that’s what is lacking in the majority of workout programs designed for women. If you’ve ever seen Car vahlo’s videos, you will notice the exercises are purely bodyweight. This is all good and well, but some criti cal elements that are lacking in the Brazilian ButtLift Workout are load (intensity) and strength (progressive overload), not to mention focusing on the best glute ac tivation exercises (exercise selection).
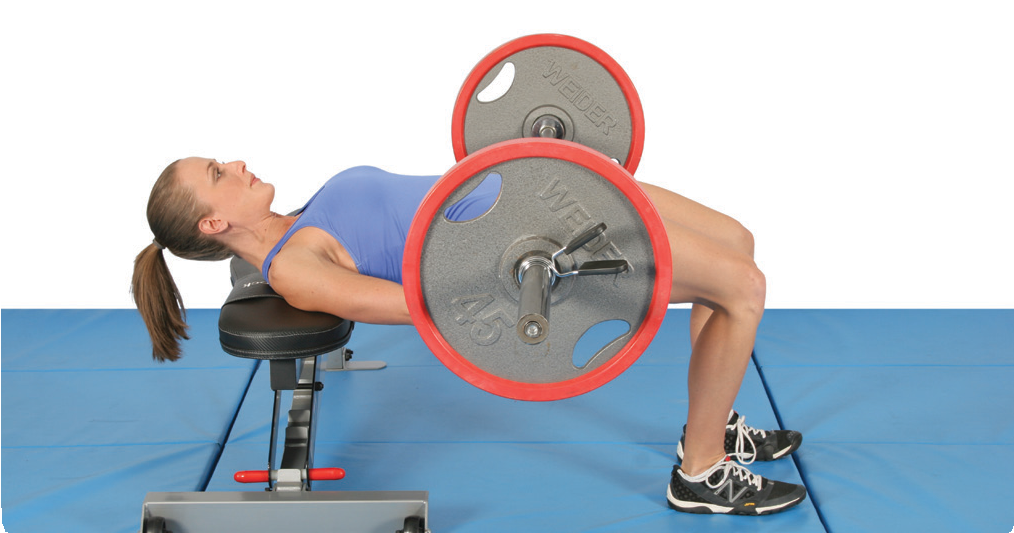
Strength creates curves, and you can only get so far in terms of strength when using only bodyweight loads. For example, a bodyweight glute bridge will activate the glutes at between twenty percent to thir ty percent of their maximal ability. Many of my ad vanced female clients perform barbell glute bridges with over two hundred twentyfive pounds (some of them use over three hundred fifteen pounds), which activates the glutes to onehundred percent of their maximal ability. For this reason, loaded exercises give you an advantage over bodyweight exercises, and this added tension on the muscles is what builds the sexy shape in the glutes. It is imperative that you continue to ask your glutes to do more over time, as this is the stimulus that drives adaptation.
Strong Curves addresses all the necessary elements in your workout. You hit the glutes multiple times per week with varying volume and load to build the stron gest, curviest butt possible. Glute exercises effectively raise the metabolism, causing your entire body to lean out, and they do a great job of working the upper body and core muscles during the process. For example, squats and deadlifts will activate a ton of upper body and core muscle. If you choose to do so, you can also work on upper body and core strength, as well as your quads, hamstrings, and calves. Over the next twelve weeks, you will not only develop greater strength and musculature, but you will also flaunt an amazing pair of glutes as an added bonus. Okay, that might be your overall goal. Either way, it’s a winning combination.
18 Chapter 3:
THE IMPORTANT MUSCLES NO ONE TALKS ABOUT
The Pelvic Floor
Your pelvic floor is a subject usually discussed with your physician—and likely when you are already hav ing issues related to pelvic floor weakness. This is a very real topic that should be discussed more in the fit ness arena, though. The reason why it isn’t talked about more often is that we currently don’t know that much about pelvic floor dysfunction. I’ve consulted the lit erature and had discussions with some of the top physi cal therapists in the world on the topic of pelvic floor dysfunction, and there really isn’t much to go by. I ex pect this to change in the next decade, but until more is known, I’ll offer you the best advice possible based on present findings.
Pregnancy, childbirth, and age all affect the strength of your pelvic floor. The Strong Curves Program pro motes strengthening of all skeletal muscles, including the pelvic floor. Later in this chapter, I will discuss the importance of adding a few supplemental exercises to help build and maintain strength in this muscle region.
The Glutes in Their Natural Habitat
Now, onto the glutes! I promise not to get too carried away in this section, but it’s important for you to un derstand gluteal physiology and why these strange and stubborn muscles just won’t grow unless you encourage them. You will also learn why these muscles are an in tegral part of your overall strength and physical health. As you learned in my introduction, I have become quite the expert at sculpting behinds. Although it may seem trivial, I must tell you that this is not an easy task. Even if you couldn’t care less about the perkiness of your posterior (which I doubt is the case), your glutes are still an important factor in training no matter your purpose.
Let’s take the aesthetic aspect of the glutes out of the equation altogether and focus solely on improving performance and function. If a sprinter comes to me because she wants to shed seconds off her time, I work on her glutes. If a baseball pitcher asks me to help improve his performance, I get his glutes stronger. For clients with back pain, I strengthen the glutes. For cli ents with poor posture, valgus collapse, anterior pel vic tilt, or any other physical impediment, I get those glutes stronger.
The glutes play an integral role in your overall func tioning and wellness, but the single nagging issue that prevents you from running like a welloiled machine is that your glutes shut down. That’s right. The glutes actually stop working properly due to inactivity. World renowned physical therapist Vladimir Janda noticed this decades ago. Some muscles are quite prone to in hibition, with the glutes probably being the worst of the bunch. So, all of this sitting at a desk all day, watching television, and driving from place to place causes your glutes to retire early.
A toddler offers a good example of amazing glute activation. Yes, toddlers have chubby little bottoms, but they have really great glute muscles as well. If you ever get a chance to hang out with a toddler for a day, just sit back and watch the adorable little guy or girl move. Pay attention to how he picks things up. This toddler will likely have better squat form than ninetynine percent of the people in your gym. Watch the kid bend, move, and manipulate around objects. This bouncing ball of energy is constantly going and taking full advantage of those glute muscles.
Our glute muscles would stay this strong through out our lives if we continued to behave like toddlers. Well, not the tantrums and the putting small objects in our mouths, but the activity of kids is what keeps their glutes strong. Unfortunately, the older we get, the less active we become. With video games, computers, and television popping up in bedrooms all over the world, inactivity creeps up on us at younger and younger ages. The more sedentary we become, the less we use our glutes. Unlike other muscles, your glutes will be pretty lazy if you allow them to be. Rather than sticking up for themselves and saying, “Hey! We need activity, too,” they go into early retirement. They just close up shop and stop working.
This causes other muscles to take over and bear the brunt of the work. Considering that your glute muscles were designed by nature to be the strongest muscles in your body, this overcompensation puts a lot of wear and tear on muscles that are not meant to handle this work load.
When the glutes shut down, you recruit other muscles to do big jobs that they are not meant to do. Your low back picks up most of the slack, as do your hamstrings, quads, and other surrounding muscles. Over time, this causes injuries. Most low back injuries are preventable, but only if strong glutes are part of the picture.
Even the slightest lower body injury will cause your glutes to shut down. This is thought to be due to our
STRONG CURVES 19
Donna always felt hip thrusts in her quadriceps rather than her glutes. She’s a very strong squatter and is quad-dominant by nature. Whether she’s doing bodyweight hip thrusts or one-hundred eighty-five pound hip thrusts, she feels them solely in her quads. I decided to give her feet-elevated glute bridges while placing her heels on the top of the bench. This took her quads completely out of the lift, placing the burden solely on the hamstrings and glutes. Though it’s an easier exercise than the barbell hip thrust, for the first time Donna was able to feel a bridging movement in her glutes.
In fact, she’d never felt a glute exercise burn her booty so deeply in her entire life. She squats two-hundred pounds and deadlifts two-hundred thirty-five pounds, but we stick to two sets of thirty feet-elevated glute bridges with only body weight. This does the trick and even helps her feel her glutes activating better during other lower body movements. Her glutes firmed up significantly after performing this movement for only two weeks.
prehistoric survival instincts. Since your glutes are the largest, most powerful muscle in your body and since your brain wants to protect and preserve the nagging part, shutting down the glutes is a wise strategy be cause it inhibits powerful locomotion, which would be counterproductive to rehabilitation. If something goes haywire or injury occurs, your body instinctively turns them off to protect the injured region. Even the smallest injury like a stubbed toe will trigger your brain to turn off your glutes, and the same has been shown for ankle, knee, hip, and low back injuries. To allow these injuries to heal, it’s wise for your body to shut down the glutes so that you can’t move as quickly or explosively.
While the stubbed toe and other injuries will even tually heal and return to normal, your glute activation doesn’t always follow suit. Unless you are actively re cruiting the glute muscles to perform tasks, they have no reason to turn back on. Think about a lion, known as the king of the African plains. These beasts are pow erful, fierce hunters, but if you watch nature movies, they pretty much lie around all day and do nothing until it’s time to hunt. That’s because instinct tells them to preserve energy for those big tasks. If you equate your glutes to the lions (or lionesses) of the human body, you can see how they work by nature. They will lie around all day long until you recruit them for big tasks. But, unlike lions, they don’t need to conserve energy to sur vive (at least not in this day and age when food isn’t scarce). In fact, the more you activate and recruit your glutes, the stronger and more powerful they become.
Talk About Lazy
The gluteus maximus is a walking paradox. Contrary to popular opinion, it is made up of a higher proportion of slowtwitch muscle fibers that fire more slowly so that they fatigue less quickly, but the muscle behaves like it has fasttwitch muscle fibers that generate short bursts of strength for explosive movements. This means that the gluteus maximus is a stubborn muscle that would rather stay dormant and let other muscles take on the big tasks.
Daily activities such as walking, using the stairs, performing chores, and job duties can keep your other muscles functioning sufficiently, but your glutes need direct, heavy, or explosive hip movement to fire cor rectly. For example, someone performing a bodyweight squatting movement might activate sixty percent of maximum quadriceps contraction but only ten percent of maximum glute contraction. You can see why nor mal daily life keeps the quads active and strong while letting the glutes go dormant at the same time. I can bet a good majority of desk workers do not get sufficient muscle activation in their hips on a daily basis. Sitting for many hours each day can potentially damage the glute muscles by several different mechanisms. The first is the shortening of your hip flexors. When this oc curs, you lose mobility, feel stiff, and pain may increase in areas like your low back, knees, and, of course, hips. Once your hip flexors tighten up, your glutes decide it’s time to hit the road, and they start to shut down. This happens because the tightening (caused by adap tive shortening) of your hip flexors doesn’t allow for full hip extension at the range where your glutes work their best. Additionally, the shortened hip flexors in hibit glute firing in a complex process known as re ciprocal inhibition. Basically your glutes say, “Okay, hip flexors, if you want to be short with me, I’ll give you the silent treatment.” Daily sitting compresses the gluteus maximus, impairing blood flow and nutrition, and interfering with neuromuscular power. Finally, as I mentioned earlier in the chapter, prior injuries and pain inhibit the glutes and prevent strong contractions.
Noted previously, several muscles can make up for weak glutes, including hamstrings, adductors, quadri ceps, and erector spinae. Imagine running a moving company where your biggest, strongest worker decides he’s going take it easy and let everyone else do the work for him. Your other workers would wear down much faster and begin to suffer aches, pains, and injuries. They probably wouldn’t get enough work done during the day either. This is exactly what happens to your sur rounding muscle and tissue when you have weak glutes. Combine hours of sitting with a lack of daily acti vation, and you’re missing all of the ingredients for a nice butt. This is more like a recipe for a very depressed backside that doesn’t activate well and has a hard time going through its natural range of motion due to hip im mobility. A very sad sight indeed. Many practitioners have coined the term “gluteal amnesia” to describe the dormant glutes that so many office workers and pretty much everyone without a physical job succumb to as they get older. Poor glutes are a virtual pandemic in our society, but Strong Curves is going to make sure you don’t succumb to that fate.
20 Chapter 3:
THE IMPORTANT MUSCLES NO ONE TALKS ABOUT
What’s the Big Deal About Glutes Anyway?
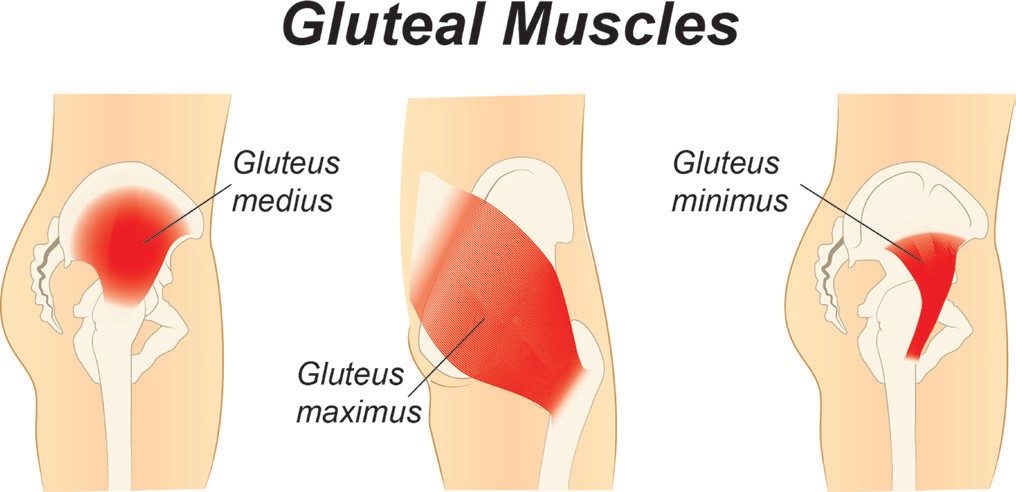
The gluteal muscle group is made up of the glu teus maximus, gluteus medius, and gluteus minimus. Physiologically, the gluteus maximus is the strongest muscle in the human body. By location alone, you can see that the gluteal muscle group is connected to your upper body, core, and lower body extremities through the pelvis, sacrum, coccyx, and femur, not to mention the tibia through the iliotibial band and the latissimus dorsi through the thoracolumbar connective tissue. The glutes are a critical component of all movement involv ing running, jumping, throwing, swinging, striking, maneuvering, and twisting. You never see an NFL re ceiver without a strong pair of glutes because they are such an integral part of his performance.
Your glutes have several large jobs that are all related to your ability to move correctly, in- cluding:
t Moving the thigh rearward, known as hip extension
t Extending the trunk, also known as hip extension t Moving the thigh laterally, known as hip abduction t Rotating the trunk or leg, known as hip external
rotation
t Rotating the pelvis rearward, known as posterior pelvic tilt
t Stabilizing the hips isometrically in all four actions mentioned above
t Absorbing the impact (eccentrically) of hip flexion, adduction, internal rotation, and anterior pelvic tilt.
t Preventing valgus collapse (knees caving inward)
t Preventing excessive spinal motion (flexion and hyperextension)
t Preventing slouching posture and lowercross syndrome
t Reducing incidents of hamstring and groin strains, sacroiliac joint pain that causes low back pain,
iliotibial band syndrome and patellofemoral (knee) pain, anterior femoral glide syndrome that causes pain in the front of the hips, piriformis syndrome that sometimes leads to sciatica, and sports hernias.
t Reducing injury potential in all areas of the body due to its vast linkage to the body’s various kinetic chains
Your glutes are also responsible for many aspects of sports performance. If you think back to high school and college, the fastest runners probably had nice glutes. The strongest servers in tennis, the highest jumpers in basketball, the most powerful weight lifters, the hardest kickers in soccer, and the best wrestlers likely carried similar attributes.
 Mary initially experienced pain in her low back during hip thrusts, so I had her engage in posterior pelvic tilt when performing them. Being a personal trainer herself, she was in good shape, so I started her hip thrust at one-hundred five pounds. After two weeks, she progressed to one-hundred fifty-five pounds and put two solid inches on her glutes without gaining any extra weight. Her booty was already fantastic, but the hip thrusts took her glutes to a brand new level in a very short period of time. Her training group could not believe how quickly she progressed and even jokingly accused her of getting implants.
STRONG CURVES 21
The Good, The Bad, and The Ugly Booty
Butts come in all shapes and sizes. Often, what differ entiates a good booty from a bad one is glute strength. It’s important to understand one thing before you begin your bootysculpting mission with Strong Curves: You can’t change your genetics. This doesn’t mean that if you have a flat bottom, it will always be flat. But you can’t expect to change a barstool seat cushion to a bean bag chair by adding more cotton.
Okay, that was a bad analogy. You will improve the strength, shape, and tone of your glutes no matter where you begin when you work through the Strong Curves Program. Still, you can only go as far as your genetics will take you. I’ve trained a client who went from hav ing a weak, flat, sagging butt (her words, not mine) to having powerful, shapely glutes that others envied. But she still couldn’t keep up with the Kardashians. It just wasn’t in her stars, yet she loved her new shape so much so that she didn’t care.
I’ve had other clients who went from zero to super hero glutes in a matter of weeks. It all depends on what you are genetically capable of accomplishing. Other factors—the relative percentage of Type I and Type II muscles fibers, age, natural hormone levels, somato type (body type and build), and stubborn body parts— are also beyond your control.
Keep that in mind, but know full well that you will achieve tremendous results if you stick with the pro gram and follow my template to the letter. Veer from the program, make your own rules, change things around, or give up, and you will be back to square uno.
Bad Booty vs. Good Booty:
The Showdown
View from Behind
Bad Good
View from the Side
Bad Good
Though my drawing is rudimentary, it clearly dem onstrates the difference between a strong set of glutes and a weak set. The bad booty on the left lacks depth, fullness, and has what are known as glute folds, where the actual buttocks show excessive folds at the separa tion point from the hamstring. The booty on the right is perky, round, and shapely. If you were a master sculp tor, you would know that you need to add matter in cer tain areas and take away matter in other areas in order to create the needed changes to go from gluteus patheti cus to gluteus magnificus. The next logical question is, “How do I go from looking like the picture on the left to looking like the picture on the right?”
What determines a good booty over a bad booty is the amount of muscle you carry back there. Many women feel that losing weight is the answer, but when they get down to the weight they desire, their butts don’t get any better. In fact, sometimes they get worse. Remember, glutes are made in the gym. You have to build that mus cle and hit it from all angles to curve out your backside.
We discussed how to get from bad to good and even from good to superhero, but what about the ugly? It isn’t that your bottom is physically ugly. It’s that your glutes have shut down for so long that you now suffer from poor movement quality. I address the importance of movement quality in Chapter Six, so don’t skip it. This chapter is directly speaking to you.
So, the ugly is when you actually suffer injury or physical symptoms from glute inactivity. I work on a regular basis with clients who suffer from poor move ment patterns due to weak glutes. It’s far more common than you would like to think, and fitness professionals are used to it. The only way you will overcome these issues is if you address them head on.
22 Chapter 3: THE IMPORTANT MUSCLES NO ONE TALKS ABOUT
Kellie’s Quick Tip: If you aren’t using it, you’re losing it. Keep those glutes active on days off by performing a few sets of glute bridges, side lying clams, and abductions in the morning before you start your day. You will notice a difference in muscle hardness, and your perky glutes will thank you!
As I mentioned before, it’s important to be honest with yourself about your abilities. If an exercise is too diffi cult, there is no shame in regressing the movement to a level that is more comfortable. If you find an exercise is far too difficult in the workout, refer to the Exercise Index for an exercise that is more suitable. They are categorized by exercise type and arranged in a progres sively more challenging manner, so you can easily find a replacement.
This doesn’t mean that the initial exercise just goes off the radar, though. Keep it as a future goal. Strong Curves was designed for progressive overload, so I’ll bet you will progress to that level far faster than you imagine. This means that weektoweek, you will make great improvements with your workouts. Don’t give up on yourself, and keep striving toward those goals.
So, rather than pushing through exercises that are too difficult, you must be able to evaluate your own movement quality and regress your workout until you are moving properly again. Weak glutes can cause your knees to cave in during a squat (valgus collapse), your posture to erode, or your low back to ache when you go about daily activities.
Don’t worry; every bad or ugly booty is fixable. By the end of this program, you will have glutes that pack power and, as an added bonus, fill out your jeans just right. Your back pain may go away, your poor move ment patterns may disappear, and you will be well on your way to a healthier, happier life all thanks to glute activation, strength, and good form!
Get Those Glutes Firing on All Cylinders
One of the most important factors in this program is consistent glute activation. You should activate your glutes during the entire duration of your workout, in cluding all lower and most upper body movements. It will not happen instantly, but after two months on this program, you will really feel your glutes working with every exercise.
On days off, take ten minutes to work on glute activa tion. Perform different athome glute exercises that are Lisa was a twenty-five-year-old, athletic-looking girl who started training with me at my former gym, Lifts. She felt her glutes had not changed shape over a twelve-month period despite performing heavy strength training, high rep strength training, explosive strength training, and all of the best glute exercises known to mankind. Lisa lost body fat and gained muscle elsewhere, but she was always a bit frustrated with her lack of glute development. When we compared her initial training pictures with her pictures after one year of training, it was evident that her backside had indeed improved markedly. I tried to convince her that she had already made great strides, but she wanted the perfect butt.
In contrast, Alicia was a nineteen-year-old, thin girl who came to Lifts at around the same time as Lisa. She trained with her mother, and her butt went from “not a whole lot” to “a whole lot” in a very short period of time. Trust me when I tell you that it looked unbelievable. One day, her mother asked, “Can you believe how amazing Alicia’s butt looks?” Now, if your mother notices your booty, you know you’ve made great improvements. I asked one of the trainers at my gym to pick up Alicia’s training journal so that we could see exactly how long she’d been training with us and how many sessions she’d performed. At that time, she’d only performed six workouts in a two-week period.
Alicia’s booty literally transformed with only six hours of training spanning over a fourteen-day period. To this day, I have never witnessed such rapid results and find this to be the most impressive case of genetic response.
These two scenarios illustrate just how important genetics can be with regard to glute adaptations. These two girls received the same training stimulus but showcased quite different results. These cases prove, however, that anyone and everyone can and will see results. Lisa no longer trains with me, but she went on to become a figure competitor with a great pair of glutes. She has continued to train hard using the best methods, and the effort has paid off.
On the other hand, I’ve run into Alicia a few times over the past couple of years, and she stopped training. Needless to say, she lost most of her behind’s c-shape, even though she possesses the perfect genetics to maintain it.
STRONG CURVES 23
offered in this book. It will make a huge difference, and you will soon feel your glutes working when you walk, when you run, and even when you stand in place. The biggest problem with glute development is that people are not activating their glutes sufficiently. The gluteus maximus is a strange muscle. It’s always trying to find a reason to shut down.
Quite often, people are performing great glute ex ercises but aren’t activating them properly throughout the movements. For example, you can squat and lunge while using mostly quad and spinal erectors, and you can deadlift and bridge by using mostly spinal erec tors and hamstrings. When you learn to activate your glutes properly and master the feel of strong glute contractions, you’ll begin to heavily incorporate your glutes into all of your lower body movement patterns, including squats, deadlifts, good mornings, lunges, hip thrusts, back extensions, and even planks.
You may have seen my YouTube videos of strong la dies and athletes moving heavy weight on their glute ex ercises. They didn’t start out that way. Most of my clients started out with bodyweight squats and bridges. I worked hard to get them to sit back, keep their knees tracking over their toes, utilize proper lumbopelvic mechanics, push through the feet properly, and symmetrically acti vate the glutes. Once all of these happen I add load. After about six weeks of constant feedback and reminding, my clients almost always boast how well their glutes work during their sessions and how confident they are because they have already reached strength levels they previously thought were unattainable.
In studying muscle activation/EMG (electromyography), I learned a few things. First, clients commented on how they felt their glutes working more with certain tweaks. This proved true in all cases. In other words, EMG activity confirmed that they activated their glutes more when doing a movement a certain way. For example, some flared their feet outward during a bridge, and this led to much greater levels of glute activation. This testing also helped me figure out why most of my advanced clients gravitated toward rounding their upper backs when performing back extensions, which was accompanied by posterior pelvic tilting and led to greater levels of glute activation.
Second, shorter individuals who were the best squatters tended to activate more quad and less glute than their taller counterparts during squatting and lunging motions. In fact, my best squatter of all time only activates about fifteen percent of her average glute MVC (maximum voluntary contraction)!
When I teach seminars for coaches, I always run them through a glute activation test consisting of su pine, prone, quadruped, and side lying movements off the floor. About a third of them give up because of se vere hamstring cramps, which proves my theory that most people do not know how to activate their glutes properly—coaches included. If you have weak glute muscles, other muscles are quick to jump in and take over responsibility. Hamstrings, spinal erectors, and other surrounding muscles often bear the brunt of the work that is required by the glutes. This keeps your glutes consistently underworked, underdeveloped, and underutilized.
So, before you begin the Strong Curves Program, you must first learn to activate your glutes from various positions. I’ve had clients who can fire their glutes like crazy from one position, but not in another. Even Kellie, my Mona Lisa, struggled to activate her glutes whenever her legs were straight as in the case of planks, pushups, and back extensions, despite the fact that her glutes fired incredibly hard during bent leg movements such as squats and bridges. It takes a good amount of work and patience to correctly fire your glutes from all positions, but these exercises will get you started.
Don’t be too hard on yourself if you find you can’t perform these testing exercises correctly. Most people can’t at first, but you will master them over time and create that strong, enviable booty you want.
Kellie’s Notes on Muscle Size vs. Muscular Strength—My Davis Versus Goliath Story
I’m not intimidating by any means. Sure, I look athletic, but most people expect me to walk into the gym and head to yoga class. The other day, I was training with the Strong Curves Program and working on my barbell glute bridges. There just happened to be a band of male pro bodybuilders across the room doing a lot more talking than working. I guess my bridges caught their attention because one of them, a top ten Mr. Olympia contender who was only a few weeks out from
a show, came over and asked if he could try the exercise. I warned him that it wasn’t as easy as it looked, and it took a long time to work up to the weight I was using, which was a meager three hundred fifty-five pounds. Surely, my tiny one hundred twenty-eight-pound frame was no match for this beast with forearms larger than my legs.
24 Chapter 3:
THE IMPORTANT MUSCLES NO ONE TALKS ABOUT
He inched under the bar, barely able to get it over his massive quads, and lay their trapped. Sweat poured down his forehead, and grunts bellowed out from his throat, while the bar didn’t move a single centimeter. He couldn’t lift it off the floor with his hips because his glutes weren’t strong enough. He spent more time in the gym each week than I probably spent all month, but all that training didn’t translate to hip strength. In fact, many bodybuilders train their glutes inadequately, and it shows on stage.
For a good twenty minutes after his humiliating defeat, he came up with several “tricks” that he was sure I had used to move the weight. But, rest assured, no trickery was involved. It’s just good work ethic, the right programming, and learning to activate the glutes properly so they grow in strength and size. Sadly for him, my glutes are just stronger than his in that range of motion.
Testing Exercises
Get down on the floor, and perform each of these movements for about sixty seconds each. If it’s a single-leg movement, perform about thirty seconds on each side.
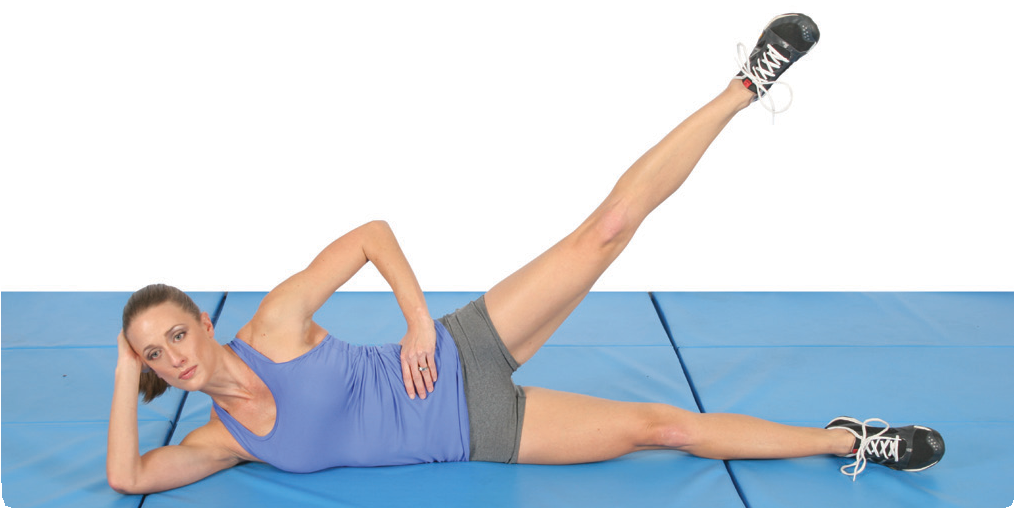
Side lying hip abduction—From a side-lying posi- tion with the body in a straight line, use the upper glutes to raise the leg. Avoid leaning backward during the movement. You should palpate the upper glutes to feel them contracting properly during the movement.
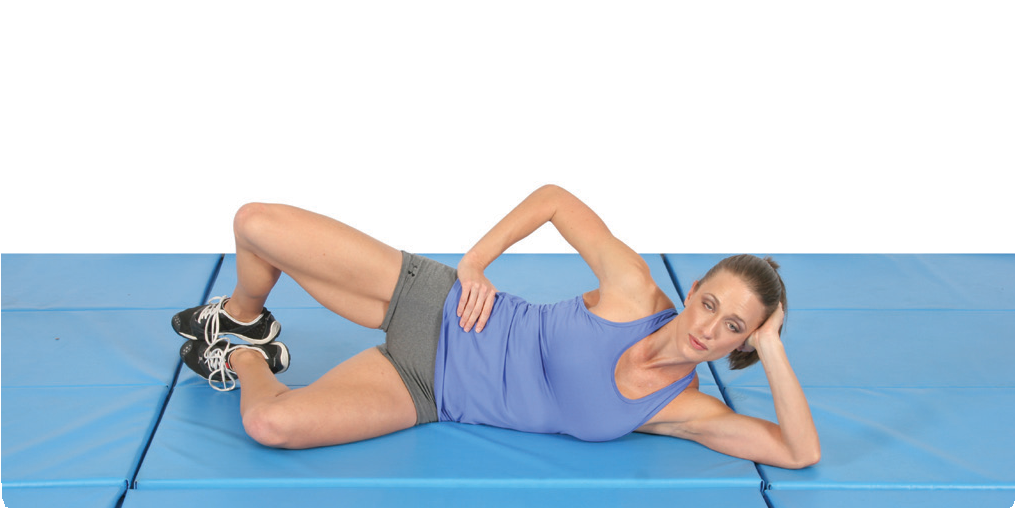
Side lying clam—From a side-lying position, flex the hips about 45 degrees, and keep the heels in contact with one another. The gluteus maximus should contract to externally rotate and lift the leg (like opening a clam- shell). You shouldn’t twist the spine or sway, and you should feel your glutes contracting sufficiently.
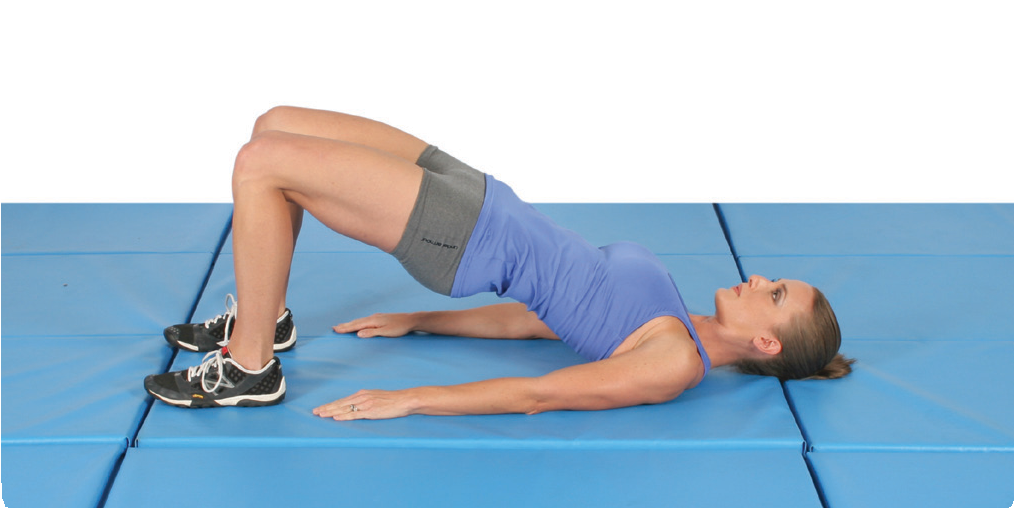
Double-leg glute bridge—From a supine posi- tion with bent legs, push through the heels, and raise the hips into the air. You should reach full hip extension and should be able to palpate the glutes, erectors, and hamstrings and find that the glutes are doing most of the work, not the erectors and hamstrings. The lumbar spine shouldn’t overarch (hyperextend), the pelvis shouldn’t rotate forward (anterior tilt), and the movement should occur in the hips.
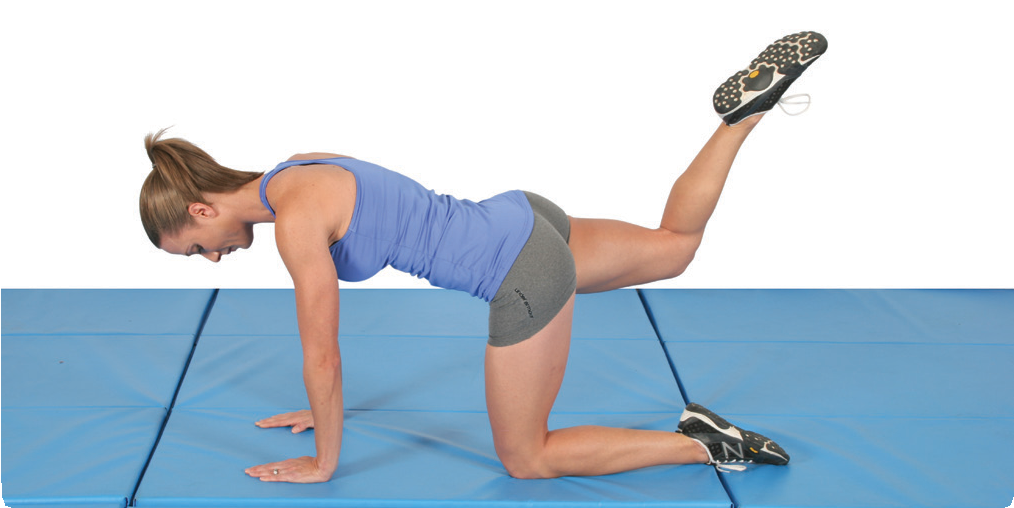
Quadruped bent leg hip extension—From a quad- ruped (all fours) position, raise one bent leg upward. The movement should occur mostly at the hips and not much at the spine and pelvis. The glutes should produce the movement, not the low back and hamstrings.
STRONG CURVES 25
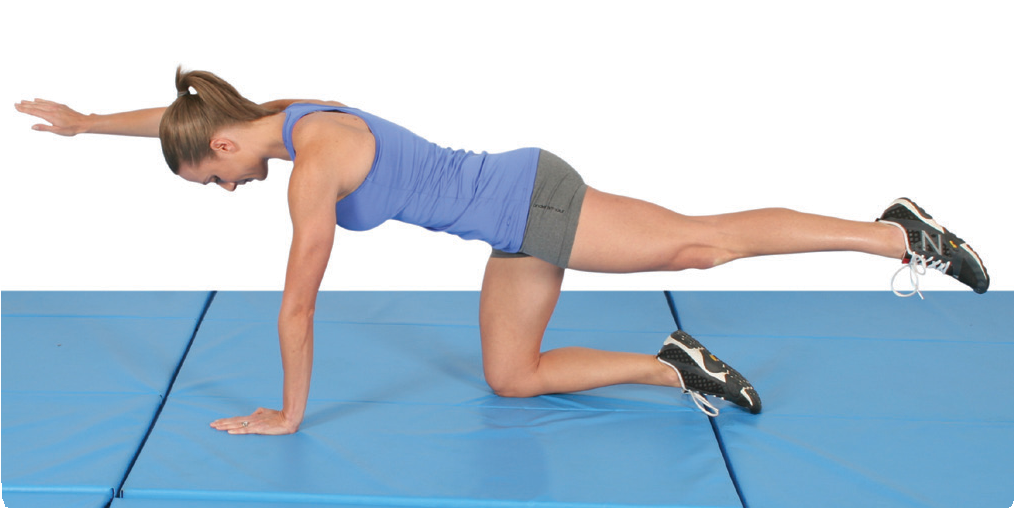
Bird dog—From a quadruped position, lift the left arm up, and kick the right leg up at the same time. Then, repeat with the right arm and left leg. Though you’ll be lifting opposing limbs, you shouldn’t shift or rotate in the core, and your spine should remain rela- tively neutral.
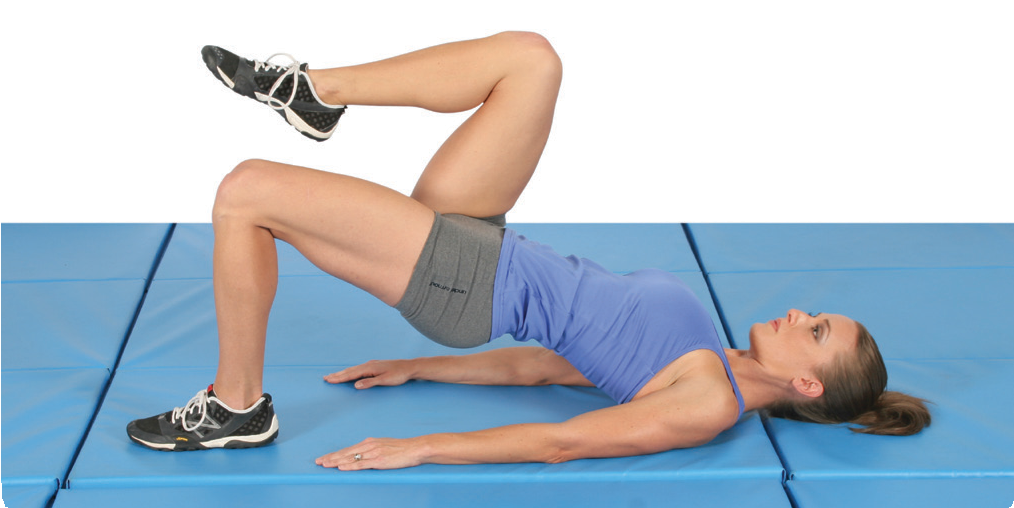
Single-leg glute bridge—From a supine position, center one bent leg, and raise the hips into the air. The non-working leg hovers in the air and can remain straight (in line with the body) or flexed with a bent knee. You shouldn’t hyperextend the low back or anteriorly tilt the pelvis, and your core shouldn’t shift or rotate. The glute max should contract very hard to raise your body into the air, and you should not feel any pain in the low back or sacral region.
tors. Essentially, you’ll rewire your motor patterns.
If you feel pain during any of these movements, it’s a bad sign. For example, people with weak glutes some times feel pain in their low backs when performing the singleleg glute bridge test. Never perform any exercise that causes immediate pain. If it hurts, don’t do it! You can always find movements to perform that won’t cause pain. Once you get stronger, you’ll be able to progress to more challenging movements, but you need to strengthen the glutes so that they keep the sacrum tight and the spine and pelvis in check in order to prevent painful patterns.
These exercises are always a good starting point if you are a beginner and lacking in the glute department. Spend ten minutes once or twice each day with these glute activation exercises, and you will be a glute mas ter in no time.
Kellie’s Quick Tip: I try to fit in various glute- activation exercises throughout my day. When
I cook, I do side leg raises or kickbacks. In the morning, I perform single-leg hip thrusts on my bed. I also keep my glutes tight during all exercises, including all upper push and pull movements. After doing this for a few days, you will feel a noticeable firmness in your glutes all the time.
Time to Get Personal
How did that feel? If your cheeks are on fire right now, that’s a good thing. If your glutes cramped up, and you doubled over in pain, that’s great! It means your glutes know how to work properly during movement, and you are well on your way to a perfectly strong and perky booty.
If, on the other hand, your hamstrings or lower back are tight, you need to practice these exercises on a daily basis until you feel your glutes working. Think of the posterior chain as a river of electrical current flow ing from the brain and branching off into three wa terfalls—the erectors, the glutes, and the hamstrings. Many individuals shuttle too much electrical current to the erectors and hamstrings and not enough to the glutes. After being on the Strong Curves Program for a period of time, you’ll entice the brain to direct more juice to the glutes and less to the hamstrings and erec.
I don’t know if it’s the subject matter or location of the subject matter, but you rarely hear fitness profes sionals discussing pelvic floor strength. I will be the first to admit that though I have trained hundreds of women over the past fifteen years, not a single client has ever asked me about pelvic floor muscles.
I figure it’s because I’m a guy, but many of my female colleagues report to me the same thing. I always make it a discussion point with my clients as a part of the learning process when we go over core stability. Usu ally, the discussion never goes beyond this, but I want to expand upon the topic with you because this might just answer some of those hard to discuss questions.
When discussing core muscles, the groups most often include larger muscles such as the rectus abdominis, in ternal and external obliques, and erector spinae, as well as smaller muscles such as the transverse abdominis, multifidus, diaphragm, and pelvic floor muscles. The core musculature forms a corset around your low back and hips, with your pelvic floor muscles slung like a hammock from your coccyx to your pubis.
26 Chapter 3: THE IMPORTANT MUSCLES NO ONE TALKS ABOUT
Building Booty-ful Muscle
Chapter 4:
One of the most common reasons people give up on training and nutrition programs is expectation. They go in with a certain result in mind and want to achieve that result in a given time period—likely as promised by the program designer. After weeks of working their way toward their goal, they realize they aren’t achieving the results they were striving toward. It’s far easier to forget the whole idea rather than tinker with their programs until they find what works best for them.
So, it’s important to note that while you will follow the same Strong Curves Program as other women— maybe even women you know—you won’t get the ex act same results as anyone else. If you do everything I say, you will achieve success with this program, but re searchers haven’t devised any protocols to assess what works best for each individual. Just like your hair color, eye color, height, and skin tone are unique to you, so is your response to stimuli in an exercise program.
To be successful with any workout or nutrition pro gram, you must learn to assess your own needs and be in tune with your body. I know this is far easier said than done. That’s why it’s important to also keep an open mind and realize, just like those late night infomercials warn, that “results may vary.” This doesn’t mean you won’t torch any fat or build any muscle. That’s far from the truth. I can promise that by the time you complete the first twelve weeks of any Strong Curves Program, you will be leaner, stronger, and more confident. But never forget that many factors—genetics, age, lifestyle, body structure, metabolism, initial conditioning, and overall health, to name a few—come into play.
When I assess a new client, I come up with the best program to fit her needs and goals on that given day. Over time, her needs may change. She may respond well to certain programming one month, but plateau with it the next. Then again, she may respond so well to the program that I leave it as is.
Since I’m not there training you, I will rely on you to notice these changes within your own program. Always keep in mind that your body has the ability to adapt rap idly to new stimuli, so experiment with your workouts to achieve the best results.
Shotgun Approach vs. Rifle Approach
In everyday life, we find it better to take the rifle approach than the shotgun approach. With the rifle ap proach, you focus on a single activity until completed before moving on to the next task. If you choose the shotgun approach, you tend to jump around too often, leaving projects unfinished.
However, in the past decade of research and field work I’ve grown fond of the shotgun as my weapon of choice when designing training programs. I’m a pre cise marksman, so even though I choose a program that spans across a wide area, I do so with the same goals in mind—to get you leaner and stronger. If, like many programs, you take the rifle approach to exercise, you focus on one goal at a time, building up each goal in a pyramid fashion. A newcomer to exercise might start with stability and endurance in the initial phase, then move on to several different phases of strength, finally ending up in a power phase months down the line.
The problem I have with this approach is that your body is usually ready to take on those big stressors (like lifts that use force and explosion) pretty early on in the game. But with the rifle approach, you don’t get to that phase for a long time. What if I told you, “We are going to play it safe, so you won’t see hip thrusts in your pro gram until week twentyfour of Strong Curves?” You wouldn’t have much confidence in my ability to coach you, and you would probably see only incremental changes in your progress each month. That’s not what you want, and that isn’t what I want for you from this program.
30 Chapter 4: BUILDING BOOTY-FUL MUSCLE
The shotgun approach to training allows you to ad dress every need at once, leaving out the guesswork. For example, what’s the best exercise for a particu lar muscle, and what’s the best rep range for muscle growth? This hasn’t been determined by researchers yet, so we must rely on anecdotal information by the many lifters out there. If you ask a variety of lifters, you’ll get a variety of answers.
In addition to adding in different exercises, rep rang es, and intensities, I also find that frequent workouts introduce you to a good amount of variety. You will get proficient at many different techniques and learn what’s optimal for your body—keeping in mind that it will change from time to time.
The template that I use for Strong Curves addresses all of these needs, allowing you to progress in stability, muscle endurance, strength, and power all at once. This will get you stronger, leaner, and shapelier in less time.
Muscle Growth (aka Hypertrophy)
Now, for the “sciency” part of the book. When I designed Strong Curves, I kept in mind the immense amount of knowledge given to me by my friend, Brad Schoenfeld, known in many circles as the hypertro phy specialist. I can’t imagine another individual who knows and understands more about muscle growth than Brad. But don’t worry; I’ll try to keep it brief and some what simple.
Your muscle generally grows through three main types of stimuli. Though there are many redundant mechanisms and physiological pathways to muscle growth (also called hypertrophy), they generally fall within these three categories:
- Muscle damage
- Metabolic stress
- Mechanical tension
Muscle Damage
Strength training is damaging to muscle tissue, and the level of damage created is worse when a muscle is lengthened (eccentrically) extensively, such as during the lowering portion of an exercise that really stretch es the muscle. And the entire muscle cell experiences damage. Parts located on the cell’s outer structure, the contractile elements that create muscle contractions, and parts located inside the muscle cell all receive mi croscopic tears in addition to the supportive connective tissue surrounding the cell.
When the cell’s membranes are torn, calcium tends to leak out, and the cell’s natural equilibrium is disrupt ed. This causes the body to respond in the same way as it would during an infection. It releases neutrophils, which work their way to the damaged tissue. More chemicals are released to attract macrophages and lym phocytes, which help remove cellular debris and main tain the cell’s structure. Various cytokines and growth factors are produced that activate myoblasts and satel lite cells (cells that normally lay dormant outside the cell but will lend their nuclei to the muscles when called upon). This allows the muscle cells to create more ma terial and grow larger.
While it’s true that damage can trigger hypertrophy, it doesn’t mean that we should actively try to cause as much damage as possible during a workout. You want to stimulate, not annihilate. Most lifters enjoy feeling a little bit of soreness in the muscles on the days fol lowing a workout, but it isn’t ideal to be extremely sore because it interferes with setting personal records and getting stronger.
The Strong Curves Program includes the best exer cises and methods for inducing muscle damage. You will focus on full range movements that actively stretch the muscles. Exercises that require a maximal stretch for the glutes under heavy load—such as lunges, Bulgarian split squats, and full squats—are excellent movements for muscle damage. But as I previously mentioned, you don’t want to get carried away. If it’s hard to get out of a chair the day after a workout or you feel like you got kicked by a mule, you’re training too hard. Moderate soreness is fine as long as you’re getting stronger and beating your prior records. Just know that you won’t set any records if you’re so sore that you hobble around. My advanced female clients’ workouts are sometimes volumedense and involve heavy weight, which is very physically taxing. But I build them up gradually over time so as to not induce excess soreness.
Strong Curves offers plenty of variety to keep your body guessing. A phenomenon known as the “repeated bout effect” protects muscles from continuous damage from repeated stimuli. This means that you might get very sore the first time you perform a certain exercise, but the following session and especially the one after that are unlikely to produce as much soreness since your body prepares itself for repeated occurrences. By switching things up and rotating exercises over time, you can continue to experience ideal levels of muscle damage without compromising strength since you’ll al ways stick to the same great movement patterns such as squat, lunge, hip hinge, and bridging motions. Finally, Strong Curves includes plenty of singleleg movements that anecdotally lead to more glute soreness, which (the oretically) is a good indicator of muscle damage.
STRONG CURVES 31
Metabolic Stress
During strength training, the muscle cell also under goes a considerable change in metabolic environment. In fact, some researchers believe that the metabolite accu mulation induced by metabolic stress is more important for hypertrophy than high force (tension) development, though Brad and I believe that mechanical tension is still most important. The importance of metabolic stress does help explain why bodybuilders experience greater gains in musculature compared to powerlifters, despite the fact that powerlifters regularly experience greater absolute tension in their muscles.
Higher rep training with lower rest periods leads to greater metabolic stress due to many factors. First, it relies primarily upon anaerobic glycolysis for energy production, which creates a buildup of metabolites in cluding lactate, hydrogen ion, inorganic phosphate, and creatine. Second, the increased time under tension leads to increased ischemia, hormonal milieu, and cell swell ing. But let me try to explain this in laymen’s terms.
What all of this means is that by focusing on meta bolic stress in your workouts, your sets will occlude the muscles and deprive them of oxygen (hypoxia), which leads to hypertrophy through several mechanisms, including increased satellite cell activity (which, as I mentioned earlier, are muscle stem cells that sit outside the cell and donate their nuclei to the muscle cells when called upon). It also elevates anabolic hormone levels that theoretically lead to greater hypertrophy, espe cially in the muscles being worked. Finally, it pumps up the muscles. This increases muscularity by several mechanisms including an expansion of the muscles due to a perceived threat to the structural integrity of the cells’ ultrastructures.
The Strong Curves Program includes the best pos sible methods to induce maximal metabolic stress. First, we include exercises that pump up the muscles and induce serious burn. When you learn to hip thrust properly and perform back extensions the way we rec ommend, you’ll be blown away by the deep burn and pump in your glutes. Second, we utilize medium and high reps from time to time, and we perform multiple glute exercises from various angles and directions, both of which increase time under tension, leading to meta bolic stress.
Furthermore, we execute special techniques to in crease the set’s intensiveness; the restpause method extends the set, allowing for the execution of more rep etitions, and the constant tension method induces maxi mal cell swelling (giving you that full muscle feeling) and ischemia (restricted blood flow and oxygen).
Finally, we organized the program so that the ana bolic hormone response could be maximized, allowing molecules such as testosterone, growth hormone, and IGF1 (which actually turns into MGF in the muscles and is an extremely hypertrophic agent) to accumulate and exert an effect that will improve body composition. This is why we move at a moderate pace, take sets close to failure, train with sufficient intensity, and get you in and out of the gym in an hour or less.
Mechanical Tension
I left mechanical tension for last because I feel it’s the most important aspect of muscle growth. Mechani cal tension is created when a muscle either contracts or is stretched. Combine these two elements (contractions and stretch) through full range eccentric and concentric actions, and you’ll see even greater results. Mechanical tension leads to increased hypertrophy through many different mechanisms, including increased growth fac tor and cytokine release, satellite cell activation, and activation of the incredibly important mTOR pathway (the head honcho pathway to hypertrophy).
When it comes to hypertrophy, the greater muscle tension the better. Increased tension requires increased neural drive, and this neural drive activates several pathways to hypertrophy and influences gene expres sion as well. Hightension, low rep training fails to de liver superior results compared to moderatetension, moderate rep training popularized by bodybuilders. For this reason, time under tension seems to be more important.
There is a relationship between EMG and muscle activation, muscle force, mechanical tension, and hy pertrophy. The greater these measures, the greater the hypertrophy. Strong Curves is sure to include the ex ercises that place the greatest amount of tension on the muscles and lead to the highest levels of activation. In fact, we employ partial range of motion exercises from time to time so that greater loads can be used to (theo retically) place greater tension on the muscles. Research shows that the gluteus maximus has a better leverage for creating torque (or turning force) at the hips and also receives greater neural drive at endrange hip extension compared to flexedrange hip extension. In other words, your glutes fire harder when squeezed (think bridges and hip thrusts) rather than when stretched (think good mornings and squats). For this reason, exercises such as barbell glute bridges are great glutebuilders because you are in a stable position, you have a short range of motion focusing on endrange hip extension to activate the greatest amount of fibers, and the barbell load is centered directly over the hips to require your glutes to do most of the work.
32 Chapter 4:
BUILDING BOOTY-FUL MUSCLE
The program in this book incorporates exercises that have long resistance moment arms (long levers), such as reverse hypers and back extensions, which in crease muscle force requirements. Finally, we teach techniques that combine multiple roles of the gluteus maximus such as proper full squats (which combine hip extension with hip external rotation) and American deadlifts (which combine hip extension with posterior pelvic tilting). These techniques lead to greater muscle activation and broader tension across the vast array of gluteal fibers.
Consensus on Muscle Hypertrophy
Clearly, maximal hypertrophy is reached through a proper and welldesigned combination of the three pri mary mechanisms of muscle growth. This is why we utilize the shotgun approach and leave no stone un turned. Your glutes deserve the best program imagin able, and I won’t let your glutes down.
One huge mistake I see is the tendency to go too heavy to the point where form breaks down. This does not increase muscle activity; it creates energy leaks and places more stress on the joints rather than the muscles. I see this all the time in the gym and just shake my head. If tension and activation increase muscle size and strength, why would you skip that part? I don’t get it, but I hope you do and avoid going for those heavy lifts prior to learning proper form and muscle activation, es pecially with the glutes. The Strong Curves Program starts you at the right level to learn proper movement patterns. These should be mastered before you even think about heavy lifts.
As your strength increases, you should maintain ex cellent form when you add weight to your movements. If your form begins to break down at any time, decrease the weight until it is darn near perfect and you feel your mus cles actively working the way they are supposed to. This is what helps you get stronger, and increased strength is the most vital component for shaping the muscle.
If you need help with your form, I have a YouTube channel that hosts several descriptive videos to guide you. You can find it by searching for BretContreras1 in the YouTube search engine.
Don’t believe me? We all know at least one person who has avidly visited the gym year in and year out. When you first met or saw this person, you envied her physique. But over time, your opinion became, “Eh, she looks all right.” That’s because she looks the same now as she did three years ago. She has been lifting the same weights and performing the same exercises every single week. But the more proficient you get at training, the less appealing her workouts become. That’s because you have found the real secret to great results: Build ing strength over time through increased intensity and program variation.
Continually working out with the same weights might help you become leaner, but it won’t increase muscle size or shape. This fictitious person from the gym might have a small, flat bum and thin, flabby arms. Muscle fills you out and gives you those nice curves you have always wanted. Her program will nev er achieve those results. Worrying about rep ranges is good, but I want you to be more concerned about in creasing your strength, adding weight to your lifts, and setting new personal records.
This might not seem like a big deal now, but the first time you master an incredible feat like walking weighted lunges, squatting with heavy weight for reps, or deadlifting a barbell with a load equal to your body weight for ten reps, you will feel exhilarated.
In order to apply tension correctly you must first learn how to activate the muscles. Current research ers use electromyography (EMG) to estimate muscle force. While it is not exact—especially during dynamic movements as opposed to isometric movements or when muscles fatigue—it’s the most practical method avail able for estimating how hard a muscle works during a given exercise. The EMG experiments I performed late into the night a few years back show that different ex ercises uniquely work different regions of the glutes.
STRONG CURVES 33
Some exercises work the entire glutes evenly, some hit the lower glutes a bit better than they hit the upper glutes, and some target the upper glutes.
Researchers and practitioners don’t know the exact formula for optimal hypertrophy, and the best meth ods for muscle growth vary extensively depending on the situation and the individual. That is what I kept in mind when creating Strong Curves so that it covers all possible bases. I wanted to address all components of muscle hypertrophy so that this program is centered on the most tensioncreating, gluteactivating exercises possible. You will use strategies to increase metabolic stress, such as higher rep ranges, highdensity training, rest pause methods, and constant tension methods. You will perform exercises that induce muscular damage due to heavy stretch loading such as reverse lunges, and you will hit the glutes with integrated multijoint move ments in addition to targeted single joint movements. Your glutes will work from multiple angles and direc tions of resistance to stress different ranges of motion; with all types of rep ranges to vary the intertwining roles of tension, stress, and damage, while using many types of resistance to provide novel stimuli and prevent adaptation. To put it simply: Your glutes will have no choice but to grow stronger and more muscular.
Below is a chart that shows the average and maxi mum activation received on several popular hip strengthening exercises:
Gluteus Maximus Average Electromyography Chart
| Exercise | Upper glute max | Mid glute max | Lower glute max |
| Bodyweight Glute Bridge | 29.1 | 13.1 | 17.3 |
| Bodyweight Single-leg Glute Bridge | 53.9 | 24.8 | 45.2 |
| Bodyweight Side Lying Abduction | 54.9 | 7.2 | 5.4 |
| Bodyweight Side Lying Clam | 70.6 | 8.2 | 6.7 |
| Bodyweight Full Squat | 27.8 | 7.0 | 30.5 |
| Bodyweight Reverse Lunge | 36.4 | 9.5 | 43.3 |
| Bodyweight Bulgarian Split Squat | 32.3 | 14.7 | 56.7 |
| Bodyweight Single-leg Box Squat | 54.4 | 17.7 | 37.2 |
| Bodyweight High Step Up | 72.0 | 15.4 | 37.0 |
| Bodyweight Back Extension | 34.0 | 12.1 | 29.6 |
| Bodyweight Reverse Hyper | 66.9 | 27.2 | 51.7 |
| Bodyweight 45-Degree Hyper | 43.9 | 13.9 | 31.7 |
| Bodyweight Hip Thrust | 39.6 | 17.9 | 47.5 |
| Bodyweight Single-leg Hip Thrust | 66.9 | 27.5 | 60.8 |
| Barbell Full Squat | 59.0 | 25.4 | 71.1 |
| Barbell Deadlift | 81.5 | 37.0 | 85.6 |
| Barbell Hip Thrust | 134.0 | 62.6 | 72.9 |
| Seated Band Hip Abduction | 93.9 | 24.5 | 24.2 |
| Cable Hip Rotation | 83.9 | 55.7 | 51.7 |
The Big Bulk Scare
I know what you’re thinking. All of this talk about musclebuilding and strengthgaining usually has women running back to the aerobics class because they don’t want to get big and bulky. If you train naturally without any anabolic or hormonal concoctions to make your muscles grow, you need not fear growing muscles like Arnold Schwarzenegger.
Physiologically, you have a much harder time build ing muscles like a man because you have lower levels of testosterone. Though you do carry a small amount of testosterone, and strength training promotes anabolism, you are in the clear when it comes to growing muscles so large you need to cut the sleeves off your shirts.
34 Chapter 4:
BUILDING BOOTY-FUL MUSCLE
Body recomposing expert Alan Aragon has devised a model for the rate of muscle growth. He compiled data after monitoring clients for considerable time to come to this conclusion. His model shows that for wom en, the average rate of muscle gain per pound per year diminishes over time, becoming hardest to gain muscle after four years of proper training. Note that this is with proper training. Someone can improperly train for four years and never gain a pound of muscle.
Going by his model, in the first year of proper strength training and nutrition, a woman may gain ten to twelve pounds of lean muscle mass. By year two, she may gain five to six pounds of lean muscle mass. In year three, she will only gain two to three pounds of lean muscle mass. The numbers in year four are less than one, so not even worth calculating. At most, over the course of four years, you may gain twentyone to twentytwo pounds of lean muscle mass. This is your optimum potential, of course, as factors like age, lifestyle, nutrition, and ge netics may limit that potential. Again, this comes only with proper training and the right cocktail of personal factors. Some individuals can train for years with no progress because their programs are not designed prop erly or they don’t exercise correctly.
Now, if you’re gasping in despair at the thought of gaining twelve pounds in a year, you haven’t considered what you will be taking off. Muscle allows your body to become more metabolically efficient, so the more you have, the more fat you burn, and training for continuous strength gains ensures that the metabolism is kicked into high gear.
You may gain ten pounds of muscle in a year, but considering that you burn fat at twice the rate you put on muscle, you can lose twenty pounds or more of fat in that same time. The harder and smarter you work, the more fat you burn. The better you eat, the more fat you burn—all while building nice rounded muscle to give your body shape. The bottom line is that you won’t grow excessively large glutes. Here is a typical conver sation that I have with women regarding this topic:
Bret: “You’re afraid that you’ll wake up tomor row and have huge glutes, right? Well strength train ing doesn’t work that way. If it did, I would be out of a job. It takes time to develop a nice muscle, especially the glutes. But let’s pretend that you’re right. Let’s say you’d end up with huge glutes if I were to train you the way I want to train you for two months. Wouldn’t there be a point in between, say four weeks from now, where your glutes looked absolutely perfect?”
Client: “Yes, that sounds about right.”
Bret: “Then I’ll make a deal with you. As soon as we reach the point where you think your butt looks perfect, we’ll quit trying to gain strength and just maintain a general level of fitness. Deal?”
Client: “Deal!”
Guess what? She never reaches that level. Sure, butts get rounder and perkier, but once the compliments start rolling in, it further motivates women to try even hard er in hopes of seeing greater gains. All I have to do is get a client through the initial fears of excess develop ment, and they’re on board. I have never had a client say to me, “Bret, my butt looks perfect. I don’t want it to get any rounder or shapelier. Let’s stop trying to get stronger at hip thrusts.”
Client success story: Kim, a fifty-four-year-old mother of two, came to me with the fear of her butt growing larger. She refused to do any heavy glute exercises. It took a lot of convincing to help her understand the difference between muscle mass and fat mass in the butt region.
She thought growing her glutes meant they would get even wider. On the contrary, as she started training they grew rounder, perkier, and shapelier. But she didn’t admit this right away. For weeks, she stopped short on her exercise sets. I’d force her to work harder and perform more reps. The battle of wits ensued with me telling her my program was working and her telling me it wasn’t.
I knew better. One day, without any coercion on my part, she set an enormous personal record (PR) on hip thrusts. I decided to call her out, saying, “What’s going on, Kim? For weeks, you’ve been berating me for pushing you to set records, and now you’re Roger Federer, setting records like crazy. You’re getting compliments, aren’t you?” Laughter filled the room, and her face turned candy apple red.
Apparently, she had earned the nickname “Buns of Steel” at work.
Once those compliments start rolling in, I know that I never have to convince a client to push herself toward greater levels of strength.
STRONG CURVES 35
So in theory, butts could indeed grow too large. Occasionally, there are women who do seem to pack on some serious muscle mass back there. But I have trained many women over the years, and I have person ally never trained a woman who grows glutes too large (though I’ve trained some of the best booties around). This is quite apparent when a client leans out. I’ve never gotten a female client down to low body fat levels and heard her complain that she has too much glute muscle. On the contrary, most want even more shape back there, even though we’re doing everything in our power to build and maintain the glutes. So, put your mind to rest. I have seen huge success by getting every female client of mine much stronger at hip thrusts. The stron ger the booty, the better the booty.
Moving in Different Directions
The majority of exercise programs designed by train ers or in popular fitness books have you moving in the same basic directions. If a program focuses on squats, lunges, bench presses, lat pulldowns, and crunches, you are only moving up, down, forward, and backward. That might seem fine, but what about moving side to side or rotational movements?
These directions are called “force vectors,” and it’s best to target multiple vectors during your program. By doing so, you train your body through all the intended functions and activate your muscles in multiple ways, as they were designed to do.
The gluteus maximus was designed to extend the hips, posteriorly tilt the pelvis, abduct the hips, and externally rotate the hips. To train the glutes through its multiple functions, you need to include exercises in your program that move the torso, hips, and pelvis for ward and backward; exercises that move the thigh in ward and outward (from side to side), and exercises that twist the hips laterally and medially. In other words, you want to perform exercises that have you moving your hips up and down (squats and deadlifts), forward and backward (hip thrusts and back extensions), and side to side (side lying abductions and band standing abductions), in addition to exercises that have you ro tating the hips back and forth (cable hip rotations) and tilting the pelvis forward and back (RKC planks and American hip thrusts).
Just doing squats and lunges won’t get you there. The Strong Curves Program has you performing all of these force vectors every week. That way, you train your body in all of the major planes to strengthen the glutes from all directions in all ranges and prevent potential injuries that could arise from a lack of glute strength and conditioning.
Movement Quality Over Quantity
Poor movement quality is a pandemic in our society. Just hang out in a shopping center one day and watch the people around you. Take note of how people walk, get up and down from a seated position, and their posture from a seated or standing position. People are hunched over, wobbly, and stiff. This is all due to jobs that re quire long hours of sitting and a sedentary lifestyle.
Most movement issues relate to three factors: mobil ity, stability, and motor control. You can have a great handle on one factor but still have issues with the other two factors. Renowned physical therapist Gray Cook has discussed this at length for years. For instance, a person may possess sufficient hamstring flexibility to deadlift properly, but once weight is added, their form falls apart. In this instance, the individual doesn’t have a mobility problem; she has a stability or motor control problem. Issues with any one of these three factors can be corrected, and corrective exercises in the form of foam rolling, stretching, mobility drills, and activation drills should be a regular part of your workout program until your form is ideal and you no longer need them.
Many of the correctives are simply conducted during the warmup as a way to get more bang for your buck. Body temperature needs to be elevated prior to heavy lifting (hence the primary purpose of a warmup), but why achieve this tissue temperature increase through riding a stationary bicycle or walking on the treadmill? These activities don’t move your joints through a full range of motion and don’t get the juices flowing opti mally. Tissues can be warmed and the nervous system can be primed while you perform exercises that will help correct dysfunction, activate dormant muscles, and assist with good posture, while taking your joints through a full range. This is the strategy behind our dynamic warmup, which I’ve developed over time with the help of popular strength coaches such as Mike Boyle and Mark Verstegen.
36 Chapter 4: BUILDING BOOTY-FUL MUSCLE
Where’d You Get Those Moves?
Chapter 6:
As someone with a discerning eye for movement, I’m appalled at what I see in the commercial gyms these days. I don’t expect every person who walks onto a gym floor to master movement patterns for squats and deadlifts (though this sure would be nice). What bothers me is when I see certified profes- sionals forcing their clients to lift inappropriate amounts of weight with very poor form. I can’t stress this enough: It’s very important to develop proper movement patterns on the various fundamental motions such as squats, lunges, hip hinges, and bridges. You may find that you’re limited in mobility, stability, and/or motor control and need to improve upon these qualities before loading up a pattern and adding resistance. You have to master your body weight before using a barbell. That’s just all there is to it. Not only will doing the “right” exercises the “wrong” way fail to shape the glutes, but it will eventually end up causing pain or injury.
Evaluating Your Own Movement Patterns
Movement patterns are the foundation upon which strength is built, so good form is imperative to your success with Strong Curves and beyond. I run my cli ents through a battery of drills during their first session to evaluate their movement competency. Understand ing how you move, where your weaknesses lie, and where to begin your training to build up weak areas and correct dysfunction will vastly improve your strength and form over time in addition to preventing serious injury. If you are not sure about your exercise form, I encourage you to find a Certified Functional Move ment Screen (FMS) expert in your area to assess your mobility, stability, and motor control during fundamen tal movement patterns. You can do this by going to the FMS website: http://functionalmovement.com/.
Don’t push yourself beyond limitations when you be gin the Strong Curves Program. Regression with exer cises may seem like you’re working backward, but in reality, it will improve your strength and allow you to reach new personal records far faster by clueing in on your weaknesses and making corrections before using heavy loads.
With this assessment, you may find that you need to regress your squats to bodyweight or goblet squats until you improve your stability. If you have poor ankle dor siflexion, you may need to stick with box squats until you bring up your mobility. Squatting may seem like a simple, natural movement, but many things have to happen for a proper squat to occur. The knees need to track over the toes, the spine needs to stay arched, the pelvis needs to keep its forward tilt, the body needs to stay centered over the feet, and the load needs to be distributed properly between the hips and knees. These criteria may be simple in a halfsquat, but a deep squat is a different story.
In addition, many women struggle with proper plank and pushup form. I find that many of my female clients perform pushups incorrectly, and I often regress them by using an elevated bar while slowly moving it toward the ground over time until they’re back in correct push up form.
52 Chapter 6:
WHERE’D YOU GET THOSE MOVES?
Krista was a former high school and collegiate athlete who arrived at my studio in Arizona after a couple of years out of her sport. She was in great shape but had one of the worst cases of valgus collapse I had ever encountered. I think of “valgus collapse” as a melting candle. Weak glutes and hip rotators fail to hold proper positioning during squatting tasks, and this causes the femurs to adduct and internally rotate, the opposite pelvis to drop (if performing single-leg squatting tasks), and the feet to pronate. Essentially, things “cave in” during the movement.
I filmed Krista during all of her exercises, and we reviewed them immediately after the set. This allowed her to see what she was doing and make rapid improvements. I showed her how her knees were caving in during squats and how she lacked symmetry during single-leg movements. She was accustomed to using a barbell, but I had her stick with a dumbbell and perform goblet squats and between-bench full squats. I placed my hands on the outside of her knees so that she focused on keeping them out throughout the movements. This greatly improved her motor control.
I also wrapped a band around her knees and had her perform band seated abductions, as well as x-band walks, side planks, and band rotary holds, to reinforce the “feel” of using the upper glutes.
She did weekly bodyweight squats with the bands around her knees to improve the strength and stability of her hip abductors and external rotators through the squatting movement pattern. These strategies, in addition to all of the other lower body movements we employed, allowed her to make rapid improvements, and we were able to beat records and add loads each and every workout.
Krista cared a great deal about her physique, and prior to working with me, she had worked with several other trainers who failed to address her condition. She often left her trainers feeling frustrated due to lack of progress with her lower body lifts. With my corrective exercises, she was able to take her squat from ninety-five pounds to one hundred fifty-five pounds in eight weeks. She completely blew me away by bringing her deadlift up ninety pounds, to an incredible two hundred seventy-five pounds. By cleaning up her technique, we were able to make much greater strides. The moral of the story? Never sacrifice good form just to set a personal record!
The Aerobic Exercise Debate
Strong Curves doesn’t have a set protocol for cardio vascular exercise. You will find that the work you do during the program greatly improves heart strength, endurance, and cardiovascular health without ever hav ing to pound the pavement or jump on the cardio equip ment at the gym. However, if you enjoy aerobic activity or believe your weight loss efforts could benefit from the fatburning effects of cardio exercise, feel free to add this type of exercise into your weekly regimen. Two or three twenty to thirty minute sessions per week is all you need; don’t go overboard.
Even when you add cardio sessions to your workout week, you still need to maintain proper nutrition. Extra exercise doesn’t give you excuses to eat poorly. For ex ample, a moderate thirtyminute elliptical workout for a woman weighing one hundred thirty pounds burns roughly two hundred ten calories. A Dunkin Donuts Blueberry Crumb donut contains five hundred calories. Not a fair trade off, is it?
Always prioritize your training around your goals. For example, sprinters should prioritize sprinting and perform their strength training after their sprint work. For your purposes, you will prioritize strength. The stronger you become, the greater your physique will look.
If you plan to add aerobic activity into your work out schedule, make sure the Strong Curves Program is prioritized over your cardio exercise (unless you are training for sport). This means that when you plan your schedule, you will perform your strength workouts first. If you want to add in twenty minutes of running to your strength program three times per week, you can either run after your strength workouts or on your days off from strength training. This ensures that you are us ing maximal effort with your strength programs, mak ing aerobic activity your secondary priority for energy demands.
If you can only make it to the gym at night and only have time for a quick walk in the morning, however, don’t skip your walk just to conform to this method. I want you to make the most of the Strong Curves Pro gram, and I designed it to easily adapt to your needs.
STRONG CURVES 53
Some of the other activities that women may wish to perform in addition to their Strong Curves workouts include:
Over-Training and Overreaching
Strength training is the most important aspect of
Walking
Cardio equipment Complexes
High-intensity interval circuits
Jumping rope Jogging Pilates Plyometrics Bike riding
Recreational Sports Running hills
Sled dragging Spin classes Step aerobics Swimming Tabatas
Yoga Sprinting
training for physical purposes. It shapes and strength ens muscles while burning fat. Training for strength brings with it a number of health benefits, including improved bone density, cardiovascular health, and in creased movement economy—just to name a few. But there is a fine line between beneficial exercise and too much exercise. One of the largest fitness myths is that in order to see great results, you must live in the gym and train for hours on end. This is the furthest thing from the truth. Roundtheclock training is not neces sary or even ideal for muscle growth or body composi tion changes.
Cardio doesn’t build shape, getting stronger does. And too much cardio will prevent you from getting stronger. I can’t emphasize this enough. If you want rounder glutes, you’ll need to build them up to be able to lift much heavier weight over time. The stronger the booty, the better the booty. Strength builds the shape while nutritional habits help reduce fat stores.
If you are new to training, I recommend adding light additional activity such as stationary walking on an inclined treadmill for fifteen to twenty minutes three times per week. If you are an advanced lifter, adding two fifteenminute hill sprint workouts to your weekly schedule may benefit your stamina while not impairing your ability to recover from strength sessions.
Again, these additional activities are not required to be successful with Strong Curves, but cardiovascu lar and aerobic activities can benefit your program by allowing you to achieve your goals faster. Just don’t overdo it! More is not better (yes, you will get constant subtle reminders of this).
It’s important to pay attention to how your body feels each day. Wake up and assess any soreness or discom fort, and evaluate how your previous day’s activities contributed to the discomfort. Is it from the newness of a particular movement, or is your body telling you to slow down and not overreach? If you are too tight or sore, you should make adjustments by decreasing the intensity or amount of activity. To improve recovery time and reduce risk of injury, dedicate at least one day per week to complete rest and recovery—even profes sional athletes take a day off. Assuming you stay the same weight, getting much stronger over time at hip thrusts, squats, and deadlifts will do far more toward developing Strong Curves than packing on miles of running without gaining strength.
I can’t tell you the number of times new clients have cried out in our first meeting, “I don’t want to devote my life to working out!” This statement usually follows with, “I just don’t have the time or energy to live in the gym.” I can honestly tell you that unless you are direct ly speaking to a professional athlete whose livelihood depends on her ability to perform in peak condition, no one has time for this. Not you, not me, and not any of my clients. Yet, my clients are able to successfully accomplish the physiques they want by spending only a few hours per week in the gym or training at home, and you can, too.
I’m going to let you in on a little secret that many in the fitness industry don’t want you to know. Most of my colleagues will tell you the truth because they truly care about your health, but the majority of the fitness industry sets you up for failure by making you believe that if you aren’t devoting your entire free time to diet and exercise, you are never going to reach your goals. You will not achieve greater results by adding in more exercises, training for extra time, or working out seven days a week with Strong Curves. You will not achieve the body you want by adding in hours of cardio to your weekly strengthtraining plan in Strong Curves or by eating at a severe caloric deficit far below what is rec ommended in this book.
In fact, if you do any or all of these things, you will feel and look worse because your body will turn against itself. You have builtin survival mechanisms that are triggered when you are under great stress. Constantly overtraining and undereating sends out stress signals to your body around the clock. Eventually, your stress hormones will kick into overdrive and wreak havoc on your immune system. In turn, you will feel rundown, fatigued, irritable, and depressed rather than motivat ed and strong. If all of this is going on inside, imagine what you will look like on the outside.
54 Chapter 6:
WHERE’D YOU GET THOSE MOVES?
One of the best things you can do is take my advice and never fall into this trap. Do not overtrain, and do not undernourish your body. Also, do not overeat be cause you feel all of this new exercise will compensate for the added calories. If you follow the Strong Curves plan to the letter, including both the nutrition and work out regimen, you will achieve your greatest physique to date. If you decide to manipulate your outcome by making changes to this plan that I strongly recommend against, don’t send me an angry email when things start to go south.
You must stick with the “less is more” mind- set, and remember these three phrases:
Show up to train hard. t Train smart, not long. t Eat for nourishment.
Finding What’s Right for Your Goals
When adding cardiovascular exercise to your Strong Curves plan, it’s important to maintain struc ture. Though many new fitness fads claim that muscle confusion is the best method for fast results, I caution against this practice for several reasons. Think about the process of learning something new. As a kid, you didn’t learn to ride your bike by getting on it every four weeks. After school every day, you reluctantly put your feet to the pedals as your dad thrust you out into the open road. You crashed, scraped a knee or two, and maybe even cried a little. But you consistently got back on that bike until you mastered it. Soon you were riding in a straight line down the road but couldn’t figure out how to stop. Once you figured out how to stop, it was time to master turns.
After hours, days, or even months of consistently try ing, you were riding your bike with the neighborhood kids like you were born to do it. The same goes for fit ness training. Exercises may seem awkward, annoying, or even impossible at first. Some of these movements might make you feel downright silly or inadequate. I’ve felt that way several times with exercises that I’ve grown to enjoy over the years. The only way you’re going to grow to enjoy the exercises in this book is to consis tently incorporate them into your workouts and improve upon your form and strength with each session.
You might be familiar with and have already mas tered some of the exercises. You may have heard of some of the exercises, but never had the guts or the in clination to test them out. Others may be completely new to you, but trust me when I say that all of them are worth adding to your program over time. In the Strong Curves Program, I encourage you to consistently use the same exercises during each individual phase. If there is an exercise in the program that you cannot use for whatever reason, choose a supplemental exercise of fered in the Exercise Index, and stick with it throughout the duration of the phase.
This is important because of the adaptability of your neuromuscular system. You may not notice it, but it takes intricately detailed communication for your brain to tell your muscles what to do during an exercise. If you’re new to the exercise, it makes the communication far more challenging for your brain. The more familiar your brain becomes with the movement, the more eas ily it can communicate with your muscles to create the correct movement patterns. The easier the communica tion, the more prepared you are for the lift. With each successive training session, your body will be better adapted to the lifts and ready to take on new challenges so that you can make steady strength gains over time. This process is known as “progressive overload.” Es sentially, you are pushing your muscles beyond adapta tion with each session by adding weight or reps or by shortening the duration between sets.
For example, if your program requires that you per form squats during a given session, yet you don’t do squats again for another four weeks, your brain has to recoordinate the movement. But if you perform squats in one session per week for four weeks, your coordina tion will greatly improve, which translates to a stronger squat. Remember that it takes thousands of repetitions in order for your brain to form a “motor engram,” which is a memorized movement pattern.
After you complete Strong Curves phases one through three, you have the freedom to explore new techniques, tinker with exercises, and try different exercises listed in the Exercise Index. I offer a template that you can use for life, and I provide an extensive collection of exercises to choose from. Once you feel you are at a level where you are using excellent form in all of your big lifts (squats, deadlifts, lunges, hip thrusts, presses, and pulls), you have more opportunity to change your routine on a regular basis. As you advance, you may introduce more variety and will need to rotate exercises more frequently. But you will have mastered the move ment patterns and will stay coordinated and strong with all movements due to the similarity of the various lower body exercises. For example, though squats, deadlifts, hip thrusts, and back extensions are all very different in terms of form, they all involve hip extension. As long as you perform movements that look like squats (double or singleleg), movements that look like dead lifts, and movements that look like bridges, you’ll be fine. This is the “same but different” philosophy. For instance, a client might perform hip thrusts, full squats, and 45degree hyperextensions one week, then barbell glute bridges, front squats, and sumo deadlifts the next week. This works because she is using the same global movement patterns, but they differ just enough to pre vent boredom.
STRONG CURVES 55
Follow these same guidelines when introducing aerobic activities to your weekly schedule. If you play soccer on Saturday and take a spin class on Tuesday, this works out to your advantage because you are con sistently using the same movement patterns, increasing your coordination with each session. If you schedule Zumba classes on Monday, and kickboxing on Wednes day, but you take up jogging and skip these classes the following week, followed by taking up rock climbing instead the week after—well, you can see where this is going. Consistency is going to be key to your suc cess. Without it, you will just flounder around with all of those new methods of exercise and never adapt well enough to become proficient at any of them. You may experience constant soreness because your body will not prepare properly for the activity. Over time you can vary your cardio each week, but try to stick to the same activities initially, and adapt gradually to avoid getting too sore.
Again, I advise you to really own your weekly sched ule and make sure that you carefully plan how much you exercise. If you join a recreational volleyball league and practice twice a week for an hour, with an hour game on the weekends, make sure you incorporate this into your weekly schedule. In this case, you wouldn’t want to strength train five days a week, completely ne glecting your need for rest. Cut down to two or three strength training sessions per week until your body adapts or your season ends. Never fall into the trap of overtraining because it’s very hard to climb back out.
What to Do When Your Progress Comes To a Screeching Halt
If you are new to strength training, you will make great gains within the first several months. This hap pens to nearly everyone, and watching those numbers consistently go up on your lifts while your body fat percentage consistently goes down is great motivation. During your first couple of months, you will get ac customed to performing a couple more reps with the same weight or the same amount of reps with heavier weight than you did the week before. Over time, it be comes difficult to set personal records; simply getting one more rep or five additional pounds on an exercise can be challenging.
This happens to many longterm clients. I find that once they begin lifting at advanced levels, they couldn’t care less how much more they lift because they have ac complished more than ninetynine percent of the popu lation.
But to ease you into these expectations, I will put things into perspective. If you could increase your strength by five pounds every week, you would in crease your lifts by two hundred sixty pounds per year. Even if you only went up five pounds per month, this would equate to sixty pounds per year. This simply does not happen year in and year out. To think of it another way, if you could increase your reps by one per week, you would get fiftytwo more reps on your exer cises per year (at a constant weight). Even if it were just one rep per month, you would increase your reps twelve per year for that weight. So, if you squat onehundred thirtyfive pounds for one rep right now, in one year, you would be able to squat the same weight for thirteen reps. That will not always happen, especially after a couple of years of training.
After you have been training for six months or so, you will have reaped most of your beginner gains. You will then have to push hard to make incremental gains, which is perfectly fine. It’s very important to under stand that some experienced powerlifters train hard year round and see just moderate increases in strength. For example, one may see fifteen pounds added to her
56 Chapter 6:
WHERE’D YOU GET THOSE MOVES?
Setting Personal Strength Goals
Strength is highly dependent on natural and genetic phenomena such as your natural body shape (somato type), proportions of body segment lengths (anthro pometry), tendon insertion points, muscle fiber type composition (type II fibers are stronger than type I), and natural hormonal levels. You will be great at some lifts, while others will make you cower in the corner.
Be inspired by what you see others accomplish, but keep things in perspective when setting your own strength goals. Don’t label yourself a failure if you can’t muster up the strength for unassisted chinups, and don’t throw in the towel if you can’t get past five body weight lunges on each side. You will accomplish these tasks, but it takes time to get there. You have to start somewhere, and you are likely beginning right where many powerful women stood not so long ago.
The CDC report for 2003 to 2006 shows that sixty four percent of women over the age of twenty in the U.S. have a bodymass index over twentyfive and are considered overweight or obese. This number can be skewed for those who carry a good amount of muscle, but I conclude that this isn’t the case for the majority within this statistic. As for the remaining thirtysix per cent of the female population who are of normal weight, probably only onethird of them perform proper resis tance training. This means about ten percent of women are competing with you for strength. I would venture to guess that if you can perform a chinup, you are in the 95thpecentile in terms of upper body pulling strength among women. In other words, if you took a random sample of one hundred women, it’s unlikely that more than five could perform a fullrange, unassisted chin up starting from a dead hang. If you aren’t there yet, know that working toward that goal puts you at a much higher level than the majority of women.
Some women base their perception of female strength on what they see advanced lifters doing in the gym. If you feel that way, I encourage you to review the real life break down on the chart that follows. At one point several years ago, I had more than thirty female clients, and I managed to train them all by myself week in and week out. While my strong female colleagues probably think that this chart is a bit “easy,” I believe it to be accurate if you consider the entire female resistance training population.
Female Strength Chart
| Exercise | Beginner | Intermediate | Advanced | Elite |
| Back squat | BW x 10 | 45 x 10 | 95-135 x 10 | 135-225 x 10 |
| Dumbbell walking lunge | BW x 10 | 20 x 10 | 30-40 x 10 | 40-60 x 10 |
| Push up | zero | 1-8 reps | 8-20 reps | 20-40 reps |
| Bench press | zero | 45 x 10 | 65-85 x 10 | 85-135 x 10 |
| Dumbbell Bench press | 20 x 10 | 20 x 10 | 25-35 x 10 | 35-50 x 10 |
| Incline press | zero | 45 x 10 | 65-85 x 10 | 85-115 x 10 |
| Dumbbell Incline press | 15 x 10 | 20 x 10 | 25-35 x 10 | 35-50 x 10 |
| Millitary press | zero | 45 x 5 | 45-65 x 10 | 65-95 x 10 |
| Dumbbell Millitary press | 10 x 10 | 15 x 10 | 20-25 x 10 | 25-35 x 10 |
| Deadlift | 45 x 10 | 65 x 10 | 95-185 x 10 | 185-275 x 10 |
| Hip thrust | BW x 20 | 45-95 x 10 | 95-185 x 10 | 185-275 x 10 |
| Dumbbell 45-degree hyper | BW x 20 | 10-20 x 10 | 20-50 x 10 | 50-100 x 10 |
| Chin up | zero | 1-3 Eccentric reps | 1-8 reps | 8-15 reps |
| One-arm row | 20 x 10 | 25 x 10 | 30-40 x 10 | 40-60 x 10 |
As mentioned previously, anthropometry plays a huge role in the display of strength. It is not uncommon for a tall woman with long femurs to front squat just the barbell but deadlift well over one hundred thirtyfive pounds. Most women can hip thrust more than they can squat, and they can deadlift more than they can hip thrust. A woman with a slender upper body and shapely legs may never be able to do a chinup no matter how lean and strong she gets. Bodyweight reverse hyperextensions are an excellent exercise for her, as her ratio of lower body weight to upper body weight makes it quite challenging. Conversely, a woman with this body type can perform bodyweight 45degree hyperextensions very easily and needs to hold onto a dumbbell to make it challenging.
74 Chapter 8:
BECOME THE ULTIMATE WORKOUT TRACKER
Another huge factor with real strength is whether you take exercises through a full range of motion. This is the only legitimate measure of strength for those movements. Some women partial squat ninetyfive pounds for ten reps but cannot do a single rep to parallel or deeper with the same weight. On the same subject, some women perform three partial range chinups but cannot do a single rep when attempting to start from a dead hang and stop at the top of the sternum. I have seen women claim to dumbbell military press a ton of weight, but it is a whole different story when forced to use a complete range of motion by starting at shoulder level and progressing to lockout while maintaining a tall stance with a strong spine that doesn’t arch back.
Typically, women who have trained in the past do not show up at my gym with the ability to perform barbell full squats. If you’re a beginner, start off with body weight exercises, ensuring proper levels of mobility, stability, and motor control—and use basic progression. Build a foundation by gaining flexibility, getting your glutes to activate properly, and learning how to stabi lize your core. In addition, build your scapular muscles so you can perform exercises with proper form. Prog ress gradually when it comes to range of motion, repeti tion, resistance, and exercise variation before you take on more challenging lifts. For example, perform goblet squats—a good intermediate exercise that bridges the gap between bodyweight and barbell squats. Barbell glute bridges come before barbell hip thrusts, and rack pulls come before deadlifts.
Dumbbells for the upper body are often necessary to bridge the gap between bodyweight and barbells. Use bands for assistance with chinups. Elevate the angle on inverted rows and pushups to make them easier. All of this is set up for you in the twelveweek Strong Curves Programs, but I want you to keep this information in mind as you progress beyond those twelve weeks.
Kellie’s Notes: Exude pride if you are at the “advanced” or “elite” stage in any of the exercises listed above, as that comes only from hard and consistent work overtime. Notice that the elite range on the chart is very broad. If you are in the elite category, set a goal to get on the upper end of different exercises. Hopefully, this chart will help you keep your strength in proper perspective. I’m very strong with my lower body exercises, but my upper body exercises put me in the advanced category, rather than the elite. I just keep striving to make greater gains.
Progress is as Progress Does
If you start with the twelveweek Bootyful Begin nings Program for beginners, it’s fine to move on to the twelveweek Gluteal Goddess Program for advanced lifters next. You may find some of the lifts challeng ing beyond your current strength, however. If this is the case, I encourage you to find supplemental exercises in the Exercise Index to perform in place of those that are too challenging for your level. Just keep those lifts you couldn’t do as future goals.
This book provides a chart that will help you track your progress. Each exercise offers a place for you to write your lifts at your low rep maximum record, me dium rep maximum record, and high rep maximum record. Fill in how much weight you lift for a single rep, yet fail on the second rep in the first section. In the second section, fill in how much weight you lift for ten consecutive reps, failing on the eleventh rep. In the last section, attempt the lift at bodyweight, and see how many reps you can accomplish.
I recommend working on these records in small in crements once you have become accustomed to your Strong Curves workouts. Give yourself a few ses sions in the routine before you attempt to set personal records. Use these records as a means to gauge your progress and as fuel to push yourself even harder. You will be amazed at how far you come from the time you make your first attempt to an attempt two months down the road.
Note that some of these exercises are not written in your program. You can save these sheets for when you do implement them into your workout because attempt ing them only once and not consistently will not give you accurate, recordable gains. As you will see in our example, not every single slot has to be completed, as some exercises don’t lend themselves well to low reps. Knowing your records on all of the lifts in various rep ranges allows you to succeed by giving you many more opportunities to set personal records and achieve pro gressive overload.
STRONG CURVES 75
GLOSSARY
Here are some terms and concepts that you should know. Understanding these definitions and meth- ods will allow you to create better programs, use better form, and achieve better results.
Activation. Muscle activation can be determined by EMG (see below for a definition of EMG). Some mus cles fire more readily than others, and the glutes are a stubborn muscle group that tends to shut down in sedentary individuals. For this reason, it is beneficial to include “activation exercises” or simple, lowload exercises to “reeducate” the glutes and get them firing properly during movement.
Active Insufficiency. When a biarticular (twojoint) muscle is shortened on one end, the amount of tension it can create is diminished due to the suboptimal muscle length. This applies to the hip thrust exercise. During the hip thrust, the hamstring muscle is shortened due to the bentknee position throughout the movement. Since the hamstring can’t produce optimum force during the hip thrust, the gluteus maximus must take over and produce increased force to make up for the weakened hamstrings.
Adaptive Shortening. If a muscle is placed in a shortened position for sufficient time, it will adapt by decreasing in length. Chronic sitting places the hip flexor muscles in a shortened position, which causes them to decrease in length over time. Tight hip flexors are not conducive to proper gluteus maximus function.
Anterior Pelvic Tilt. A majority of the population is in anteriorpelvic tilt (APT). This means that their pel vises are tilted forward. In other words, the top of the pelvis is shifted forward while the bottom of the pel vis is shifted rearward. This can interfere with proper gluteal functioning. Some portions of exercises, such as the bottom of a deadlift, should be performed with a slight anterior pelvic tilt. It isn’t easy to modify pos ture, but proper strength training is a powerful stimu lus for posture improvements if good form is consis tently adhered to.
Auto-Regulation. Some days, you will feel great, have sufficient energy, and your body will feel very strong. Other days, you will feel drained and weak. It’s important to “autoregulate” or adjust your workout according to “biofeedback” by listening to what your body is telling you. You should always go to the gym with a plan in mind, but this plan is not set in stone since there will be days when you will ramp things up or scale things down depending on how you feel. Don’t force a personal record to happen by using sloppy form. When you’re not feeling up to the task, ease up, and you’ll rebound quickly.
Biofeedback. Your body will give you signals that are indicative of how your body is functioning at the moment. Your psychological state, how much stress you’re under, how much sleep you received, what foods you consumed, and how fatigued you are from previ ous workouts combine to determine your “readiness.” Some days you’ll be ready, some days you’ll be really ready, and other days you won’t be ready to achieve amazing training sessions.
Compensation. When strength, stability, or mobility is impaired during movement, the body will attempt to execute the pattern by compensating at other joints or with other muscles. From a survival standpoint, this is a good thing (for example, if you’re trying to escape from being trapped under a heavy object), but from a safety standpoint, it’s a bad thing. Let’s say you lack hamstring flexibility (and, therefore, hip extension mo bility) and you try to perform a heavy deadlift. Your body will inevitably round at the lumbar spine in order to “compensate” for the lack of hamstring flexibility, as this is the only way to get into position to hoist the bar bell. This places your lower back at considerable risk, which is why optimal form via ideal levels of mobility, stability, and motor control is paramount.
164 GLOSSARY
Concentric Contraction. A concentric action re quires that the muscle contracts with sufficient force to shorten the muscle. For example, when you’re at the bottom of a squat and you rise to a standing position, you performed the concentric portion of the movement since the glutes and quadriceps went from stretched to normal lengths.
Constant Tension Method. The constant tension method is valuable for the barbell hip thrust exercise. Here’s what you do: First, make sure you load the bar bell with smaller plates—twentyfive pounders maxi mum. This way, there won’t be a gap at the bottom of the movement where you’re not under any tension. Now, start performing your set. Pump out your repetitions in pistonlike fashion, moving up and down at a fast and steady pace while moving through a full range of mo tion. You’ll use higher rep ranges for this method—for example, twenty reps. At fifteen reps, your muscles will burn very badly, but you’ll make sure to squeeze out an extra five reps so that you reach twenty nonstop reps where the tension on the glutes never diminished throughout the set.
Density. When you pack a training session full of ac tivity and don’t rest very much, the session is “dense.” In my experience, women are much better than men in terms of being able to tolerate dense training sessions. They can push themselves very hard on a set and move right into the next exercise or next set without resting much. While it’s important to have dense workouts, re member that resistance training shouldn’t mimic non stop circuit training. You do need to rest in between sets in order to allow for recovery if you want to build maximum strength and curves.
Dynamic. Dynamic is another term for “moving.” Dy namic exercises require motion in contrast to static ex ercises, which require motionless holds. For example, a situp is a dynamic core exercise, while a plank is a static core exercise. Some exercises require dynamic and static muscle actions. For example, a pushup or chinup re quire dynamic shoulder and scapular motions combined with simultaneous static lumbar and pelvic actions.
Eccentric Contraction. An eccentric action requires that the muscle contracts while the muscle is elongated. For example, when you lower yourself from a standing position to the bottom of a squat, you perform the ec centric portion of the movement since the glutes and quadriceps contract while the muscles are forcibly lengthened.
Electromyography. Electromyography or EMG ex amines the level of neural activation received by the muscles. I have conducted many EMG experiments which have given me a good idea as to which exercises activate the specific portions of the glutes the best. In general, the greater the activation, the greater the active tension on the muscles.
Endurance. Performing high repetitions along with “dense” workouts will build muscular endurance and stamina.
Energy Leaks. When the body can’t maintain proper position in an exercise, certain muscles will fail in their endeavors to stabilize joints and will be forced into “ec centric contractions” or activelengthening actions due to insufficient strength. Think of the knees caving in a squat (upper glutes failing to stabilize and falling into eccentric contractions), or the lower back rounding in a deadlift (erector spinae failing to stabilize and falling into eccentric contractions).
Exercise Progressions. When a certain movement becomes too easy, you should increase the difficulty in order to continually challenge the muscles. You can do this by using more weight or performing more reps, but another way is by moving on to a more challeng ing exercise progression. For example, you can increase an exercise’s range of motion by performing deadlifts or reverse lunges off of a step (creating a deficit), or you can increase an exercise’s lever arm by placing the arms overhead in a back extension (prisoner position), for example, or performing an ab wheel rollout from the feet rather than from the knees.
Exercise Regressions. When an exercise is too challenging to allow for proper execution, it is neces sary to regress the exercise in order to allow for the mastery and motor learning of sound movement pat terns. You must master bodyweight in a squat before placing a bar on your back. You must be able to hip hinge before holding onto a bar in a deadlift. You must
STRONG CURVES 165
Barbell Hip Thrust
What You Feel: Glutes, quadri- ceps
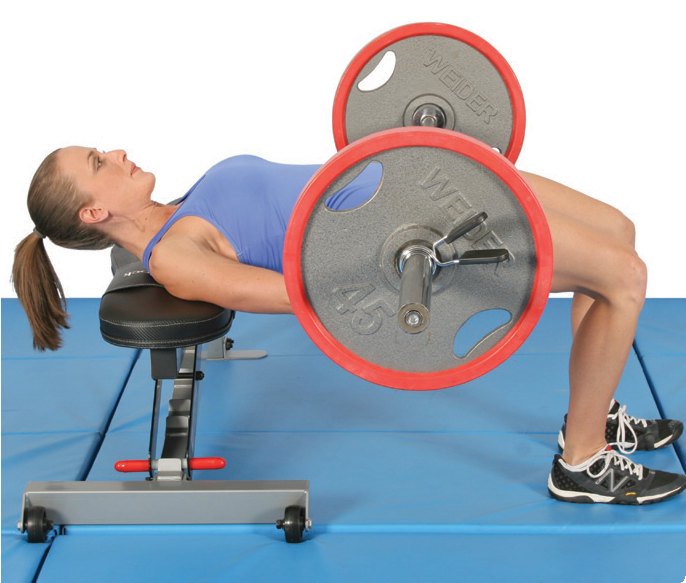

Tips
t Drive through your heels, keeping your toes on the floor and your knees in line with your toes.
t Push your weight up with your glutes, not your lower back or hamstrings. You will feel these muscles working to an extent, but they should not overcompensate for your glute muscles.
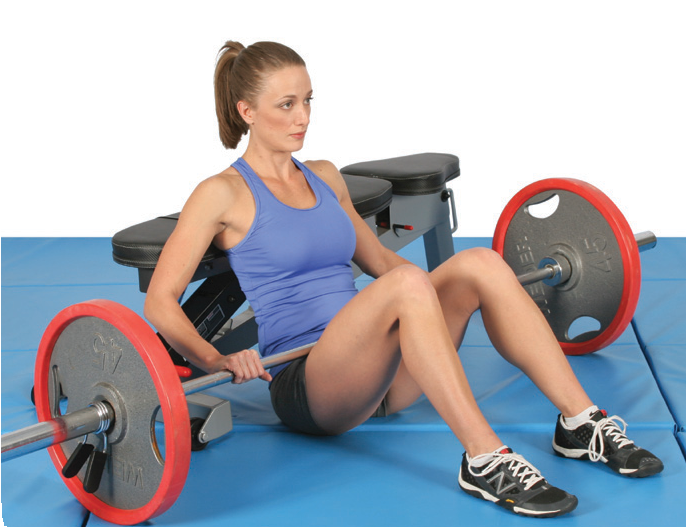
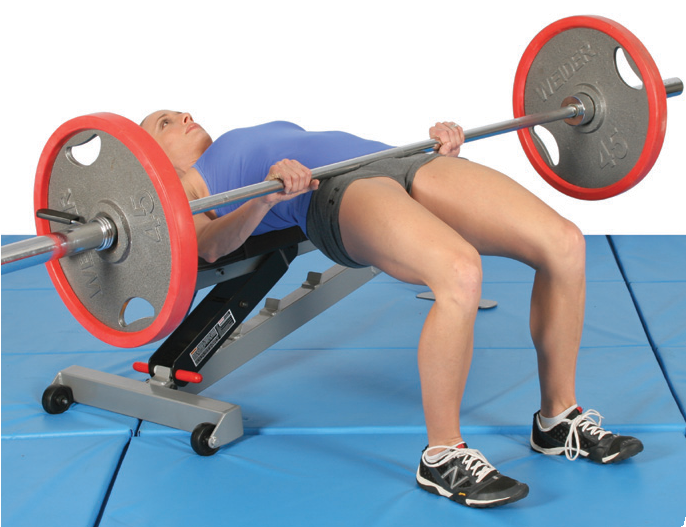
t Use a fluid motion all the way up and down.
t Keep a strong core by not allowing overarching or curving inward of the lumbar spine.
t At the top of the motion, your torso is parallel to the ground.
t Pause for a brief moment when at the top of the movement.
The hip thrust is the premier glute-building movement. The knees stay bent so that the hamstrings are inhibited, forc- ing the glutes to work harder. Tension doesn’t let off the glutes throughout the movement like it does in other popular glute exercises. This constant tension causes a deep burn in the glutes, letting you know how much your booty is working. Muscle activation reaches a high point due to the end-range glute muscle force requirements which is the range of maximal neural activation for the gluteus maximus.
The hips move through a good range of motion, and the glutes produce incredible force due to the inherent stabil- ity involved in the exercise. Since the core (back strength) isn’t a limiting factor like it is in other movements, the hip thrust allows the gluteus maximus to “do its thing” and maximize its output.
Increasing glute strength and glute muscle will not only improve aesthetics, but it will improve the leverage and power that the glutes produce during exercise and positively impact the way your body moves and transfers force throughout.
What to Do
- From a seated position on the floor, position your upper back across a bench (should be lined up at around the bottom of the shoulder blades). Make sure the bench is secure and doesn’t slide.
- Place a barbell across the hips (should be lined up just above the pubic bone), and grasp the bar to keep it in place throughout the movement. A Hampton bar pad or Airex Balance pad can be used to reduce the bar pressure on the abdomen.
- If sufficient weight is used (example: 135 pounds), the larger plates will allow for the bar to simply roll over the legs and onto the hips.
- Bend the hips and knees so that the feet are positioned toward the buttocks and are flat on the ground.
- Make sure your back “hinges” around the bench; don’t allow it to slide back and forth during the movement, and don’t allow the barbell to slide forward or backward during the movement.
@. Take a deep breath, and raise your hips, making sure to push through the heels and keep the knees tracking over the middle toes.
- As the hips rise, your lumbar spine will want to hyperextend (overarch), and your pelvis will want to tilt anteriorly (forward), but you cannot let this happen.
- Make sure that the glutes push the hips upward so that the movement occurs at the hips and not the spine, and make sure that the glutes prevent the pelvis from tilting forward.
@. Raise your hips as high as possible while keeping the spine in a neutral position.
- If observing the lockout of the movement from the side view, the hips should be at full extension (or slightly hyperextended), the knees should be at right angles or 90 degrees, and your feet should be flat on the ground.
- Lower the weight under control, and return to the starting position.
STRONG CURVES 199
Hip Thrust Mistakes and How to Fix Them
Overarching Low Back—Notice in the picture that Kellie is overarching (also known as hyperextending her lumbar spine). This is accompanied by an anterior pelvic tilt, where the front of the pelvis drops downward and the back of the pelvis rises upward. You can spot this because her chest isn’t in neutral; it’s too arched, as is the arch in her lumbar spine. This happens if you have weak glutes and try to substitute lumbopelvic motion for hip motion. The solution is to reduce the load and learn to keep your spine stable in the neutral position, while moving entirely at the hip joint and using the glutes to push the hips upward and prevent the pelvis from tilting.
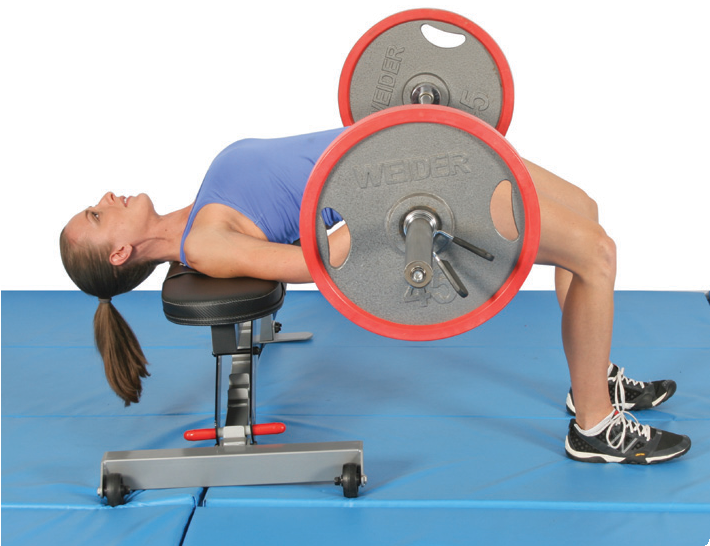
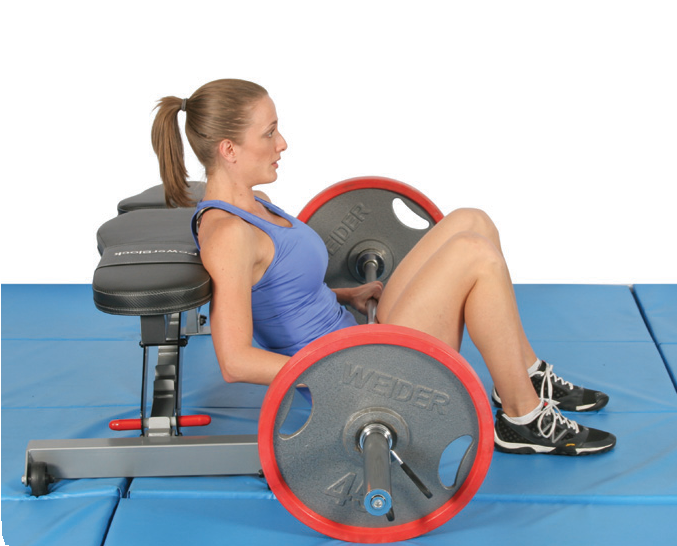
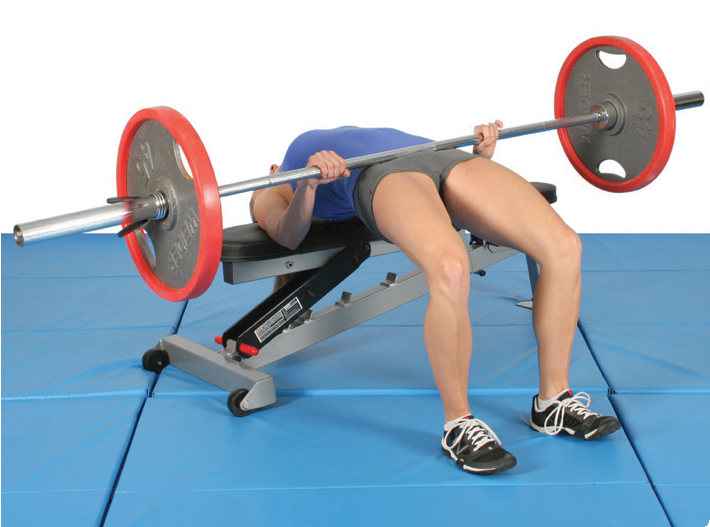
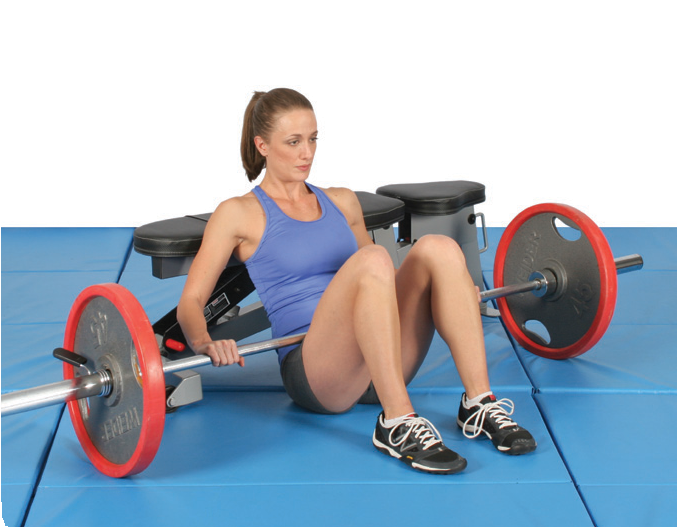
Improper Neck Alignment—As you can see in the picture, Kellie is failing to maintain proper neck alignment and is flexing her cervical spine. The neck should stay in line with the spine throughout the hip thrust motion.
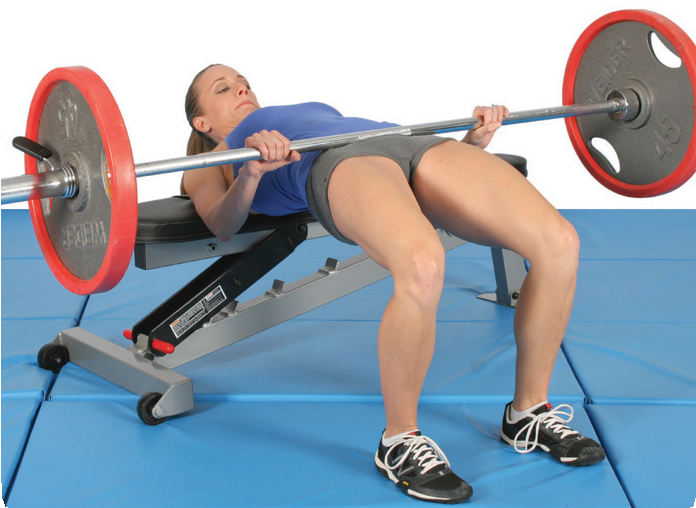
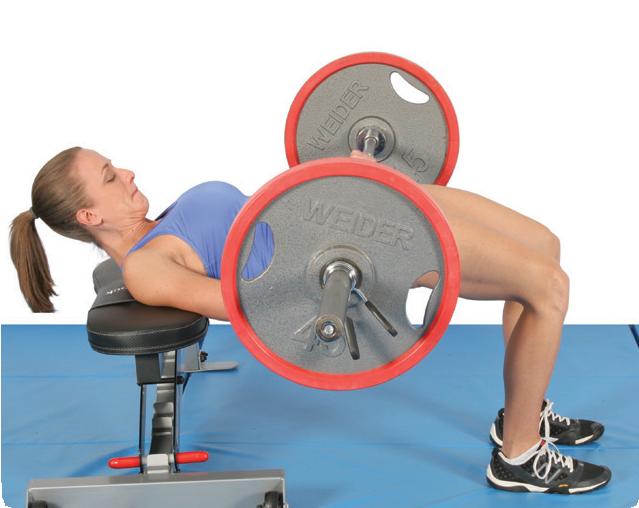
Insufficient Hip Extension—In this picture, Kellie isn’t reaching full hip ex- tension. This happens when you use too much weight and are unable to complete the full range of motion. It’s very important that you achieve full hip extension on each repetition, as this is the range of motion that activates the glutes the best. The solution is to drop down in weight and feel the glutes pushing the hips forward to end-range.
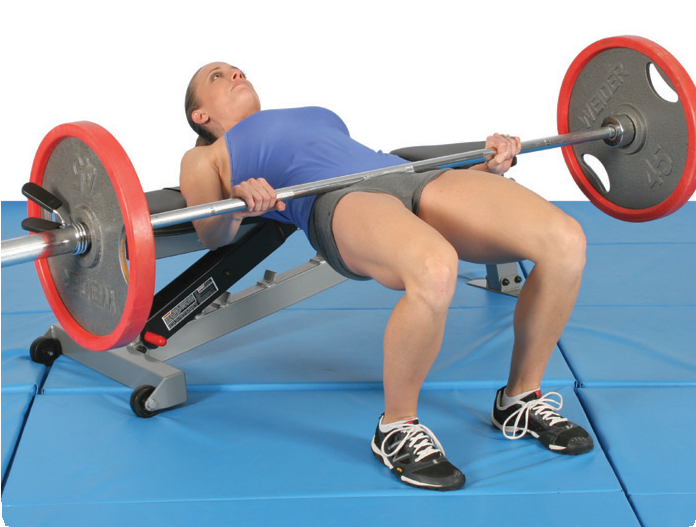
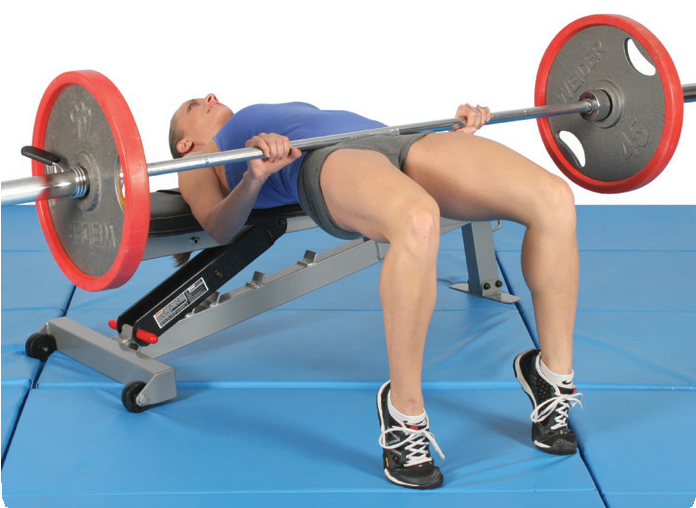
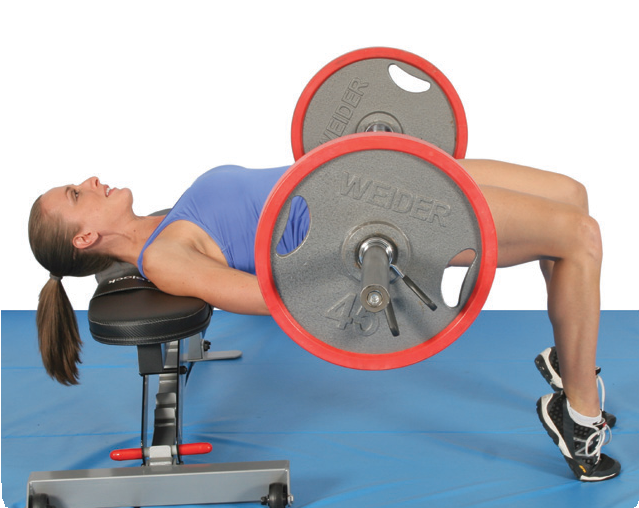

Rising Onto Toes—Notice in the picture that Kellie has risen up onto her toes. This typically occurs in indi- viduals who display “quad-dominant” movement strategies. Keep your toes on the ground, and push through the heels. Eventually, this will feel natural.
STRONG CURVES 201
Barbell Full Squat
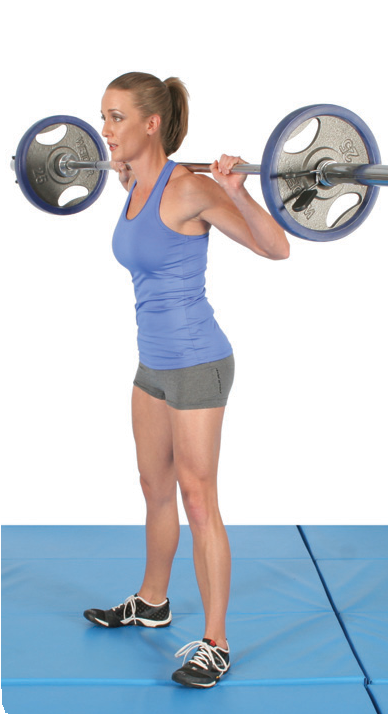
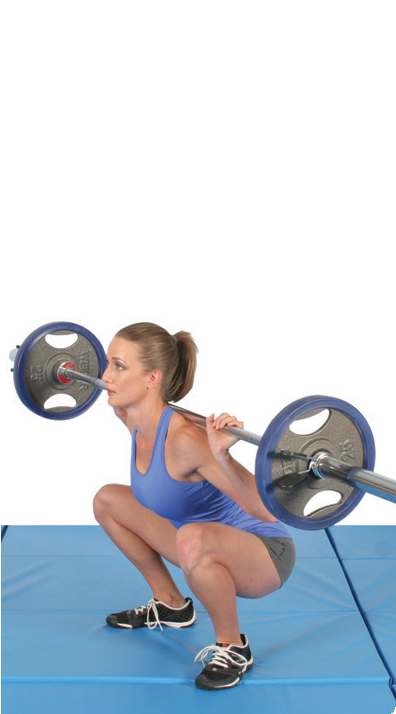
The full squat is a staple in any glute-training program, but squatting to a deep position isn’t an easy task for many women. Poor ankle flexibility, limited hip move- ment, or upper back stiffness can cause issues with squatting. Poor core stability and strength within the back of your body (posterior chain) can also cause prob- lems.

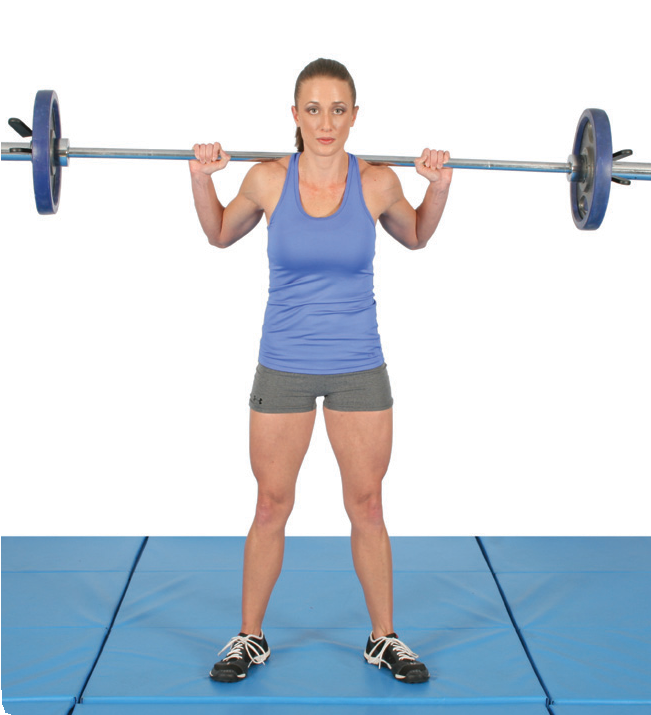
With the right coaching, many women can gain the abil- ity to squat deeply over time, but some lifters may never be able to squat below a parallel position. For example, some lifters’ hips are shaped in a way that prevents bend- ing to a certain range at the hips. If this is an issue, this causes problems in the lower back and pelvis, and that nice outward arch starts to curve inward.
Improving mobility and stability while working on your squat pattern is a good idea no matter how great your squats. As you progress, your squat pattern will feel more natural, and you will be able to add more load. Not everyone is capable of safely and comfortably squat- ting deeply. If this is the case for you, it’s perfectly fine to squat to a parallel position or slightly below parallel. Don’t ever force yourself into a position that is poten- tially harmful.
The full squat works the glutes at the bottom of the movement when the hips are flexed and the glutes are stretched. It also works the quads and erectors, helping to build nice thighs and back muscles. For athletes, the squat can lead to increases in vertical jump and accel- eration speed.
What You Feel: Quadriceps, glutes
Tips
t Keep your chest up, and maintain a good lower back arch.
t Push your knees out so that they track over your toes.
t Keep your weight on your heels.
t Sink your hips straight down between your knees.
What to Do
- Stand with a stance just wider than shoulder-wide and your feet slightly flared to about a 30-degree angle.
- Place a barbell across your upper back. The bar can be placed beneath the spine of the scapula (low bar position) or above the spine of the scapula (high bar position). Depending on your goals and comfort level, keep the bar tightly secured across the upper back (don’t let it shift around).
- Take a deep breath, and while keeping your chest up and a good lower back arch, descend into a full squat position.
- Make sure to keep your knees out so that they track over the toes.
- As you descend, the lower back will want to flex (round), and your pelvis will want to posteriorly tilt (tilt rearward). Do not let this happen.
@. Make sure your weight doesn’t shift forward and that you push through the heels.
- At the bottom position, your chest is up, your knees are out, your low back is arched, and your feet are flat on the ground.
- Rise upward, making sure to squeeze the glutes to lockout.
@. Return to the starting position.
STRONG CURVES 217
Barbell Front Squat
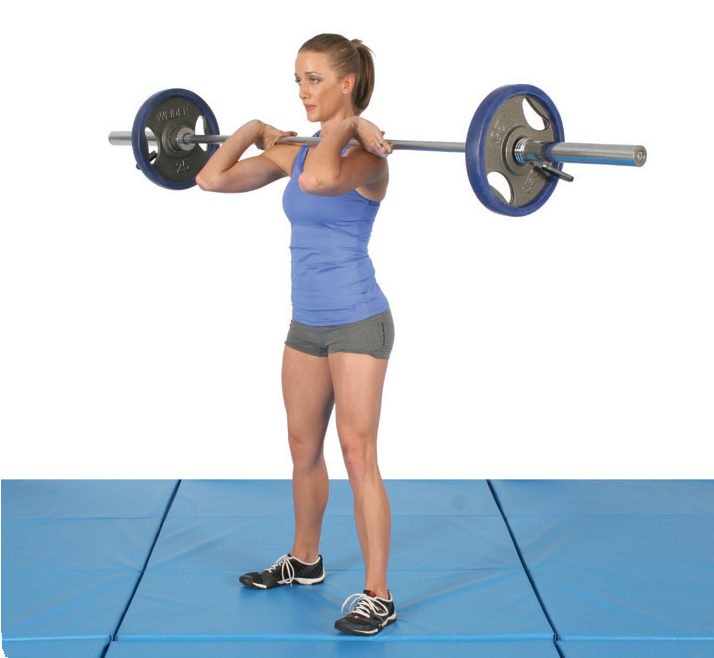
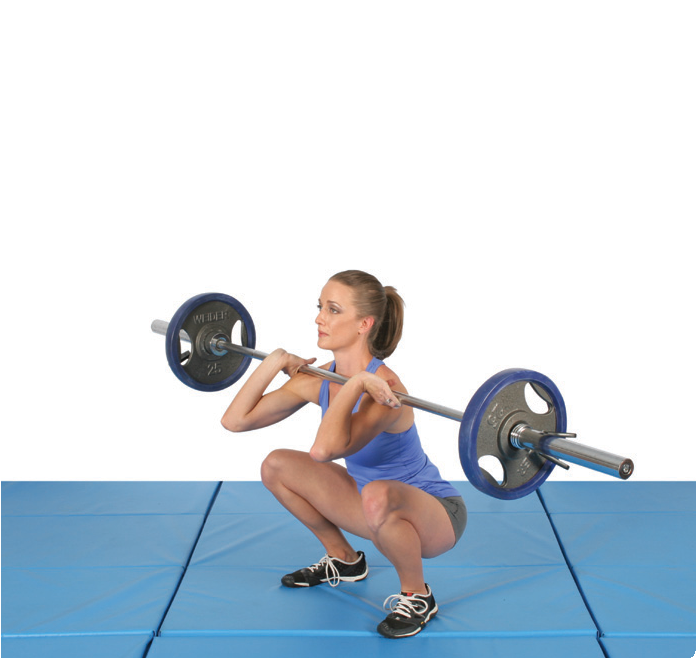
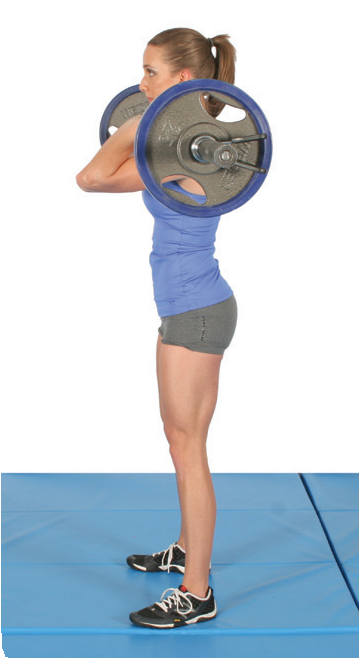
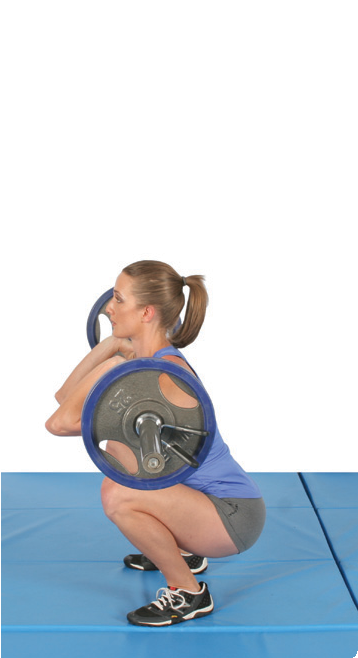
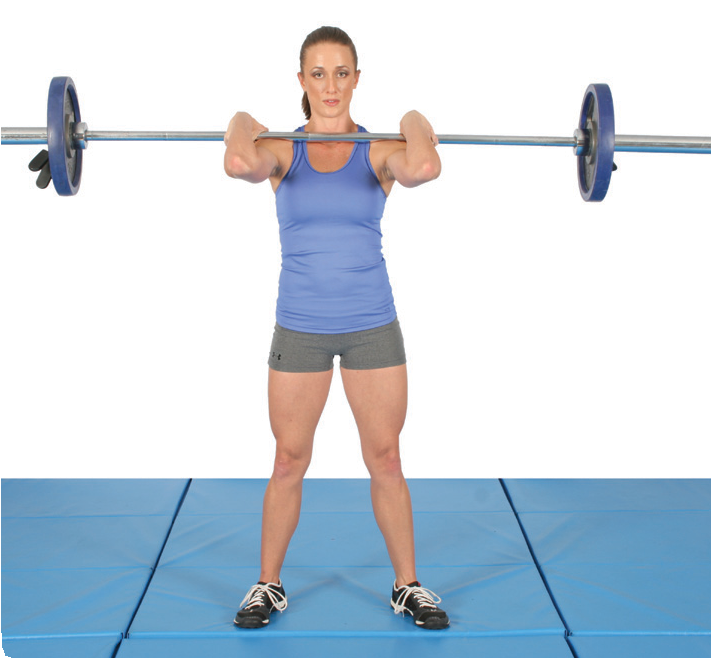

This squat variation keeps your trunk more upright, which spares the spine while still taxing the legs and core. Many coaches and athletes prefer this squat variation because they feel it’s a safer alternative to the back squat. Some women initially complain that the barbell position on their shoulders is uncomfortable, but this diminishes over time.
What You Feel: Quadriceps, glutes
Tips
t Keep your chest up, and maintain a good lower back arch.
t Rest the weight on your shoulders, not your wrists and hands.
t Keep your elbows high and tucked in.
t Push your knees out so that they track over your toes.
t Keep your weight on your heels.
t Sink your hips straight down between your knees.
What to Do
- Step up to the bar positioned at shoulder height. Create a shelf with your front shoulders. Place the bar on your shoulders close to your neck.
- Keep your elbows up high, and step back from the rack. Stand slightly wider than shoulder width.
- Sit down between your knees, and descend until your hip joints are below your knees, pushing your knees out over your toes.
- When you reach a comfortable depth, push back up, making sure to keep your trunk upright.
- Return to the starting position.
218 Exercise Index: QUAD DOMINANT
Zercher Squat
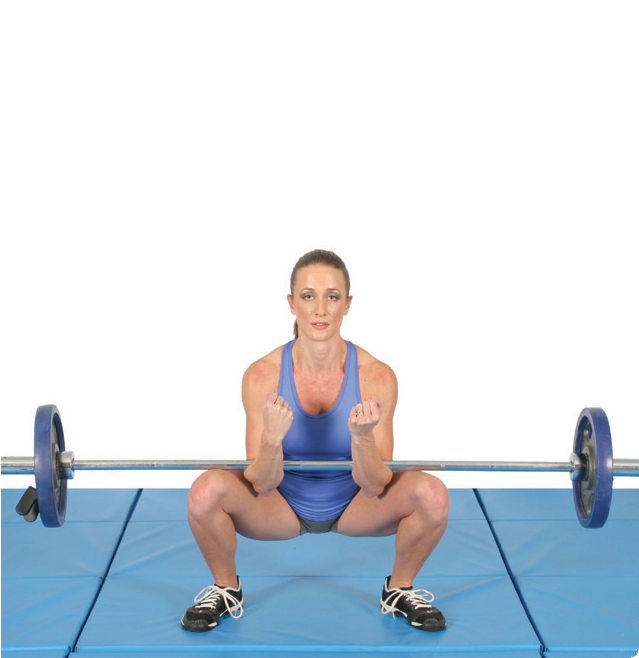
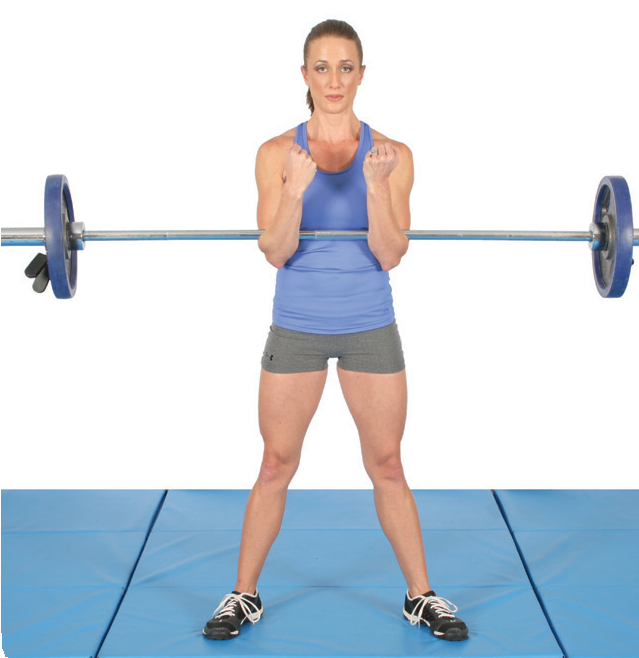
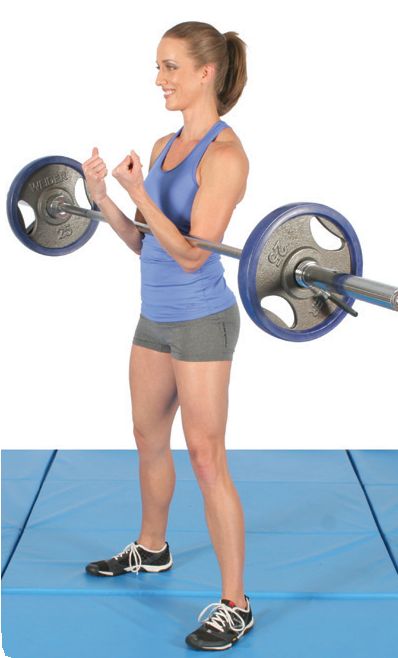
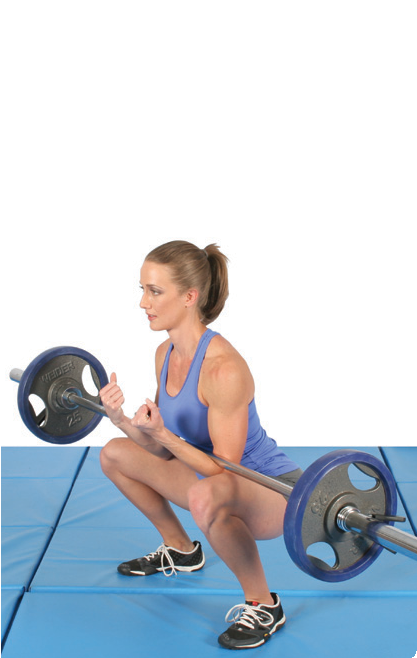
Out of all the standing squat variations, this type of squat maximizes gluteal and core muscle activation. Yet, it’s probably the most uncomfortable variation because holding the load in the arms can be quite painful. Over time, this pain and discomfort subside, and you’ll be able to up the intensity.
What You Feel: Quadriceps, glutes, core
Tips
t Keep your chest up, and maintain a good lower back arch.
t Push your knees out so that they track over your toes.
t Keep your weight on your heels.
t Sit back, and use your hips.
What to Do
- Set the bar on the rack at waist height. Step up the bar, positioning it in the bend of your elbows.
- Step back, and stand tall, keeping the bar tight against your body. Stand slightly wider than shoulder width.
- Sit back and down, descending until your hip joints are below your knees, pushing your knees out over your toes.
- Squat down until your elbows touch your thighs, keeping your core tight.
- Return to the starting position.
Squat Mistakes and How to Fix Them
Knee Break/Forward Weight Shift—Notice in the picture how Kellie has an upright torso while initiating the bending at the knees and shifting her weight forward. You want to imagine that someone behind you has a rope around your hips and is pulling rearward, which allows you to initi- ate the movement by breaking at the hips. You also want to keep your weight on your heels, and sit back and down.
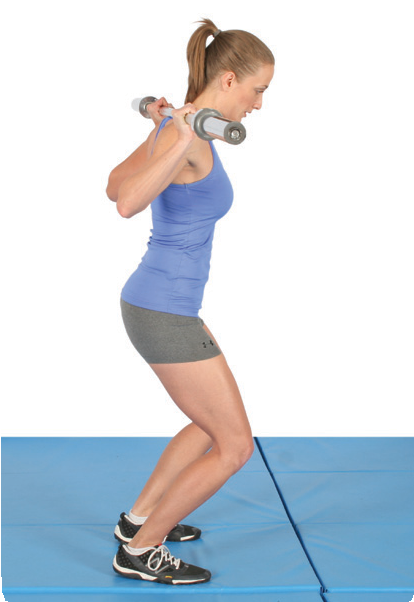
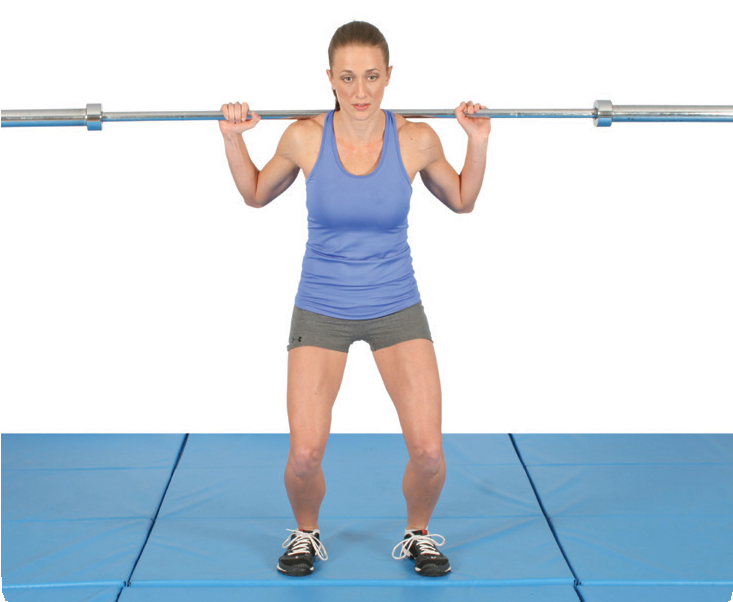
Too Much Torso Lean—Your torso will indeed lean forward in a squat, but you don’t want to lean too far forward. Your anthropometry will play a large role in what your squat looks like, but you never want to fold in half during a squat.
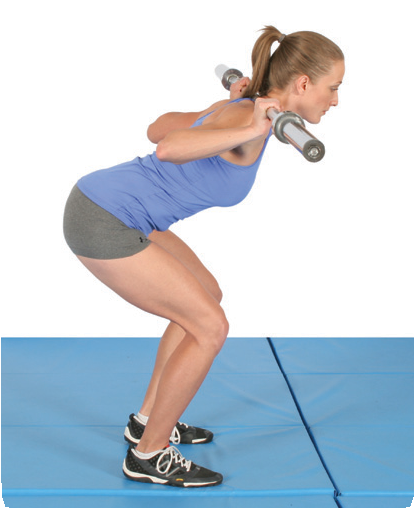

STRONG CURVES 219
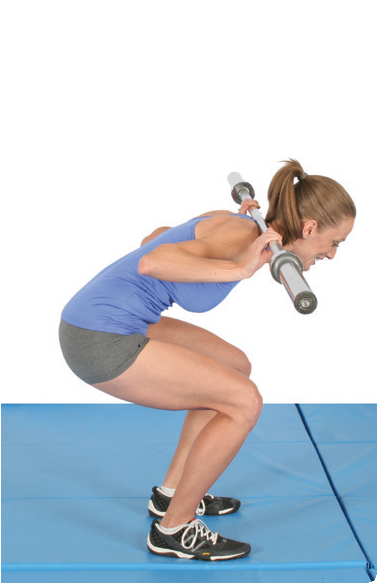
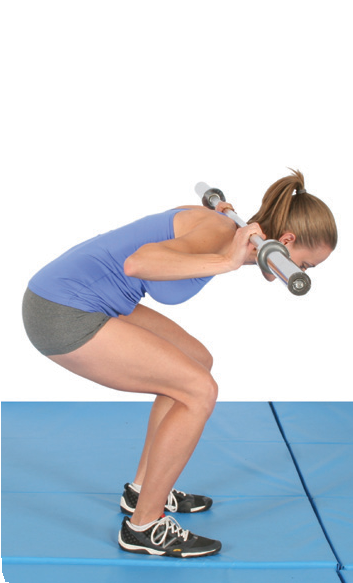
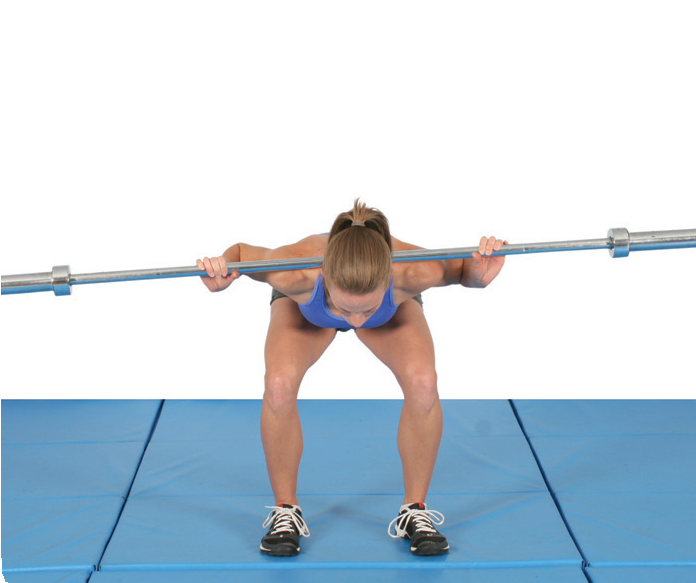
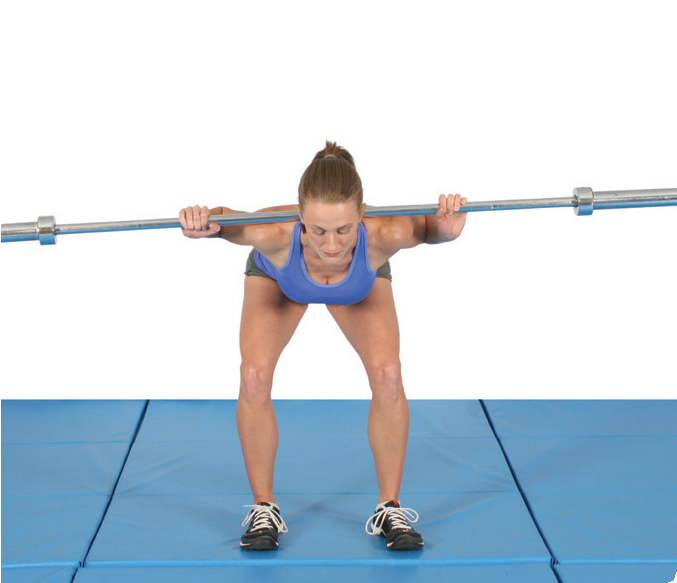
Low Back Rounding—Always keep your back arched in a squat; don’t allow it to round. Often, individuals round at the bottom of a squat due to inadequate hip flexion mobility, which pulls the pelvis into posterior pelvic tilt. The spine then goes along for the ride and is pulled into flexion. So, only go as deep as you can while keeping the low back in neutral position.
Knee Caving—Probably the most common er- ror in a squat is valgus collapse or knee caving. This is due to weak glutes and external hip rota- tors. Force your knees out, especially at the bot- tom of the squat, so that they track properly over your feet.
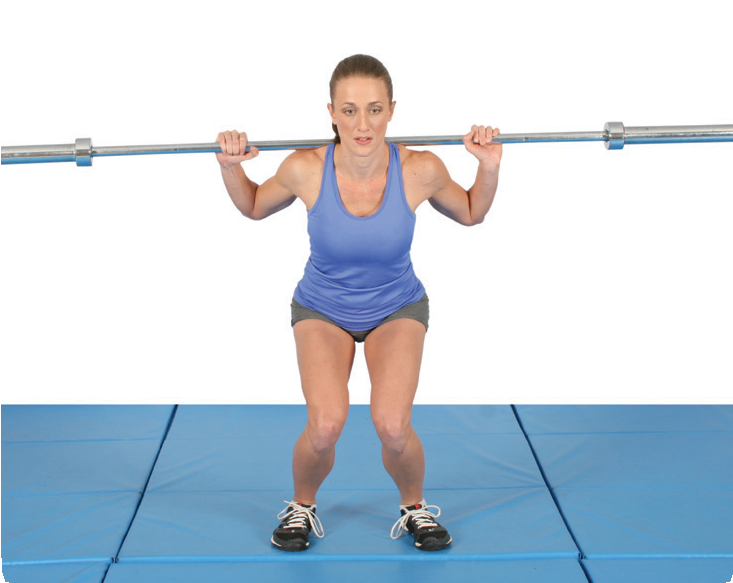
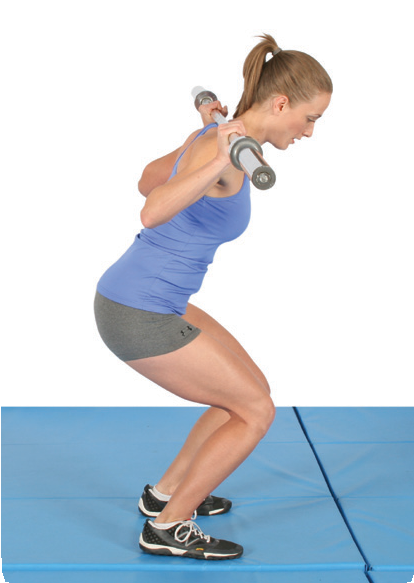
Improper Neck Alignment—Many individuals look up when they squat, and while this isn’t the biggest deal in the world, it’s probably safer and more efficient to maintain a neutral neck position. For this reason, avoid looking up, and keep your neck in line with your torso.
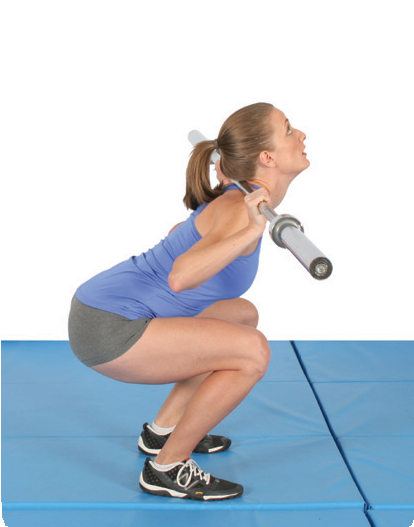
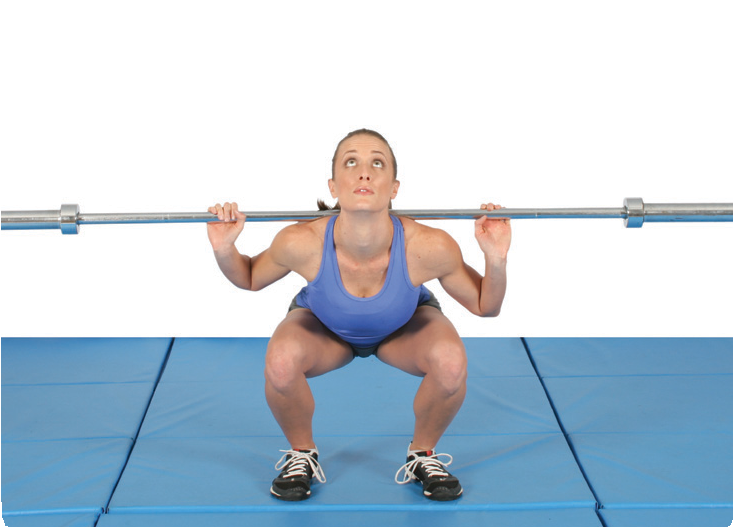
Rising Onto Toes—People often rise up onto their toes during a squat, particularly in the bot- tom position. This is usually a consequence of inadequate ankle dorsiflexion mobility or tight plantar flexors. Stay on your heels, and work on increasing ankle mobility to allow for proper squatting depth and performance.
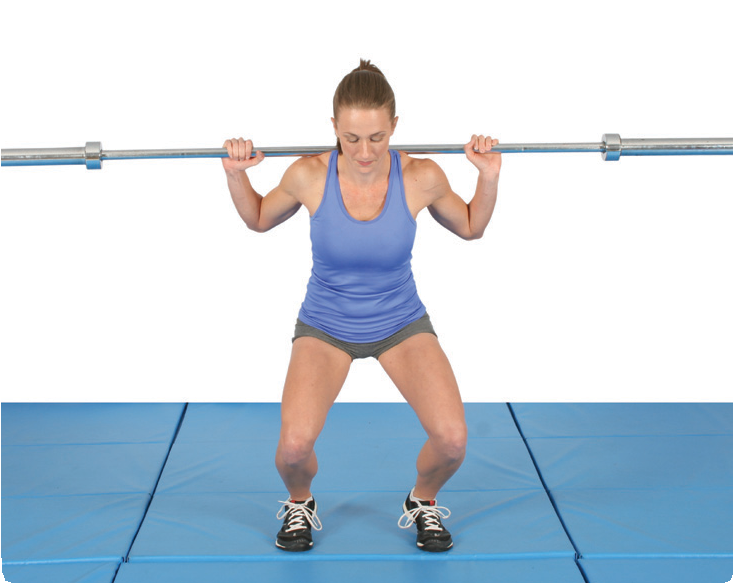
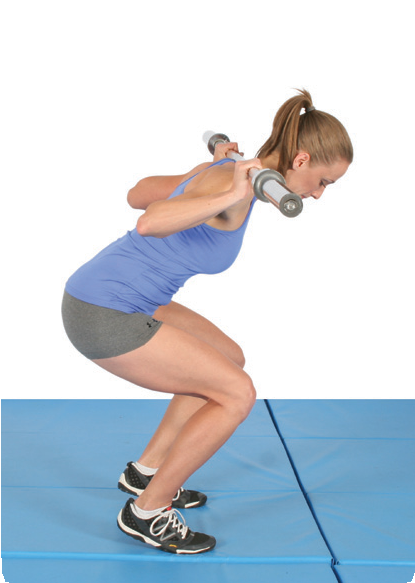
220 Exercise Index: QUAD DOMINANT
Conventional Deadlift
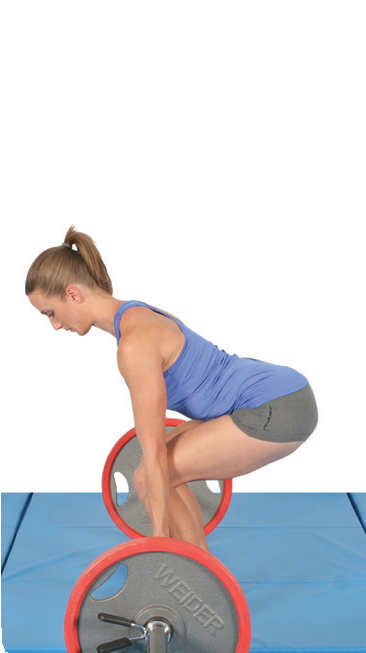
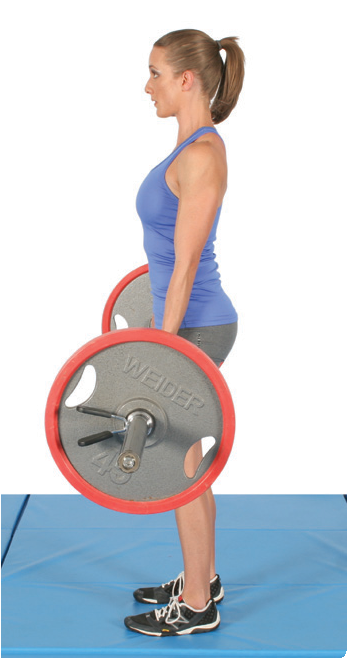
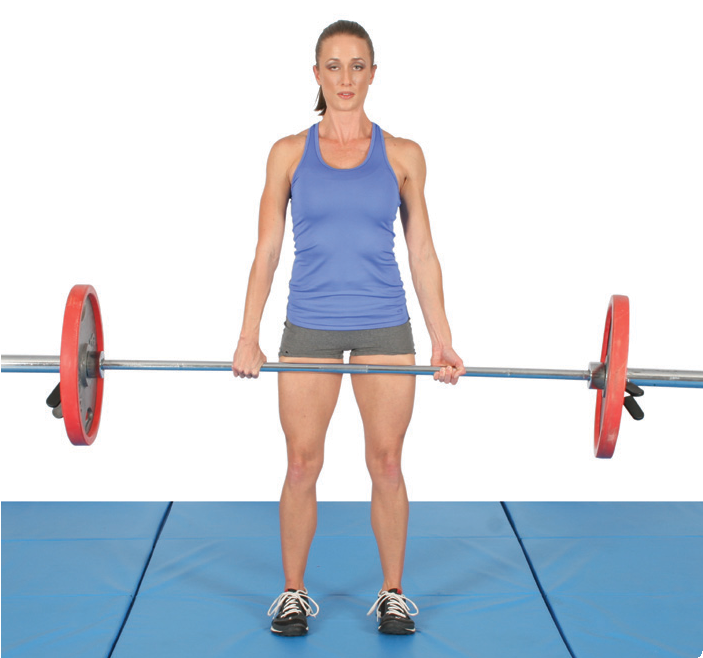
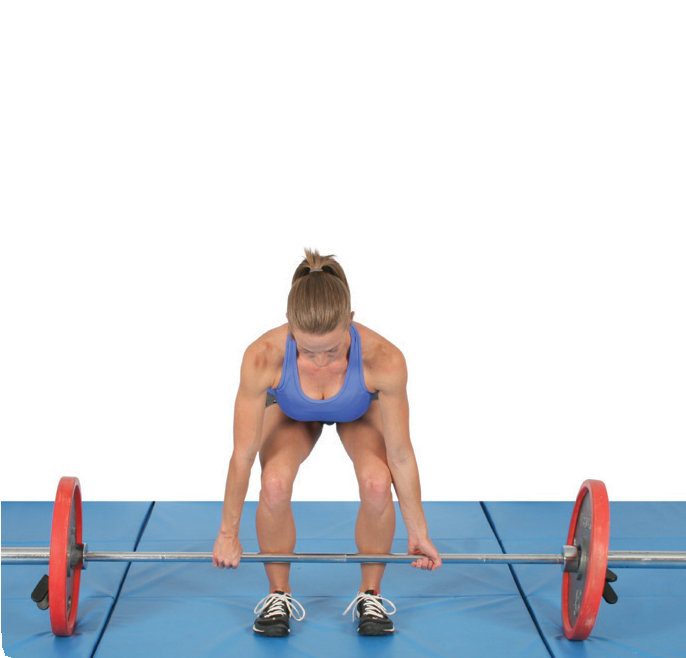
The deadlift is an incredible glute-builder when per- formed correctly. Most people are stronger when round- ing the back, but this isn’t the safest way to deadlift. Keeping the natural spinal arches in the deadlift will pro- tect the spine and allow you to stay healthy over the long haul.
The glutes get worked thoroughly during the entire range of a deadlift, as they contribute to getting the bar off the ground as well as properly locking out the lift with good mechanics. The deadlift doesn’t just work the glutes, however. It works the entire posterior chain, along with the grip muscles, including the calves, the hamstrings, the erector spinae, the lats, the rear delts, the rhomboids, and the traps.
For some, especially those with hamstring flexibil- ity issues, maintaining good form at the bottom of the range of motion poses an issue. If this sounds like you, rack pulls or hex bar deadlifts are a better option until you improve your hip flexion and hamstring mobility.
Deadlifting will do wonders for functional, usable strength and will lead to considerable improvements in athleticism. Setting a personal record on a deadlift is a wonderful feeling that boosts confidence and improves self-esteem.
What You Feel: Back, hamstrings, glutes
Tips
t The deadlift is not a squat; it’s a hip hinge. The hips stay higher than they do in a squat.
t Don’t let the bar drift out in front of you. The bar skims your body.
t The eccentric component (lowering) should be a mirror image of the concentric component (rising). Don’t neglect eccentric technique.
t Be concerned with your neck position, and keep it neutral throughout the deadlift ROM.
t Line up with your shoulders slightly in front of the bar.
t Don’t round your back down low or hyperextend your back up high. Keep your spine in a neutral position, and revolve around the hips.
What to Do
- Begin by standing with a narrow stance and your feet pointed straight ahead with your shins approximately 2-3 inches from the barbell.
- Sit back and down, bend over, and grasp hold of the barbell, making sure to keep an even grip. (A double overhand grip can be used, or a mixed grip can be used if going heavy.)
- Make sure you keep your chest up, and hold a strong lower back arch. If a mirror were in front of you, you should be able to read your shirt in the mirror.
- From a side view, your hips should be higher than your knees, and your shoulders should be higher than your hips. Your shoulders should be positioned slightly in front of the bar.
- Before the lift begins, look down so that your neck is in a neutral position. (Obviously, you’ll no longer be able to read your shirt in the mirror.)
@. Take a deep breath, and raise the barbell, making sure that the bar skims your body throughout the entire repetition.
- Your lower back will want to round (flex), and your pelvis will want to posteriorly tilt (roll rearward). Don’t let this happen.
- Rise to full extension, stand tall, and use the glutes to push your hips forward to lockout.
@. Begin the descent by sitting back as if performing an RDL. Keep a strong lower back arch, and keep the bar close to your body.
10.Once the bar descends lower than your knees, bend the knees, and keep lowering until you return to the starting position.
238 Exercise Index: HIP DOMINANT
Deadlift Mistakes and How to Fix Them
Improper Neck Alignment—As you can see in the picture, Kellie is hyperextending her cervi- cal spine. You want to look down, and keep your head and neck in line with your torso.

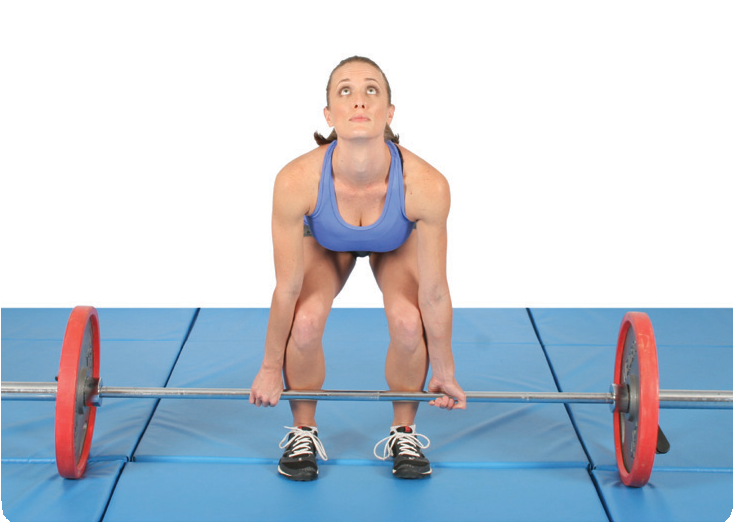
Rounded Back—This is the most common deadlifting error and is more prevalent at the bot- tom of a deadlift. Hamstring tightness and poor core stability can be the culprit, but quite often, your back is simply stronger when rounded. For this reason, you must build up the discipline to keep your core stable and your back in a neu- tral position while revolving around the hip joint. Practice makes perfect.
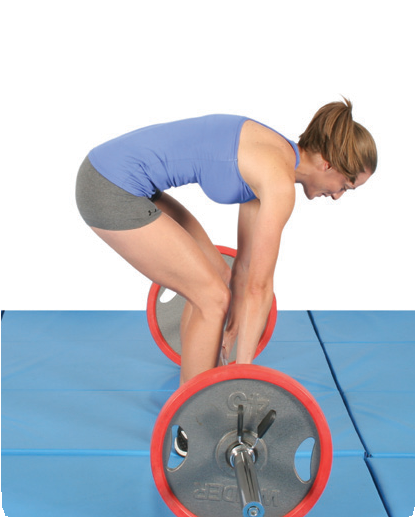
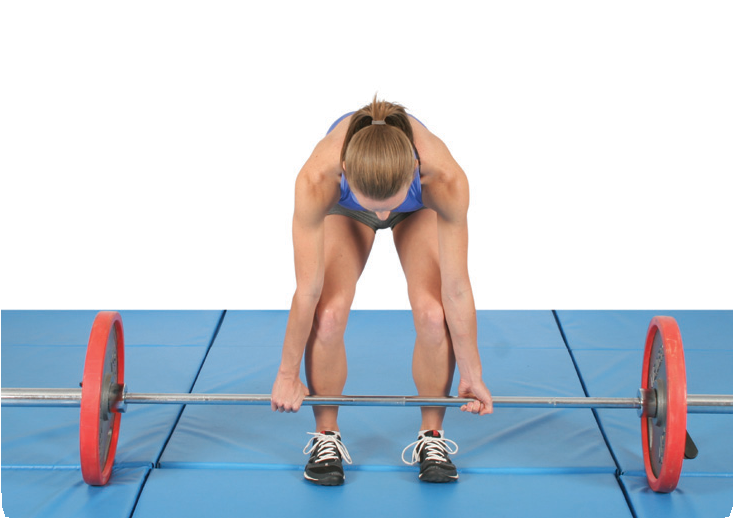
Squatting the Weight Up—The deadlift is not a squat, and many people set up with their hips too low. Your hips should be higher than your knees but lower you’re your shoulders when you set up for a deadlift, and your hamstrings should be taut and ready to contribute to the pull.
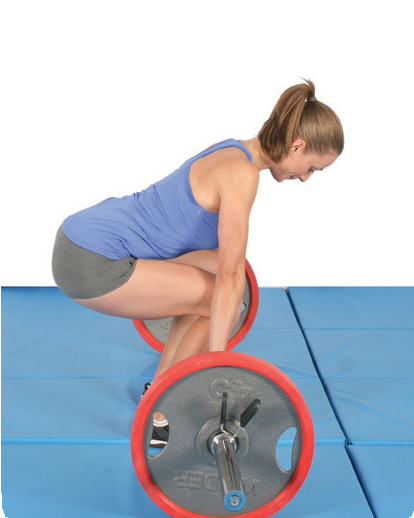

Shoulders Behind Bar—Your shoulders should be directly above or, better yet, slightly in front of the bar when initiating the pull. They should not be positioned behind the bar, which is a common beginner error.

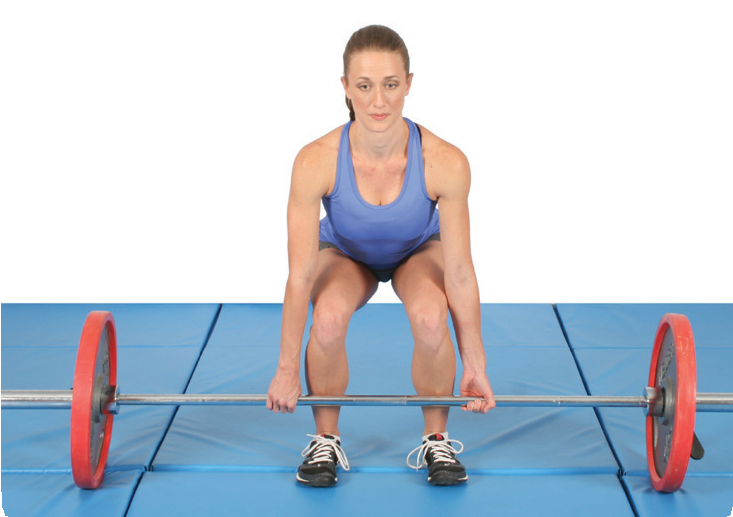
Stance and Hands Too Wide—The proper set up for a deadlift involves a narrow stance with your feet straight ahead and your arms posi- tioned just outside the legs. Don’t stand too wide or grip too far out on the barbell.

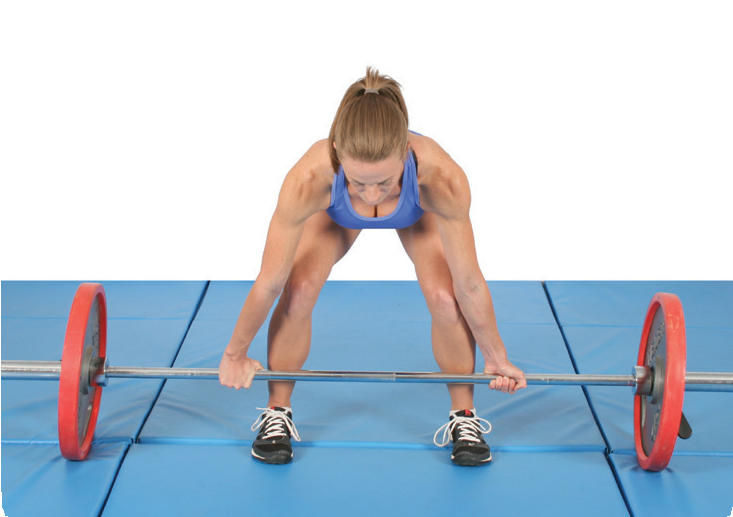
STRONG CURVES 243
Arms Over the Legs—Proper arm position is just outside the legs in a conventional deadlift and just inside the legs in a sumo deadlift. Do not position your arms over your legs, or the bar won’t skim your body. This will make the move- ment harder on your lower back.
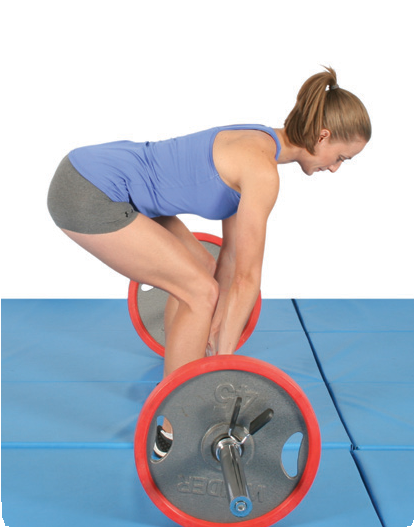
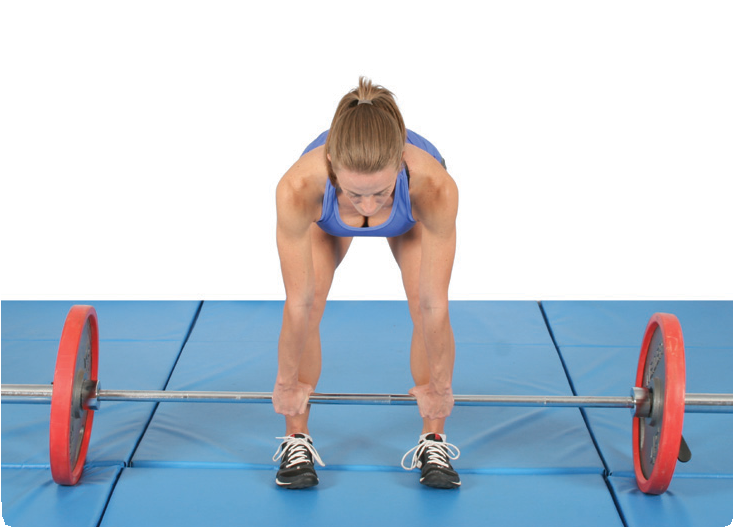
Bar Too Far Forward—The bar skims your body throughout the entire deadlift ROM. At no point should the bar be more than an inch away from your body.
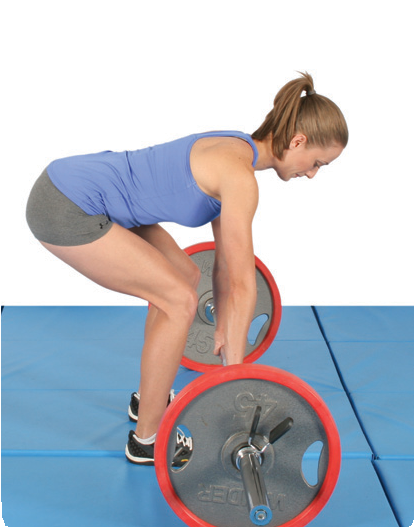
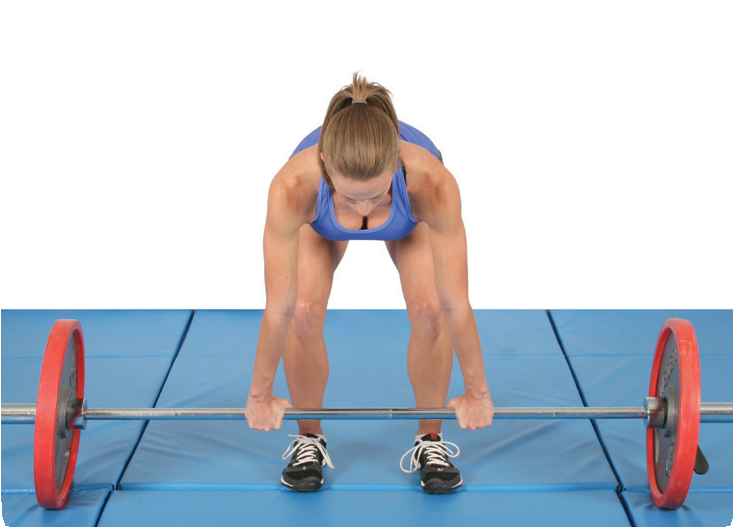
Hyperextended Back—This deadlifting error usually occurs at the top of a deadlift during the lockout. It happens because of weak glutes. In- stead of the glutes pushing the hips forward into full hip extension, the spinal erectors pull the spine too far backward, leading to overarching and potential injury. Use the glutes up top, and push your hips forward while keeping your back in a neutral position.
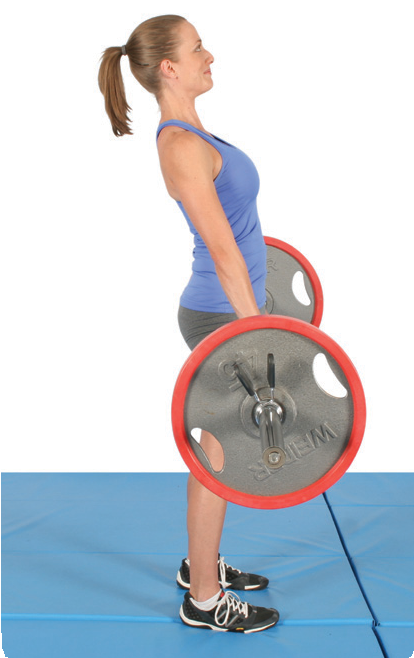
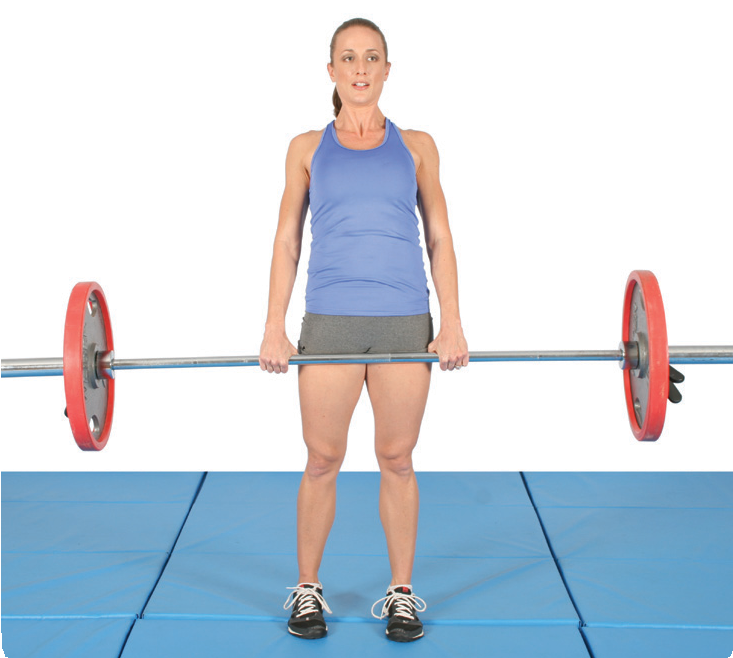
Shrugging—Beginners who have bodybuild- ing experience are accustomed to pulling too much with the arms. You’ll see them bending the elbows or shrugging the shoulders during the deadlift. This is not efficient and will prevent you from getting stronger. Your arms are hooks, and the movement occurs at the hips, not the arms and scapulae.
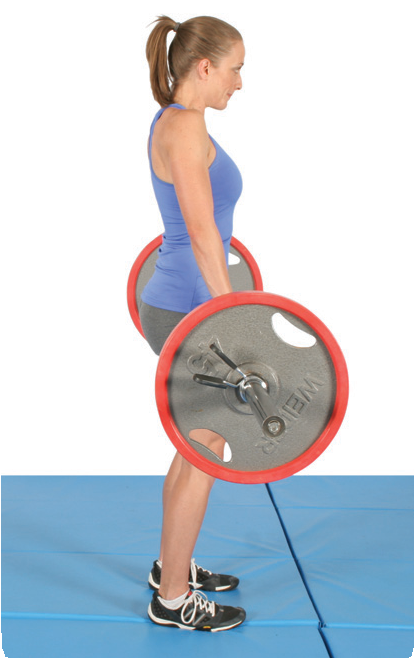
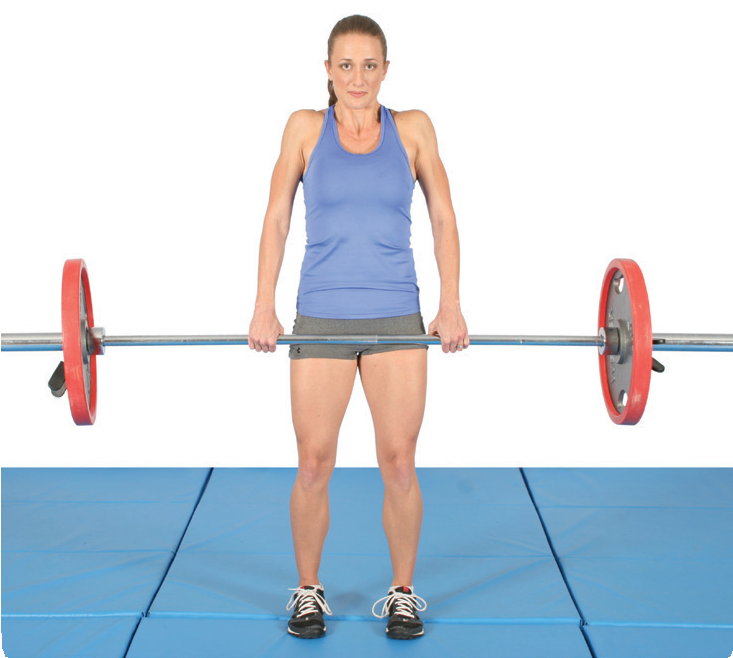
244 Exercise Index: HIP DOMINANT
Long Lever Front Plank
Use this exercise to increase the difficulty of a front plank by moving your arms farther out from your torso.
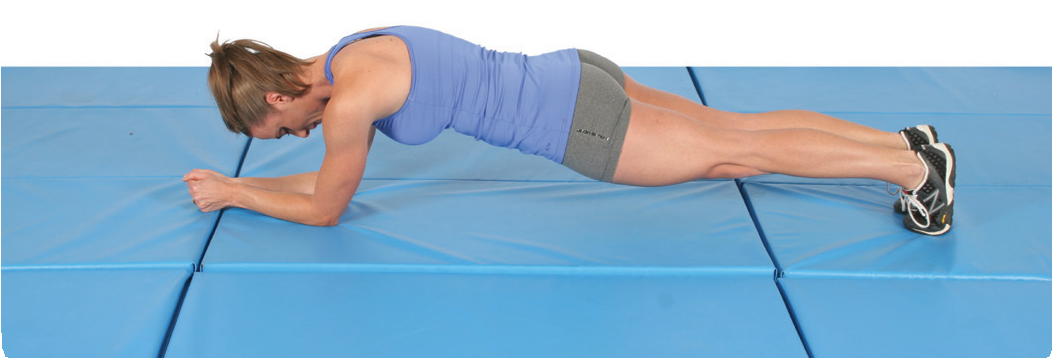
What You Feel: Abdominals
Tips
t Squeeze your glutes and quads along with your abdominals to prevent your lower back from sagging.
t It’s easy to bend at the neck and push your hips up into a pike while performing these. Keep your neck and spine in neutral alignment.
t It’s better to maintain good form for a shorter period of time than to allow your form to break down just to add seconds to the clock..
What to Do
- Lie facedown on a mat. Pushup onto your forearms, positioning your elbows near your forehead.
- Raise your body upward, creating a straight line from your head to your toes.
- Contract your abdominals, glutes, and quads throughout the duration of the exercise.
- Hold for as long as possible, and release.
RKC Plank
This plank variation trains the lumbar spine to resist hy- perextension while simultaneously training the glutes to work as posterior pelvic tilters and building glute endur- ance. Many people struggle to activate their glutes in this position. If you are one of these people, I recom- mend performing the RKC plank every single day for two months until it becomes natural. Just perform one or two sets of 10 to 30 seconds. The RKC plank is also a valu- able exercise for increasing the effectiveness of other glute exercises. Perform a 10 second hold immediately before or after sets of hip thrusts or kettlebell swings and you’ll put the glutes on overdrive. This is a good strategy to experiment with from time to time.
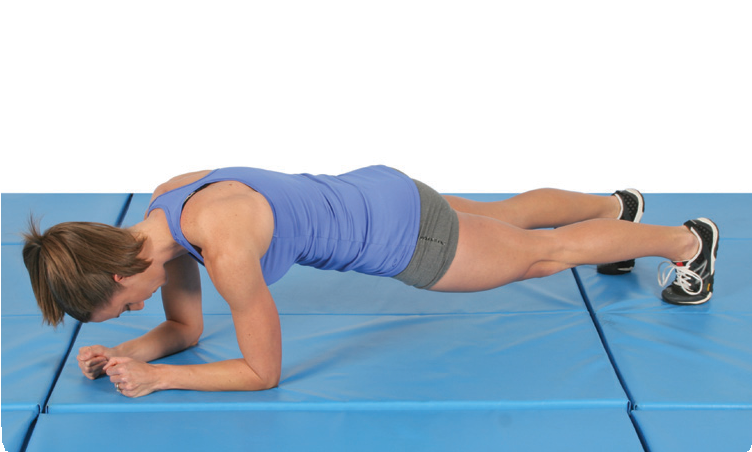
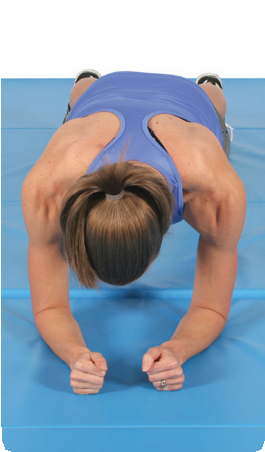
What You Feel: Abdominals, glutes, quads
Tips
t The RKC plank turns on every muscle in the body. It’s a great way to fully exert your muscles for a very short duration.
t It’s easy to bend at the neck and push your hips up into a pike while performing these. Keep your neck and spine in neutral alignment.
t It’s better to maintain good form for a shorter period of time than to allow your form to break down just to add seconds to the clock.
What to Do
- Lie facedown on a mat. Pushup onto your forearms, positioning your elbows directly under your shoulders. Tighten your shoulders into place, and squeeze your fists.
- Raise your body upward, creating a straight line from your head to your toes.
- Squeeze your glutes as hard as possible into a posterior pelvic tilt. Don’t lose this contraction.
- Pull your elbows toward your toes and your toes toward your elbows as hard as you can.
- Hold for as long as possible, and release.
STRONG CURVES 295